Cocos Creator + TypeScript 入门教程_new-script.ts-程序员宅基地
技术标签: Cocos Creator Cocos Creator实战教程
这不是 Cocos Creator 的入门教程,也不是TypeScript 的入门教程,这是 Cocos Creator+TypeScript 的入门教程。
前提
无论学什么技术知识,官方文档都应该是你第一个教程,所以请先至少阅读新手上路这一节 http://docs.cocos.com/creator/manual/zh/getting-started/ 再来看这篇文章。
这里假设你已经安装成功了 Cocos Creator。
TypeScript VS JavaScript
这里当然只会讲优点:
1. ts 是 js 的超集,所有 js 的语法 ts 都支持。
2. ts 支持接近完美的代码提示,js 代码提示接近于没有。
3. ts 有类型定义,编译时就可以排除很多无意义的错误。
4. ts 可以重构,适合大型项目。
5. ts 可以使用 es6 async之类的所有新语法。而 js Cocos Creator 还没有完全支持es6。
6. 最重要的一点:我以后的教程都会用 ts 写,如果你不用 ts,你就会永远失去我了。
代码编辑器选择
这里只推荐两个:
- Visual Studio Code
- WebStorm
vs code 的优点是快,与cocos creator 结合的好,一些功能需要自己安装插件。
webstorm 的优点是所有你想要的功能都先天内置了,缺点是占内存,个人感觉还有点丑。
对于我自己来说,我在公司用 WebStorm,在家用 VS Code。
如果你还是不知道用哪个,我只能先推荐你用VS Code 因为下面的内容是面向VS Code。
学习 TypeScript
既然要用ts开发游戏,肯定要知道ts的语法,我这一篇文章不可能把所有ts的语法都讲完,所以https://www.tslang.cn/docs/home.html,当然,不一定要一次性全看完,你可以先看个大概,遇到问题再补习。
TypeScript 环境配置
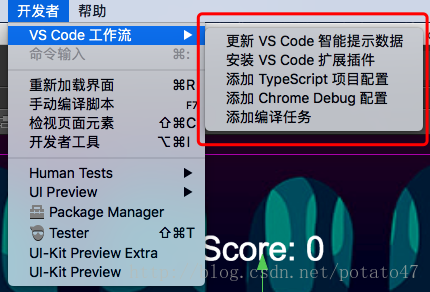
任意打开一个项目,把这几个都点一遍
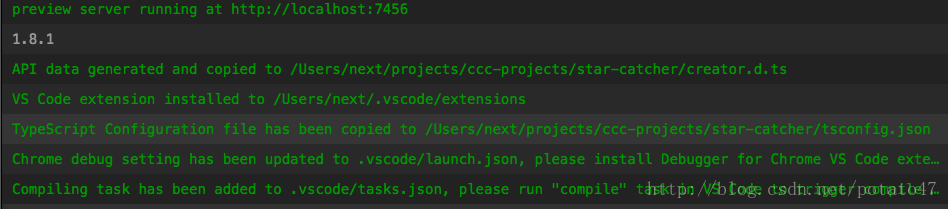
控制台会输出
打开编辑器,你会发现一个名字为 creator.d.ts 的脚本
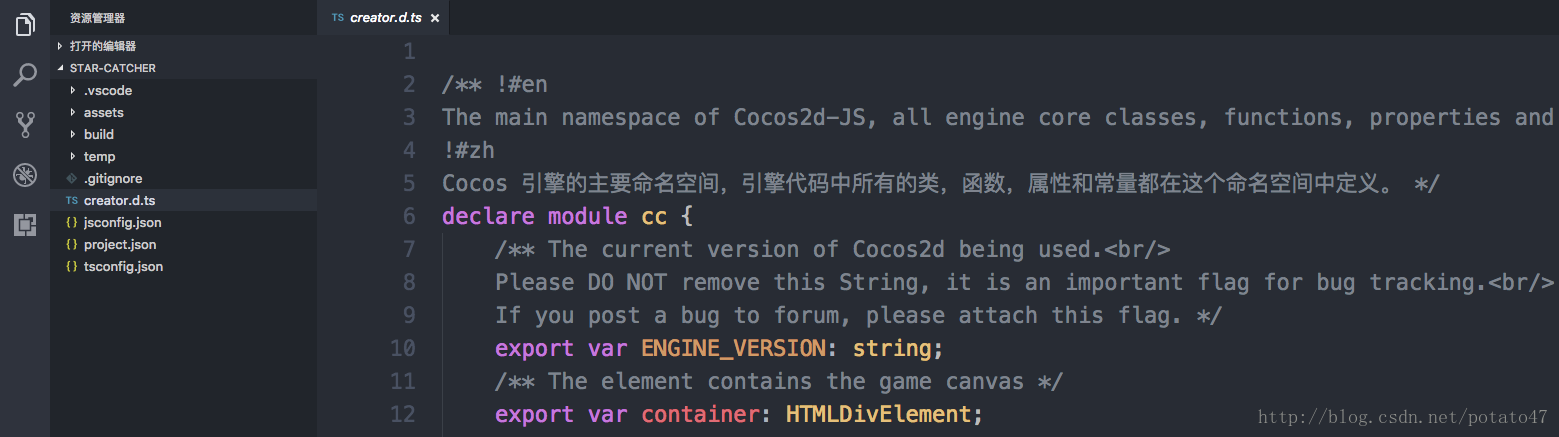
creator 的提示都依靠这个脚本,引擎的api变动也要及时更新这个脚本,所以每次更新引擎的时候都要重新点一次上面那个“更新VS Code只能提示数据“来重新生成creator.d.ts。
资源管理器右键新建一个ts脚本,点开后你会发现有很多没用的东西,而且还会有一个提示错误(1.81)。。。
//  - [English] http://www.cocos2d-x.org/docs/editors_and_tools/creator-chapters/scripting/typescript/index.html
// Learn Attribute:
//  - [Chinese] http://www.cocos.com/docs/creator/scripting/reference/attributes.html
//  - [English] http://www.cocos2d-x.org/docs/editors_and_tools/creator-chapters/scripting/reference/attributes/index.html
// Learn life-cycle callbacks:
//  - [Chinese] http://www.cocos.com/docs/creator/scripting/life-cycle-callbacks.html
//  - [English] http://www.cocos2d-x.org/docs/editors_and_tools/creator-chapters/scripting/life-cycle-callbacks/index.html

const {ccclass, property} = cc._decorator;

@ccclass
export default class NewClass extends cc.Component {


    @property(cc.Label)
    label: cc.Label = null;

    @property
    text: string = 'hello';

    // LIFE-CYCLE CALLBACKS:

    // onLoad () {},

    start () {

    },

    // update (dt) {},
}
编辑器右上角“打开程序安装路径“,
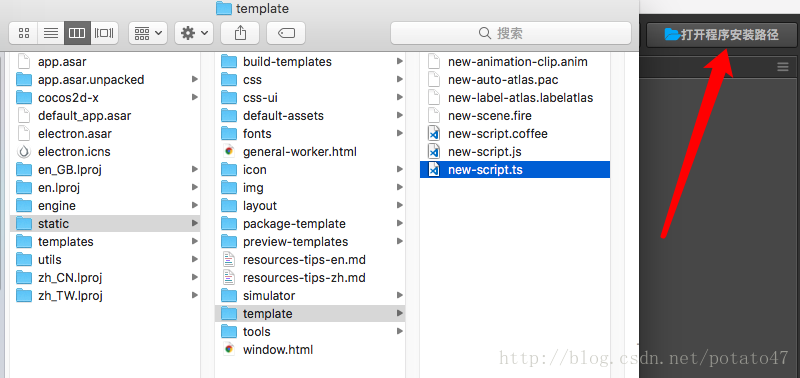
static-》template-》new-script.ts
这个脚本就是新建ts脚本的默认样式,我们来重新编辑一下,编辑后的脚本如下
const {ccclass, property} = cc._decorator;

@ccclass
export class NewClass extends cc.Component {


}
重新新建一个ts脚本,你会发现跟刚才编辑的默认脚本是一个样子了。
配置自己的声明文件
以d.ts为后缀名的文件,会被识别为声明文件,creator.d.ts是引擎的声明文件,我们也可以定义自己的声明文件,需要注意的是声明文件要放在assets文件外,因为assets文件里的脚本都会被引擎编译,而声明文件的作用就是写代码时提示一下,编译之后就不需要了。
举个栗子
在项目的根目录添加一个global.d.ts文件
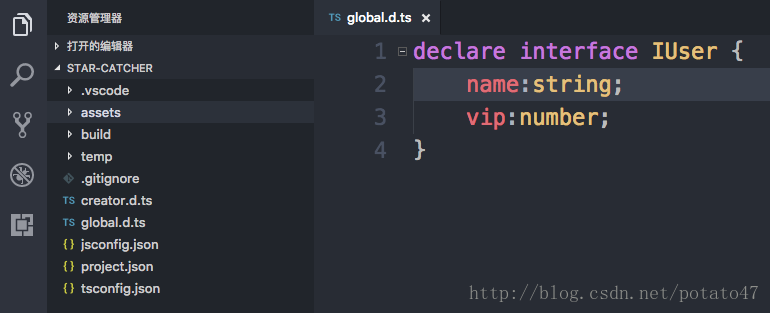
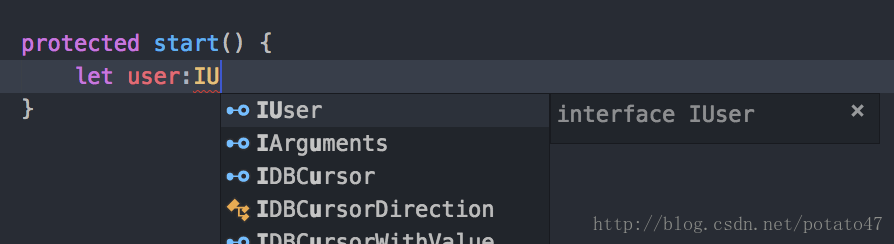
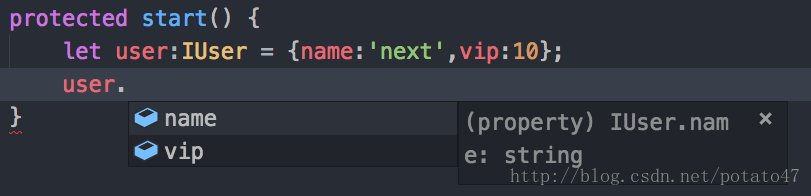
然后在项目里的脚本里就可以得到对应的提示
更多类型定义戳 https://www.tslang.cn/docs/handbook/declaration-files/introduction.html
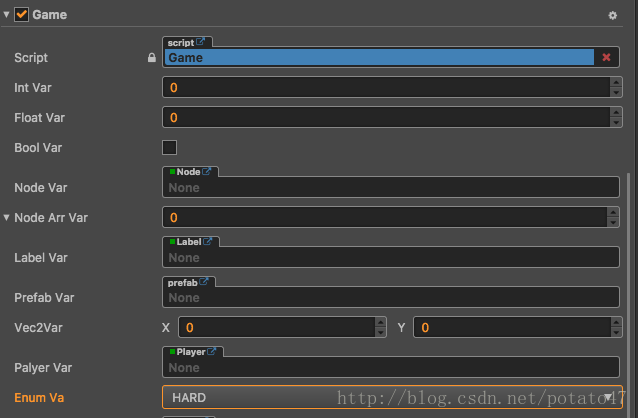
属性类型声明
const LEVEL = cc.Enum({EASY:1,HARD:2});

@ccclass
export class Game extends cc.Component {

    // 整型
    @property(cc.Integer)
    intVar: number = 0;
    // 浮点型
    @property(cc.Float)
    floatVar: number = 0;
    // 布尔型
    @property(cc.Boolean)
    boolVar: boolean = false;
    // 节点
    @property(cc.Node)
    nodeVar: cc.Node = null;
    // 节点数组
    @property([cc.Node])
    nodeArrVar: Array<cc.Node> = [];
    // Label
    @property(cc.Label)
    labelVar: cc.Label = null;
    // 预制体
    @property(cc.Prefab)
    prefabVar: cc.Prefab = null;
    // 点
    @property(cc.Vec2)
    vec2Var: cc.Vec2 = cc.v2();
    // 自定义节点
    @property(Player)
    palyerVar: Player = null;
    // 重点来了,自定义枚举
    /**
     * 全局变量
     * const LEVEL = cc.Enum({EASY:1,HARD:2});
     */
    @property({
        type:LEVEL
    })
    enumVa = LEVEL.EASY;
}
用 TypeScript 写一个游戏
最后我们来切身体会一下TypeScript的柔软丝滑。
挑一个熟悉的游戏来写,官方文档里有一个摘星星的游戏,我们用Ts重新写一下。
第一步:新建一个工程
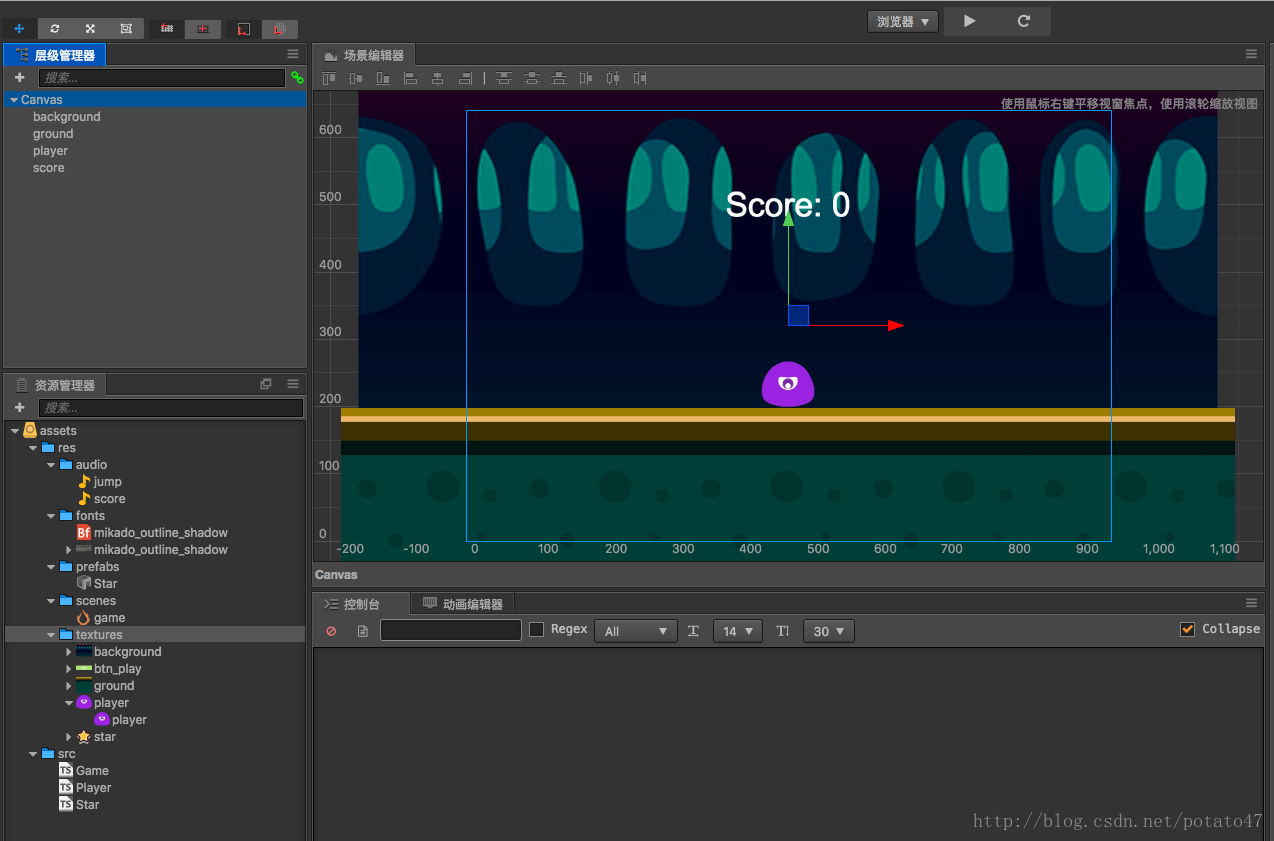
第二步:写几个脚本
Game.ts
import { Player } from "./Player";

const { property, ccclass } = cc._decorator;

@ccclass
export class Game extends cc.Component {
    // 这个属性引用了星星的预制资源
    @property(cc.Prefab)
    private starPrefab: cc.Prefab = null;
    // 星星产生后消失时间的随机范围
    @property(cc.Integer)
    private maxStarDuration = 0;
    @property(cc.Integer)
    private minStarDuration = 0
    // 地面节点,用于确定星星生成的高度
    @property(cc.Node)
    private groundNode: cc.Node = null;
    // player 节点,用于获取主角弹跳的高度,和控制主角行动开关
    @property(cc.Node)
    public playerNode: cc.Node = null;
    // score label 的引用
    @property(cc.Label)
    private scoreLabel: cc.Label = null;
    // 得分音效资源
    @property(cc.AudioClip)
    private scoreAudio: cc.AudioClip = null;

    // 地面节点的Y轴坐标
    private groundY: number;
    // 定时器
    public timer: number;
    // 星星存在的持续时间
    public starDuration: number;
    // 当前分数
    private score: number;

    protected onLoad() {
        // 获取地平面的 y 轴坐标
        this.groundY = this.groundNode.y + this.groundNode.height / 2;
        // 初始化计时器
        this.timer = 0;
        this.starDuration = 0;
        // 生成一个新的星星
        this.spawnNewStar();
        // 初始化计分
        this.score = 0;
    }

    // 生成一个新的星星
    public spawnNewStar() {
        // 使用给定的模板在场景中生成一个新节点
        let newStar = cc.instantiate(this.starPrefab);
        // 将新增的节点添加到 Canvas 节点下面
        this.node.addChild(newStar);
        // 为星星设置一个随机位置
        newStar.setPosition(this.getNewStarPosition());
        // 将 Game 组件的实例传入星星组件
        newStar.getComponent('Star').init(this);
        // 重置计时器
        this.starDuration = this.minStarDuration + cc.random0To1() * (this.maxStarDuration - this.minStarDuration);
        this.timer = 0;
    }

    // 新星星的位置
    public getNewStarPosition() {
        let randX = 0;
        // 根据地平面位置和主角跳跃高度,随机得到一个星星的 y 坐标
        let randY = this.groundY + cc.random0To1() * this.playerNode.getComponent('Player').jumpHeight + 50;
        // 根据屏幕宽度,随机得到一个星星 x 坐标
        let maxX = this.node.width / 2;
        randX = cc.randomMinus1To1() * maxX;
        // 返回星星坐标
        return cc.p(randX, randY);
    }

    // called every frame
    protected update(dt: number) {
        // 每帧更新计时器,超过限度还没有生成新的星星
        // 就会调用游戏失败逻辑
        if (this.timer > this.starDuration) {
            this.gameOver();
            return;
        }
        this.timer += dt;
    }

    // 得分
    public gainScore() {
        this.score += 1;
        // 更新 scoreDisplay Label 的文字
        this.scoreLabel.string = 'Score: ' + this.score.toString();
        // 播放得分音效
        // 不加as any就会报错,不信你试试
        cc.audioEngine.play(this.scoreAudio as any, false, 1);
    }

    // gg
    private gameOver() {
        this.playerNode.stopAllActions(); //停止 player 节点的跳跃动作
        cc.director.loadScene('game');
    }

}
Player.ts
const { ccclass, property } = cc._decorator;

@ccclass
export class Player extends cc.Component {
    // 主角跳跃高度
    @property(cc.Integer)
    private jumpHeight: number = 0;
    // 主角跳跃持续时间
    @property(cc.Integer)
    private jumpDuration: number = 0;
    // 最大移动速度
    @property(cc.Integer)
    private maxMoveSpeed: number = 0;
    // 加速度
    @property(cc.Integer)
    private accel: number = 0;
    // 跳跃音效资源
    @property(cc.AudioClip)
    private jumpAudio: cc.AudioClip = null;

    private xSpeed: number = 0;
    private accLeft: boolean = false;
    private accRight: boolean = false;
    private jumpAction: cc.Action = null;

    private setJumpAction() {
        // 跳跃上升
        let jumpUp = cc.moveBy(this.jumpDuration, cc.p(0, this.jumpHeight)).easing(cc.easeCubicActionOut());
        // 下落
        let jumpDown = cc.moveBy(this.jumpDuration, cc.p(0, -this.jumpHeight)).easing(cc.easeCubicActionIn());
        // 添加一个回调函数,用于在动作结束时调用我们定义的其他方法
        let callback = cc.callFunc(this.playJumpSound, this);
        // 不断重复,而且每次完成落地动作后调用回调来播放声音
        return cc.repeatForever(cc.sequence(jumpUp, jumpDown, callback));
    }

    private playJumpSound() {
        // 调用声音引擎播放声音
        cc.audioEngine.play(this.jumpAudio as any, false, 1);
    }

    private addEventListeners() {
        cc.systemEvent.on(cc.SystemEvent.EventType.KEY_DOWN, this.onKeyDown, this);
        cc.systemEvent.on(cc.SystemEvent.EventType.KEY_UP, this.onKeyUp, this);
        cc.find("Canvas").on(cc.Node.EventType.TOUCH_START, this.onScreenTouchStart,this);
        cc.find("Canvas").on(cc.Node.EventType.TOUCH_CANCEL, this.onScreenTouchEnd, this);
        cc.find("Canvas").on(cc.Node.EventType.TOUCH_END, this.onScreenTouchEnd,this);
    }

    private moveLeft() {
        this.accLeft = true;
        this.accRight = false;
    }

    private moveRight() {
        this.accLeft = false;
        this.accRight = true;
    }

    private stopMove() {
        this.accLeft = false;
        this.accRight = false;
    }

    private onScreenTouchStart(event: cc.Event.EventTouch) {
        if (event.getLocationX() > cc.winSize.width/2) {
            this.moveRight();
        } else {
            this.moveLeft();
        }
    }

    private onScreenTouchEnd() {
        this.stopMove();
    }

    private onKeyDown(event: cc.Event.EventKeyboard) {
        switch ((event as any).keyCode) {
            case cc.KEY.a:
            case cc.KEY.left:
                this.moveLeft();
                break;
            case cc.KEY.d:
            case cc.KEY.right:
                this.moveRight();
                break;
        }
    }

    private onKeyUp(event: cc.Event.EventKeyboard) {
        switch ((event as any).keyCode) {
            case cc.KEY.a:
            case cc.KEY.left:
                this.stopMove();
                break;
            case cc.KEY.d:
            case cc.KEY.right:
                this.stopMove();
                break;
        }
    }

    // use this for initialization
    protected onLoad() {
        // 初始化跳跃动作
        this.jumpAction = this.setJumpAction();
        this.node.runAction(this.jumpAction);

        // 加速度方向开关
        this.accLeft = false;
        this.accRight = false;
        // 主角当前水平方向速度
        this.xSpeed = 0;

        // 初始化输入监听
        this.addEventListeners();
    }

    // called every frame
    protected update(dt: number) {
        // 根据当前加速度方向每帧更新速度
        if (this.accLeft) {
            this.xSpeed -= this.accel * dt;
        } else if (this.accRight) {
            this.xSpeed += this.accel * dt;
        }
        // 限制主角的速度不能超过最大值
        if (Math.abs(this.xSpeed) > this.maxMoveSpeed) {
            // if speed reach limit, use max speed with current direction
            this.xSpeed = this.maxMoveSpeed * this.xSpeed / Math.abs(this.xSpeed);
        }

        // 根据当前速度更新主角的位置
        this.node.x += this.xSpeed * dt;
        if (this.node.x <= -this.node.parent.width / 2) {
            this.node.x = this.node.parent.width / 2;
        }
        if (this.node.x > this.node.parent.width / 2) {
            this.node.x = -this.node.parent.width / 2;
        }
    }

}
Star.ts
import { Game } from "./Game";

const {ccclass,property} = cc._decorator;

@ccclass
export class Star extends cc.Component {


    // 星星和主角之间的距离小雨这个数值时,就会完成收集
    @property(cc.Integer)
    private pickRadius: number = 0;
    private game: Game = null;

    public init(game:Game) {
        this.game = game;
    }

    getPlayerDistance() {
        // 根据 player 节点位置判断距离
        let playerPos = this.game.playerNode.getPosition();
        // 根据两点位置计算两点之间距离
        let dist = cc.pDistance(this.node.position, playerPos);
        return dist;
    }

    onPicked() {
        // 当星星被收集时,调用 Game 脚本中的接口,生成一个新的星星
        this.game.spawnNewStar();
        // 调用 Game 脚本的得分方法
        this.game.gainScore();
        // 然后销毁当前星星节点
        this.node.destroy();
    }

    // called every frame
    update(dt:number) {
        // 每帧判断和主角之间的距离是否小于收集距离
        if (this.getPlayerDistance() < this.pickRadius) {
            // 调用收集行为
            this.onPicked();
            return;
        }
        // 根据 Game 脚本中的计时器更新星星的透明度
        let opacityRatio = 1 - this.game.timer/this.game.starDuration;
        let minOpacity = 50;
        this.node.opacity = minOpacity + Math.floor(opacityRatio * (255 - minOpacity));
    }

}
第三步:可以玩了【github pages发布教程传送门】
https://potato47.github.io/star-catcher/
这后面的进度有点快,同学们自己消化一下,老师去吃饭了。
参考:http://forum.cocos.com/t/typescript-creator-github/42200
http://docs.cocos.com/creator/manual/zh/scripting/typescript.html
https://www.tslang.cn/docs/home.html
源码:https://github.com/potato47/star-catcher
原文:http://blog.csdn.net/potato47/article/details/79254524
智能推荐
攻防世界_难度8_happy_puzzle_攻防世界困难模式攻略图文-程序员宅基地
文章浏览阅读645次。这个肯定是末尾的IDAT了,因为IDAT必须要满了才会开始一下个IDAT,这个明显就是末尾的IDAT了。,对应下面的create_head()代码。,对应下面的create_tail()代码。不要考虑爆破,我已经试了一下,太多情况了。题目来源:UNCTF。_攻防世界困难模式攻略图文
达梦数据库的导出(备份)、导入_达梦数据库导入导出-程序员宅基地
文章浏览阅读2.9k次,点赞3次,收藏10次。偶尔会用到,记录、分享。1. 数据库导出1.1 切换到dmdba用户su - dmdba1.2 进入达梦数据库安装路径的bin目录,执行导库操作 导出语句:./dexp cwy_init/[email protected]:5236 file=cwy_init.dmp log=cwy_init_exp.log 注释: cwy_init/init_123..._达梦数据库导入导出
js引入kindeditor富文本编辑器的使用_kindeditor.js-程序员宅基地
文章浏览阅读1.9k次。1. 在官网上下载KindEditor文件,可以删掉不需要要到的jsp,asp,asp.net和php文件夹。接着把文件夹放到项目文件目录下。2. 修改html文件,在页面引入js文件:<script type="text/javascript" src="./kindeditor/kindeditor-all.js"></script><script type="text/javascript" src="./kindeditor/lang/zh-CN.js"_kindeditor.js
STM32学习过程记录11——基于STM32G431CBU6硬件SPI+DMA的高效WS2812B控制方法-程序员宅基地
文章浏览阅读2.3k次,点赞6次,收藏14次。SPI的详情简介不必赘述。假设我们通过SPI发送0xAA,我们的数据线就会变为10101010,通过修改不同的内容,即可修改SPI中0和1的持续时间。比如0xF0即为前半周期为高电平,后半周期为低电平的状态。在SPI的通信模式中,CPHA配置会影响该实验,下图展示了不同采样位置的SPI时序图[1]。CPOL = 0,CPHA = 1:CLK空闲状态 = 低电平,数据在下降沿采样,并在上升沿移出CPOL = 0,CPHA = 0:CLK空闲状态 = 低电平,数据在上升沿采样,并在下降沿移出。_stm32g431cbu6
计算机网络-数据链路层_接收方收到链路层数据后,使用crc检验后,余数为0,说明链路层的传输时可靠传输-程序员宅基地
文章浏览阅读1.2k次,点赞2次,收藏8次。数据链路层习题自测问题1.数据链路(即逻辑链路)与链路(即物理链路)有何区别?“电路接通了”与”数据链路接通了”的区别何在?2.数据链路层中的链路控制包括哪些功能?试讨论数据链路层做成可靠的链路层有哪些优点和缺点。3.网络适配器的作用是什么?网络适配器工作在哪一层?4.数据链路层的三个基本问题(帧定界、透明传输和差错检测)为什么都必须加以解决?5.如果在数据链路层不进行帧定界,会发生什么问题?6.PPP协议的主要特点是什么?为什么PPP不使用帧的编号?PPP适用于什么情况?为什么PPP协议不_接收方收到链路层数据后,使用crc检验后,余数为0,说明链路层的传输时可靠传输
软件测试工程师移民加拿大_无证移民,未受过软件工程师的教育(第1部分)-程序员宅基地
文章浏览阅读587次。软件测试工程师移民加拿大 无证移民,未受过软件工程师的教育(第1部分) (Undocumented Immigrant With No Education to Software Engineer(Part 1))Before I start, I want you to please bear with me on the way I write, I have very little gen...
随便推点
Thinkpad X250 secure boot failed 启动失败问题解决_安装完系统提示secureboot failure-程序员宅基地
文章浏览阅读304次。Thinkpad X250笔记本电脑,装的是FreeBSD,进入BIOS修改虚拟化配置(其后可能是误设置了安全开机),保存退出后系统无法启动,显示:secure boot failed ,把自己惊出一身冷汗,因为这台笔记本刚好还没开始做备份.....根据错误提示,到bios里面去找相关配置,在Security里面找到了Secure Boot选项,发现果然被设置为Enabled,将其修改为Disabled ,再开机,终于正常启动了。_安装完系统提示secureboot failure
C++如何做字符串分割(5种方法)_c++ 字符串分割-程序员宅基地
文章浏览阅读10w+次,点赞93次,收藏352次。1、用strtok函数进行字符串分割原型: char *strtok(char *str, const char *delim);功能:分解字符串为一组字符串。参数说明:str为要分解的字符串,delim为分隔符字符串。返回值:从str开头开始的一个个被分割的串。当没有被分割的串时则返回NULL。其它:strtok函数线程不安全,可以使用strtok_r替代。示例://借助strtok实现split#include <string.h>#include <stdio.h&_c++ 字符串分割
2013第四届蓝桥杯 C/C++本科A组 真题答案解析_2013年第四届c a组蓝桥杯省赛真题解答-程序员宅基地
文章浏览阅读2.3k次。1 .高斯日记 大数学家高斯有个好习惯:无论如何都要记日记。他的日记有个与众不同的地方,他从不注明年月日,而是用一个整数代替,比如:4210后来人们知道,那个整数就是日期,它表示那一天是高斯出生后的第几天。这或许也是个好习惯,它时时刻刻提醒着主人:日子又过去一天,还有多少时光可以用于浪费呢?高斯出生于:1777年4月30日。在高斯发现的一个重要定理的日记_2013年第四届c a组蓝桥杯省赛真题解答
基于供需算法优化的核极限学习机(KELM)分类算法-程序员宅基地
文章浏览阅读851次,点赞17次,收藏22次。摘要:本文利用供需算法对核极限学习机(KELM)进行优化,并用于分类。
metasploitable2渗透测试_metasploitable2怎么进入-程序员宅基地
文章浏览阅读1.1k次。一、系统弱密码登录1、在kali上执行命令行telnet 192.168.26.1292、Login和password都输入msfadmin3、登录成功,进入系统4、测试如下:二、MySQL弱密码登录:1、在kali上执行mysql –h 192.168.26.129 –u root2、登录成功,进入MySQL系统3、测试效果:三、PostgreSQL弱密码登录1、在Kali上执行psql -h 192.168.26.129 –U post..._metasploitable2怎么进入
Python学习之路:从入门到精通的指南_python人工智能开发从入门到精通pdf-程序员宅基地
文章浏览阅读257次。本文将为初学者提供Python学习的详细指南,从Python的历史、基础语法和数据类型到面向对象编程、模块和库的使用。通过本文,您将能够掌握Python编程的核心概念,为今后的编程学习和实践打下坚实基础。_python人工智能开发从入门到精通pdf