实验五 进程通信_进程同步实验心得-程序员宅基地
一、实验目的:
掌握进程通信的基本原理、作用。了解LINUX 、Windows进程间通信的不同方法,如命名管道、文件映射等,掌握进程间通信的基本原理。掌握相关函数的使用方法。
二、实验环境:
一台运行Linux操作系统的计算机。
三、实验内容:
PART 1 LINUX 进程通信
1. 命名管道
(1)建立如下两个C 源文件,并编译链接成可执行文件,文件名可自己设置。
源文件:fifo_write.c
#include <sys/types.h>
#include <sys/stat.h>
#include <errno.h>
#include <fcntl.h>
#include <stdlib.h>
#include <stdio.h>
#include <signal.h>
#define MYFIFO "myfifo"
int main(int argc, char *argv[])
{
int fd;
fd=open(MYFIFO,O_WRONLY);
if (fd==-1)
{
printf("open fifo file error.\n");
exit(1);
}
while(1)
{ char buff[128]={0};
fgets(buff,128,stdin);
if (strncmp(buff,"end",3)==0)
break;
write(fd,buff,strlen(buff));
}
close(fd);
exit(0);
}
源文件: fifo_read.c
#include <sys/types.h>
#include <sys/stat.h>
#include <errno.h>
#include <fcntl.h>
#include <stdlib.h>
#include <stdio.h>
#include <string.h>
#include <signal.h>
#define MYFIFO "myfifo"
int main( )
{
int fd;
int nread;
if (access(MYFIFO,F_OK)==-1)
{
if ((mkfifo(MYFIFO,0666)<0)&&(errno!=EEXIST))
{
printf("Cannot create fifo file\n");
exit(1);
}
}
fd=open(MYFIFO,O_RDONLY);
if (fd==-1)
{
printf("open fifo file error.\n");
exit(1);
}
while (1)
{
char buff[128]={0};
int n=read(fd,buff,127);
if ( n==0 )
{
printf("对方已关闭!\n");
break;
}
printf("read(n=%d):%s",n,buff);
}
close(fd);
exit(0);
}
- 打开两个命令窗口,分别运行以上两个程序,观察分析程序运行结果。


- 在以上代码的基础上,增加如下功能:fifo_read.c程序中,输出"对方已关闭!"信息之前,输出一共从fifo_write.c程序中接收了多少行信息。
修改后的代码:
#include <sys/types.h>
#include <sys/stat.h>
#include <errno.h>
#include <fcntl.h>
#include <stdlib.h>
#include <stdio.h>
#include <string.h>
#include <signal.h>
#include <unistd.h>
#define MYFIFO “myfifo”
int main( )
{
int fd;
int nread;
int count = 0; //增加的代码语句
if (access(MYFIFO,F_OK)== -1)
{
if ((mkfifo(MYFIFO,0666)<0)&&(errno!=EEXIST))
{
printf(“Cannot create fifo file\n”);
exit(1);
}
}
fd=open(MYFIFO,O_RDONLY);
if (fd == -1)
{
printf(“open fifo file error.\n”);
exit(1);
}
while (1)
{
char buff[128]={0};
int n=read(fd,buff,127);
if ( n==0 )
{
printf(“共从fifo_write.c程序中接收了%d行信息\n”,count);
printf(“对方已关闭!\n”);
break;
}
printf(“read(n=%d):%s”,n,buff);
count++; }
close(fd);
exit(0);
}

2. 共享内存
(1) 建立如下两个C 源文件,并编译链接成可执行文件,文件名可自己设置。
源文件 mem_keyboard.c
#include <stdio.h>
#include <stdlib.h>
#include <sys/types.h>
#include <sys/ipc.h>
#include <sys/shm.h>
#include <errno.h>
#include <string.h>
int main(int argc, const char *argv[])
{
key_t key;
int shmid;
char *p = NULL;
key=1234;
if(key < 0)
{
perror("fail ftok ");
exit(1);
}
shmid = shmget(key,128,IPC_CREAT|0666); //创建/打开共享内存,返回id根据id映射
p = (char *)shmat(shmid,NULL,0); //映射,返回地址,根据地址操作
if( p == (char *)(-1) )
{
perror("shmat fail ");
exit(1);
}
while(1) //接收到 quit 结束循环
{
//read 时p中 内容不会清空
fgets(p,10,stdin);
if(strstr(p,"quit") != NULL)
{
break;
}
}
shmdt(p); //解除映射
shmctl(shmid,IPC_RMID,NULL); //删除
return 0;
}
源文件 mem_print.c
#include <stdio.h>
#include <stdlib.h>
#include <sys/types.h>
#include <sys/ipc.h>
#include <sys/shm.h>
#include <errno.h>
#include <string.h>
#include <unistd.h>
int main(int argc, const char *argv[])
{
key_t key;
int shmid;
char *p = NULL;
key=1234;
if(key < 0)
{
perror("fail ftok ");
exit(1);
}
shmid = shmget(key,128,IPC_CREAT|0666);
p = (char *)shmat(shmid,NULL,0);
if( p == (char *)(-1) )
{
perror("shmat fail ");
exit(1);
}
while(1)
{
sleep(1);
printf("P:%s",p);
if(strstr(p,"quit") != NULL)
{
break;
}
}
shmdt(p);
shmctl(shmid,IPC_RMID,NULL);
return 0;
}
- 打开两个命令窗口,分别运行以上两个程序,观察分析程序运行结果。程序未退出时,另外打开一个命令窗口,用命令 ipcs 查看共享内存的信息。

- 以上程序只是实现简单的进程通信,未进行互斥控制。打开三个命令窗口,其中两个运行mem_keyboard程序,一个运行mem_print程序,观察程序运行结果,有什么问题。
答:输出结果被另外一个输入信息占据。

(4) 在以上程序的基础上,实现简单的互斥控制,mem_keyboard向共享内存写入数据之后,mem_print才能开始读,同样,mem_print将共享内存的数据读出之后,mem_keyboard才能写入下一行数据。
修改后的代码:
mem_keyboard.c:
#include <stdio.h>
#include <stdlib.h>
#include <sys/types.h>
#include <sys/ipc.h>
#include <sys/shm.h>
#include <errno.h>
#include <string.h>
int main(int argc, const char *argv[])
{
key_t key,key2;
int shmid,mutex;
char *p = NULL;
char *p2 = NULL;
key=1234;
key2 = 5678;
if(key < 0)
{
perror("fail ftok ");
exit(1);
}
shmid = shmget(key,128,IPC_CREAT|0666);
mutex = shmget(key2, 4, IPC_CREAT|0666);
p = (char *)shmat(shmid,NULL,0);
if( p == (char *)(-1) )
{
perror("shmat fail ");
exit(1);
}
p2 = (char *)shmat(mutex,NULL,0);
if( p2 == (char *)(-1) )
{
perror("shmat2 fail ");
exit(1);
}
*p2=0;
while(1) {
while(*p2!=0);
fgets(p,10,stdin);
*p2=1;
if(strstr(p,“quit”) != NULL)
{
break;
}
}
Shmdt(p);
shmdt(p2);
shmctl(shmid,IPC_RMID,NULL);
shmctl(mutex,IPC_RMID,NULL);
return 0;
}
mem_print.c:
#include <stdio.h>
#include <stdlib.h>
#include <sys/types.h>
#include <sys/ipc.h>
#include <sys/shm.h>
#include <errno.h>
#include <string.h>
#include <unistd.h>
int main(int argc, const char *argv[])
{
key_t key,key2;
int shmid,mutex;
char *p = NULL;
char *p2 = NULL;
key=1234;
key2 = 5678;
if(key < 0)
{
perror("fail ftok ");
exit(1);
}
shmid = shmget(key,128,IPC_CREAT|0666);
mutex = shmget(key2, 4, IPC_CREAT|0666);
p = (char *)shmat(shmid,NULL,0);
if( p == (char *)(-1) )
{
perror("shmat fail ");
exit(1);
}
p2 = (char *)shmat(mutex,NULL,0);
if( p2 == (char *)(-1) )
{
perror("shmat2 fail ");
exit(1);
}
while(1)
{
while(*p2!=1);
printf(“P:%s”,p);
*p2=0;
if(strstr(p,“quit”) != NULL)
{
break;
}
}
Shmdt(p);
shmdt(p2);
shmctl(shmid,IPC_RMID,NULL);
shmctl(mutex,IPC_RMID,NULL);
return 0;
}

PART 2 Windows进程通信
1. 共享内存文件映射方式
1)建立一个server.cpp文件,源代码为:
#include <iostream>
#include <windows.h>
#include <stdlib.h>
#include <time.h>
using namespace std;
int main(int argc, char *argv[])
{
int nRetCode = 0;
char szBuffer[20] ;
HANDLE hMapping = CreateFileMapping(NULL,NULL,PAGE_READWRITE,0,4096, "ShareMemory");
LPVOID lpBase = MapViewOfFile(hMapping,FILE_MAP_WRITE|FILE_MAP_READ,0,0,0);
srand((unsigned)time(NULL));
while(1)
{ for(int i=0;i<=18;i++)
szBuffer[i]=rand()%26+65;
szBuffer[19]='\0';
puts(szBuffer);
strcpy((char*)lpBase,szBuffer);
Sleep(1000);
}
Sleep(20000);
UnmapViewOfFile(lpBase);
CloseHandle(hMapping);
return nRetCode;
}
编译生成server.exe文件。

2)建立一个client.cpp文件,源代码为:
#include <iostream>
#include <windows.h>
using namespace std;
int main(int argc, char *argv[])
{
int nRetCode = 0;
HANDLE hMapping = OpenFileMapping(FILE_MAP_ALL_ACCESS,NULL,"ShareMemory");
if (hMapping)
{
wprintf(L"%s\r\n",L"Success");
LPVOID lpBase = MapViewOfFile(hMapping,FILE_MAP_READ|FILE_MAP_WRITE,0,0,0);
char szBuffer[20] = {0};
while(1)
{
strcpy(szBuffer,(char*)lpBase);
printf("%s\n",szBuffer);
Sleep(1000);
}
UnmapViewOfFile(lpBase);
CloseHandle(hMapping);
}
else
{
wprintf(L"%s",L"OpenMapping Error");
}
return nRetCode;
}
编译生成client.exe文件。

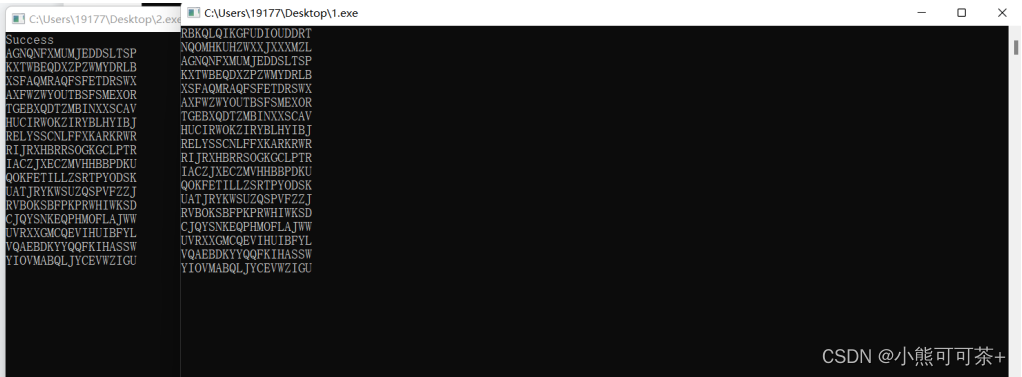
- 先运行server.exe文件,再运行client.exe文件,分析运行结果。

- 实现上述程序的控制停止功能,可以两种方式停止发送字符串:一种是服务器端发送10个字符串后便结束程序;另一种是用户在服务器端输入字符即结束程序。
server.cpp修改代码:
#include <iostream>
#include <windows.h>
#include <stdlib.h>
#include <time.h>
#include <conio.h>
using namespace std;
int main(int argc, char *argv[]){
int nRetCode = 0;
char szBuffer[20] ;
char c[20];
HANDLE hMapping = CreateFileMapping(NULL,NULL,PAGE_READWRITE,0,4096,"ShareMemory");
LPVOID lpBase =MapViewOfFile(hMapping,FILE_MAP_WRITE|FILE_MAP_READ,0,0,0);
srand((unsigned)time(NULL));
while(1){
for(int i=0;i<=18;i++)
szBuffer[i]=rand()%26+65;
szBuffer[19]='\0';
puts(szBuffer);
strcpy((char*)lpBase,szBuffer);
Sleep(1000);
if(kbhit())
{
gets(c);
if(strlen(c)==10)
break;
}
}
Sleep(20000);
UnmapViewOfFile(lpBase);
CloseHandle(hMapping);
return nRetCode;
}

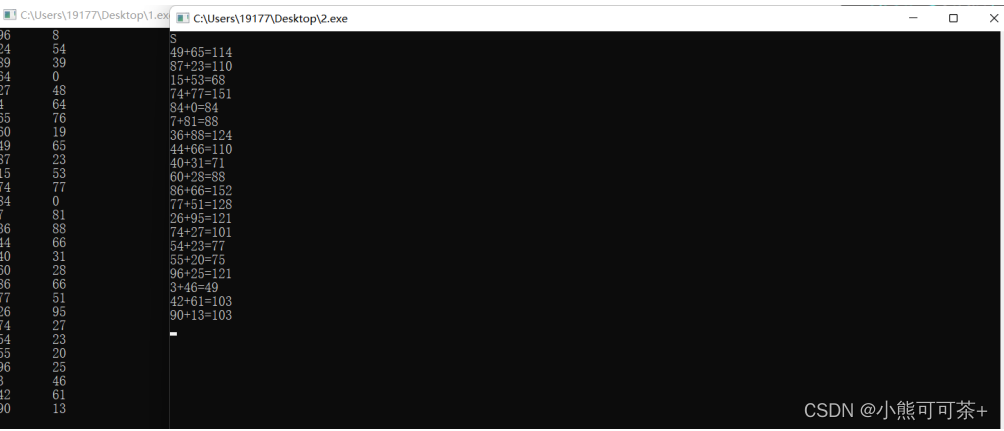
5)将上述程序的功能改为:server端每次发送两个100之内的整数,client端实现将两个整数相加,并输出加法计算式。
server.cpp修改代码:
#include <iostream>
#include <windows.h>
#include <stdlib.h>
#include <time.h>
using namespace std;
int main(int argc, char *argv[])
{
int nRetCode = 0;
char szBuffer[3] ;
HANDLE hMapping =CreateFileMapping(NULL,NULL,PAGE_READWRITE,0,4096, "ShareMemory");
LPVOID lpBase =MapViewOfFile(hMapping,FILE_MAP_WRITE|FILE_MAP_READ,0,0,0);
srand((unsigned)time(NULL));
while(1)
{
szBuffer[0]=rand()%100;
szBuffer[1]=rand()%100;
szBuffer[2]='\0';
printf("%d\t%d\n",szBuffer[0],szBuffer[1]);
strcpy((char*)lpBase,szBuffer);
Sleep(1000);
}
Sleep(20000);
UnmapViewOfFile(lpBase);
CloseHandle(hMapping);
return nRetCode;
}
client.exe修改代码:
#include <iostream>
#include <windows.h>
using namespace std;
int main(int argc, char *argv[]){
int nRetCode = 0;
HANDLE hMapping =OpenFileMapping(FILE_MAP_ALL_ACCESS,NULL,"ShareMemory");
if (hMapping){
wprintf(L"%s\r\n",L"Success");
LPVOID lpBase =MapViewOfFile(hMapping,FILE_MAP_READ|FILE_MAP_WRITE,0,0,0);
char szBuffer[20] = {0};
while(1)
{
strcpy(szBuffer,(char*)lpBase);
printf("%d+%d=%d\n",szBuffer[0],szBuffer[1],szBuffer[0]+szBuffer[1]);
Sleep(1000);
}
UnmapViewOfFile(lpBase);
CloseHandle(hMapping);
}
else{
wprintf(L"%s",L"OpenMapping Error");
}
return nRetCode;
}

2. 命名管道方式
1)建立一个server.cpp文件,源代码为:
#include <iostream>
#include <windows.h>
using namespace std;
int main(int argc, char* argv[])
{
int nRetCode = 0;
int err;
BOOL rc;
HANDLE hPipeHandle1;
char lpName[] = "\\\\.\\pipe\\myPipe";
char InBuffer[50] = "";
char OutBuffer[50] = "";
DWORD BytesRead,BytesWrite;
hPipeHandle1 = CreateNamedPipe((LPCSTR)lpName, PIPE_ACCESS_DUPLEX|FILE_FLAG_OVERLAPPED|WRITE_DAC, PIPE_TYPE_MESSAGE|PIPE_READMODE_BYTE|PIPE_WAIT, 1,20,30,NMPWAIT_USE_DEFAULT_WAIT, (LPSECURITY_ATTRIBUTES)NULL);
if((hPipeHandle1 == INVALID_HANDLE_VALUE)||(hPipeHandle1 == NULL))
{
err = GetLastError();
printf("Server Pipe Create Fail!err = %d\n",err);
exit(1);
}
else printf("Server Pipe Create Success!\n");
while(1)
{
rc = ConnectNamedPipe(hPipeHandle1,(LPOVERLAPPED)NULL);
if(rc == 0)
{
err = GetLastError();
printf("Server Pipe Connect Fail err = %d\n",err);
exit(2);
}
else printf("Server Pipe Connect Success\n");
strcpy(InBuffer,"");
strcpy(OutBuffer,"");
rc = ReadFile(hPipeHandle1,InBuffer,sizeof(InBuffer),&BytesRead,(LPOVERLAPPED)NULL);
if(rc == 0 && BytesRead ==0)
{
err = GetLastError();
printf("Server Read Pipe Fail!err = %d",err);
exit(3);
}
else printf("Server Read Pipe Success!\nDATA from Client is %s\n",InBuffer);
rc = strcmp(InBuffer,"end");
if(rc == 0) break;
printf("Please Input Data to Send\n");
scanf("%s",OutBuffer);
rc = WriteFile(hPipeHandle1,OutBuffer,sizeof(OutBuffer),&BytesWrite,(LPOVERLAPPED)NULL);
if(rc == 0) printf("Server Write Pipe Success!\n");
else printf("Server Write Pipe Success!\n");
DisconnectNamedPipe(hPipeHandle1);
rc = strcmp(OutBuffer,"end");
if(rc == 0) break;
}
return 0;
}
编译生成server.exe文件。

2)建立一个client.cpp文件,源代码为:
#include <iostream>
#include <windows.h>
using namespace std; //命名空间
int main(int argc, char* argv[])
{
int nRetCode = 0; //整型类型的
int err = 0;
BOOL rc = 0;
char lpName[] = "\\\\.\\pipe\\myPipe";
char InBuffer[50] = "";
char OutBuffer[50] = "";
DWORD BytesRead;
while(1)
{
strcpy(InBuffer,"");
strcpy(OutBuffer,"");
printf("Input Data Please!\n");
scanf("%s",InBuffer);
rc = strcmp(InBuffer,"end");
if(rc == 0)
{
rc = CallNamedPipe(lpName,InBuffer,sizeof(InBuffer),OutBuffer,
sizeof(OutBuffer),&BytesRead,NMPWAIT_USE_DEFAULT_WAIT);
break;
}
rc = WaitNamedPipe(lpName,NMPWAIT_WAIT_FOREVER);
if(rc == 0)
{
err = GetLastError();
printf("Wait Pipe Fail!err = %d\n",err);
exit(1);
}
else printf("Wait Pipe Success!\n");
rc = CallNamedPipe(lpName,InBuffer,sizeof(InBuffer),OutBuffer,
sizeof(OutBuffer),&BytesRead,NMPWAIT_USE_DEFAULT_WAIT);
rc = strcmp(OutBuffer,"end");
if(rc == 0) break;
if(rc == 0)
{
err = GetLastError();
printf("Pipe Call Fail!err = %d\n",err);
exit(1);
}
else printf("Pipe Call Success!\nDATA from Server is %s\n",OutBuffer);
}
printf("Now Client to be End!\n");
return nRetCode;
}
编译生成client.exe文件。

3) 先运行server.exe文件,再运行client.exe文件,分析运行结果。

四、心得体会:
通过本次实验了解了管道进程间通信形式,掌握利用管道进行进程通信的程序设计,管道是半双工的,数据只能向一个方向流动;需要双方通信时,需要建立起两个管道; 单独构成一种独立的文件系统:管道对于管道两端的进程而言,就是一个文件,但它不是普通的文件,它不属于某种文件系统,而是自立门户,单独构成一种文件系统。数据的读出和写入:一个进程向管道中写的内容被管道另一端的进程读出。基本达到了本次实验的要求。另外,对于共享内存通信的工作机制也有了一定的了解,掌握线程与进程在组成成分上的差别,以及与其相适应的通讯方式和应用目标。也让我对管道及共享区的作用和用法,以及对操作系统中各进程之间的通信和协同作用等方面有了更深的了解。总之,本次实验自己收获了很多。
智能推荐
oracle 12c 集群安装后的检查_12c查看crs状态-程序员宅基地
文章浏览阅读1.6k次。安装配置gi、安装数据库软件、dbca建库见下:http://blog.csdn.net/kadwf123/article/details/784299611、检查集群节点及状态:[root@rac2 ~]# olsnodes -srac1 Activerac2 Activerac3 Activerac4 Active[root@rac2 ~]_12c查看crs状态
解决jupyter notebook无法找到虚拟环境的问题_jupyter没有pytorch环境-程序员宅基地
文章浏览阅读1.3w次,点赞45次,收藏99次。我个人用的是anaconda3的一个python集成环境,自带jupyter notebook,但在我打开jupyter notebook界面后,却找不到对应的虚拟环境,原来是jupyter notebook只是通用于下载anaconda时自带的环境,其他环境要想使用必须手动下载一些库:1.首先进入到自己创建的虚拟环境(pytorch是虚拟环境的名字)activate pytorch2.在该环境下下载这个库conda install ipykernelconda install nb__jupyter没有pytorch环境
国内安装scoop的保姆教程_scoop-cn-程序员宅基地
文章浏览阅读5.2k次,点赞19次,收藏28次。选择scoop纯属意外,也是无奈,因为电脑用户被锁了管理员权限,所有exe安装程序都无法安装,只可以用绿色软件,最后被我发现scoop,省去了到处下载XXX绿色版的烦恼,当然scoop里需要管理员权限的软件也跟我无缘了(譬如everything)。推荐添加dorado这个bucket镜像,里面很多中文软件,但是部分国外的软件下载地址在github,可能无法下载。以上两个是官方bucket的国内镜像,所有软件建议优先从这里下载。上面可以看到很多bucket以及软件数。如果官网登陆不了可以试一下以下方式。_scoop-cn
Element ui colorpicker在Vue中的使用_vue el-color-picker-程序员宅基地
文章浏览阅读4.5k次,点赞2次,收藏3次。首先要有一个color-picker组件 <el-color-picker v-model="headcolor"></el-color-picker>在data里面data() { return {headcolor: ’ #278add ’ //这里可以选择一个默认的颜色} }然后在你想要改变颜色的地方用v-bind绑定就好了,例如:这里的:sty..._vue el-color-picker
迅为iTOP-4412精英版之烧写内核移植后的镜像_exynos 4412 刷机-程序员宅基地
文章浏览阅读640次。基于芯片日益增长的问题,所以内核开发者们引入了新的方法,就是在内核中只保留函数,而数据则不包含,由用户(应用程序员)自己把数据按照规定的格式编写,并放在约定的地方,为了不占用过多的内存,还要求数据以根精简的方式编写。boot启动时,传参给内核,告诉内核设备树文件和kernel的位置,内核启动时根据地址去找到设备树文件,再利用专用的编译器去反编译dtb文件,将dtb还原成数据结构,以供驱动的函数去调用。firmware是三星的一个固件的设备信息,因为找不到固件,所以内核启动不成功。_exynos 4412 刷机
Linux系统配置jdk_linux配置jdk-程序员宅基地
文章浏览阅读2w次,点赞24次,收藏42次。Linux系统配置jdkLinux学习教程,Linux入门教程(超详细)_linux配置jdk
随便推点
matlab(4):特殊符号的输入_matlab微米怎么输入-程序员宅基地
文章浏览阅读3.3k次,点赞5次,收藏19次。xlabel('\delta');ylabel('AUC');具体符号的对照表参照下图:_matlab微米怎么输入
C语言程序设计-文件(打开与关闭、顺序、二进制读写)-程序员宅基地
文章浏览阅读119次。顺序读写指的是按照文件中数据的顺序进行读取或写入。对于文本文件,可以使用fgets、fputs、fscanf、fprintf等函数进行顺序读写。在C语言中,对文件的操作通常涉及文件的打开、读写以及关闭。文件的打开使用fopen函数,而关闭则使用fclose函数。在C语言中,可以使用fread和fwrite函数进行二进制读写。 Biaoge 于2024-03-09 23:51发布 阅读量:7 ️文章类型:【 C语言程序设计 】在C语言中,用于打开文件的函数是____,用于关闭文件的函数是____。
Touchdesigner自学笔记之三_touchdesigner怎么让一个模型跟着鼠标移动-程序员宅基地
文章浏览阅读3.4k次,点赞2次,收藏13次。跟随鼠标移动的粒子以grid(SOP)为partical(SOP)的资源模板,调整后连接【Geo组合+point spirit(MAT)】,在连接【feedback组合】适当调整。影响粒子动态的节点【metaball(SOP)+force(SOP)】添加mouse in(CHOP)鼠标位置到metaball的坐标,实现鼠标影响。..._touchdesigner怎么让一个模型跟着鼠标移动
【附源码】基于java的校园停车场管理系统的设计与实现61m0e9计算机毕设SSM_基于java技术的停车场管理系统实现与设计-程序员宅基地
文章浏览阅读178次。项目运行环境配置:Jdk1.8 + Tomcat7.0 + Mysql + HBuilderX(Webstorm也行)+ Eclispe(IntelliJ IDEA,Eclispe,MyEclispe,Sts都支持)。项目技术:Springboot + mybatis + Maven +mysql5.7或8.0+html+css+js等等组成,B/S模式 + Maven管理等等。环境需要1.运行环境:最好是java jdk 1.8,我们在这个平台上运行的。其他版本理论上也可以。_基于java技术的停车场管理系统实现与设计
Android系统播放器MediaPlayer源码分析_android多媒体播放源码分析 时序图-程序员宅基地
文章浏览阅读3.5k次。前言对于MediaPlayer播放器的源码分析内容相对来说比较多,会从Java-&amp;gt;Jni-&amp;gt;C/C++慢慢分析,后面会慢慢更新。另外,博客只作为自己学习记录的一种方式,对于其他的不过多的评论。MediaPlayerDemopublic class MainActivity extends AppCompatActivity implements SurfaceHolder.Cal..._android多媒体播放源码分析 时序图
java 数据结构与算法 ——快速排序法-程序员宅基地
文章浏览阅读2.4k次,点赞41次,收藏13次。java 数据结构与算法 ——快速排序法_快速排序法