Ubuntu 16.04 LTS Tensorflow-CPU/Cuda9.0 + Cudnn7.0.5 + Tensorflow-GPU_correct kernel headers and development packages in-程序员宅基地
技术标签: 环境配置
概述
- 此教程为Ubuntu 16.04 下 Tensorflow-GPU或者CPU版本的安装
- 安装前,请务必执行1.1.1的操作,验证您的显卡是NIVIDIA的并且支持GPU计算。如果不支持GPU运算,则只能安装Tensorflow-CPU版本,直接跳过1、2、3大标题,从4. Virtualenv + Tensorflow1.5处开始,并选择安装CPU版本
- 注意!!安装CUDA和cuDNN时,都不要安装最新版本,一切按照本篇中的版本进行安装。
1. NVIDIA CUDA Toolkit 9.0
1.1 Pre-installation Actions
1.1.1 Verify the system has a CUDA-capable GPU.
type the following at the command line to get the information of your graphics card
$ lspci | grep -i nvidiaIf your graphics card is from NVIDIA and it is listed in here, your GPU is CUDA-capable.
1.1.2 Verify the system is running a supported version of Linux.
The CUDA Development Tools are only supported on some specific distributions of Linux. These are listed in the CUDA Toolkit release notes.
To determine which distribution and release number you’re running, type the following at the command line:
$ uname -m && cat /etc/*releaseYou should see output similar to the following, modified for your particular system:
x86_64
Red Hat Enterprise Linux Workstation release 6.0 (Santiago)
The x86_64 line indicates you are running on a 64-bit system. The remainder gives information about your distribution.
1.1.3 Verify the system has gcc installed.
To verify the version of gcc installed on your system, type the following on the command line:
$ gcc --versionIf an error message displays, you need to install the development tools from your Linux distribution or obtain a version of gcc and its accompanying toolchain from the Web.
1.1.4 Verify the system has the correct kernel headers and development packages installed.
The kernel headers and development packages for the currently running kernel can be installed with:
$ sudo apt-get install linux-headers-$(uname -r)
1.2 Install
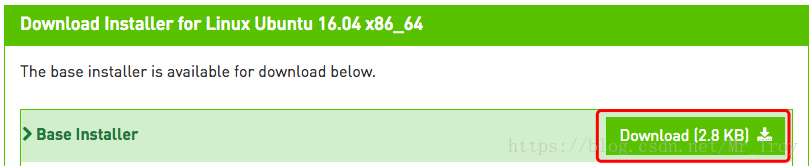
1.2.1 Download the CUDA Toolkit 9.0
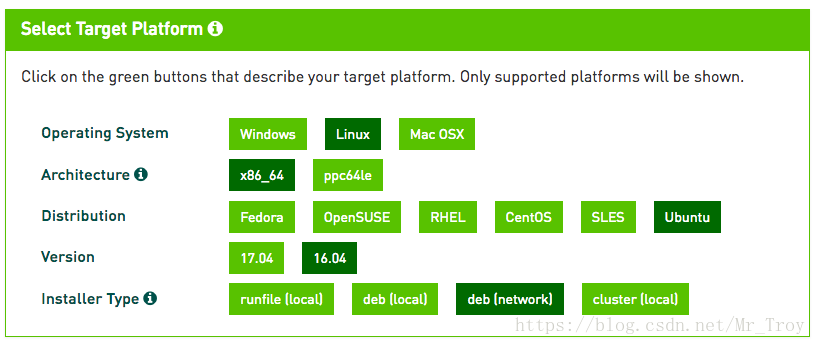
1.2.2 Install the CUDA Toolkit 9.0
$ cd ~/Downloads
$ sudo dpkg -i cuda-repo-ubuntu1604_9.0.176-1_amd64.deb
$ sudo apt-key adv --fetch-keys http://developer.download.nvidia.com/compute/cuda/repos/ubuntu1604/x86_64/7fa2af80.pub
$ sudo apt-get update
$ sudo apt-get install cuda-9-0
1.3 Post-installation Actions
$ export PATH=/usr/local/cuda-9.0/bin${
    PATH:+:${
    PATH}}
$ export LD_LIBRARY_PATH=/usr/local/cuda-9.0/lib64\
                         ${
    LD_LIBRARY_PATH:+:${
LD_LIBRARY_PATH}}- 重启以更新环境变量
2. cuDNN v7.0
2.1 Download
To download the cuDNN , click here
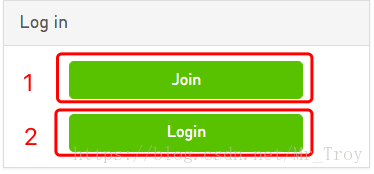
The download of cuDNN requires membership of the NVIDIA Developer Program,so you need to create your account first and then Login.
Do not choose the latest version

Choose the v7.0.5 for CUDA 9.0

Download Runtime 、 Developer 、Code Samples

2.2 Install
$ cd ~/Downloads
$ sudo dpkg -i libcudnn7_7.0.5.15-1+cuda9.0_amd64.deb
$ sudo dpkg -i libcudnn7-dev_7.0.5.15-1+cuda9.0_amd64.deb
$ sudo dpkg -i libcudnn7-doc_7.0.5.15-1+cuda9.0_amd64.deb
2.3 Verifying
To verify that cuDNN is installed and is running properly, compile the mnistCUDNN
- Copy the cuDNN sample to a writable path.
$ cp -r /usr/src/cudnn_samples_v7/ $HOME- Go to the writable path.
$ cd $HOME/cudnn_samples_v7/mnistCUDNN- Compile the mnistCUDNN sample.
$ make clean && make- Run the mnistCUDNN sample.
$ ./mnistCUDNNIf cuDNN is properly installed and running on your Linux system, you will see a
message similar to the following:
Test passed!3. Virtualenv + Tensorflow1.5
3.1 Install the Virtualenv
- 发出下列其中一条命令来安装 pip 和 Virtualenv:
$ sudo apt-get install python3-pip python3-dev python-virtualenv- 发出下列其中一条命令来创建 Virtualenv 环境:
$ sudo virtualenv --system-site-packages -p python3 ~/tensorflow targetDirectory 用于指定 Virtualenv 树的顶层目录。我们的说明中假定 targetDirectory 为 ~/tensorflow,但您可以选择任何目录。
3.2 source the Virtualenv
- 为了避免每次激活输入长命令,我们用tensorflow来代替”source ~/tensorflow/bin/activate”。
- 打开~/.bashrc file文件
$ sudo gedit ~/.bashrc- 文件最后一行追加一行,然后保存并关闭文件
alias tensorflow="source ~/tensorflow/bin/activate"- 无需重启的更新环境变量的方法
$ source ~/.bashrc- 发出下列其中一条命令来激活 Virtualenv 环境:
$ tensorflow- 执行上述 source 命令后,您的提示符应该会变成如下内容则表示成功
(tensorflow)$ 3.3 Install the Tensorflow
发出下列其中一条命令以在处于活动状态的 Virtualenv 环境中安装
TensorFlow-CPU版本(无需安装CUDA和CUDNN)
(tensorflow)$ sudo pip3 install --upgrade tensorflow- TensorFlow-GPU版本(需要安装CUDA和CUDNN)
(tensorflow)$ sudo pip3 install --upgrade tensorflow-gpu4.3 Verifying the Tensorflow
$ tensorflow
(tensorflow)$ Python3
>> import tensorflow as tf
>> hello = tf.constant('Hello, TensorFlow!')
>> sess = tf.Session()
>> print(sess.run(hello))
若如果系统输出以下内容,就说明您可以开始编写 TensorFlow 程序了:
Hello, TensorFlow!智能推荐
leetcode 172. 阶乘后的零-程序员宅基地
文章浏览阅读63次。题目给定一个整数 n,返回 n! 结果尾数中零的数量。解题思路每个0都是由2 * 5得来的,相当于要求n!分解成质因子后2 * 5的数目,由于n中2的数目肯定是要大于5的数目,所以我们只需要求出n!中5的数目。C++代码class Solution {public: int trailingZeroes(int n) { ...
Day15-【Java SE进阶】IO流(一):File、IO流概述、File文件对象的创建、字节输入输出流FileInputStream FileoutputStream、释放资源。_outputstream释放-程序员宅基地
文章浏览阅读992次,点赞27次,收藏15次。UTF-8是Unicode字符集的一种编码方案,采取可变长编码方案,共分四个长度区:1个字节,2个字节,3个字节,4个字节。文件字节输入流:每次读取多个字节到字节数组中去,返回读取的字节数量,读取完毕会返回-1。注意1:字符编码时使用的字符集,和解码时使用的字符集必须一致,否则会出现乱码。定义一个与文件一样大的字节数组,一次性读取完文件的全部字节。UTF-8字符集:汉字占3个字节,英文、数字占1个字节。GBK字符集:汉字占2个字节,英文、数字占1个字节。GBK规定:汉字的第一个字节的第一位必须是1。_outputstream释放
jeecgboot重新登录_jeecg 登录自动退出-程序员宅基地
文章浏览阅读1.8k次,点赞3次,收藏3次。解决jeecgboot每次登录进去都会弹出请重新登录问题,在utils文件下找到request.js文件注释这段代码即可_jeecg 登录自动退出
数据中心供配电系统负荷计算实例分析-程序员宅基地
文章浏览阅读3.4k次。我国目前普遍采用需要系数法和二项式系数法确定用电设备的负荷,其中需要系数法是国际上普遍采用的确定计算负荷的方法,最为简便;而二项式系数法在确定设备台数较少且各台设备容量差..._数据中心用电负荷统计变压器
HTML5期末大作业:网页制作代码 网站设计——人电影网站(5页) HTML+CSS+JavaScript 学生DW网页设计作业成品 dreamweaver作业静态HTML网页设计模板_网页设计成品百度网盘-程序员宅基地
文章浏览阅读7k次,点赞4次,收藏46次。HTML5期末大作业:网页制作代码 网站设计——人电影网站(5页) HTML+CSS+JavaScript 学生DW网页设计作业成品 dreamweaver作业静态HTML网页设计模板常见网页设计作业题材有 个人、 美食、 公司、 学校、 旅游、 电商、 宠物、 电器、 茶叶、 家居、 酒店、 舞蹈、 动漫、 明星、 服装、 体育、 化妆品、 物流、 环保、 书籍、 婚纱、 军事、 游戏、 节日、 戒烟、 电影、 摄影、 文化、 家乡、 鲜花、 礼品、 汽车、 其他 等网页设计题目, A+水平作业_网页设计成品百度网盘
【Jailhouse 文章】Look Mum, no VM Exits_jailhouse sr-iov-程序员宅基地
文章浏览阅读392次。jailhouse 文章翻译,Look Mum, no VM Exits!_jailhouse sr-iov
随便推点
chatgpt赋能python:Python怎么删除文件中的某一行_python 删除文件特定几行-程序员宅基地
文章浏览阅读751次。本文由chatgpt生成,文章没有在chatgpt生成的基础上进行任何的修改。以上只是chatgpt能力的冰山一角。作为通用的Aigc大模型,只是展现它原本的实力。对于颠覆工作方式的ChatGPT,应该选择拥抱而不是抗拒,未来属于“会用”AI的人。AI职场汇报智能办公文案写作效率提升教程 专注于AI+职场+办公方向。下图是课程的整体大纲下图是AI职场汇报智能办公文案写作效率提升教程中用到的ai工具。_python 删除文件特定几行
Java过滤特殊字符的正则表达式_java正则表达式过滤特殊字符-程序员宅基地
文章浏览阅读2.1k次。【代码】Java过滤特殊字符的正则表达式。_java正则表达式过滤特殊字符
CSS中设置背景的7个属性及简写background注意点_background设置背景图片-程序员宅基地
文章浏览阅读5.7k次,点赞4次,收藏17次。css中背景的设置至关重要,也是一个难点,因为属性众多,对应的属性值也比较多,这里详细的列举了背景相关的7个属性及对应的属性值,并附上演示代码,后期要用的话,可以随时查看,那我们坐稳开车了······1: background-color 设置背景颜色2:background-image来设置背景图片- 语法:background-image:url(相对路径);-可以同时为一个元素指定背景颜色和背景图片,这样背景颜色将会作为背景图片的底色,一般情况下设置背景..._background设置背景图片
Win10 安装系统跳过创建用户,直接启用 Administrator_windows10msoobe进程-程序员宅基地
文章浏览阅读2.6k次,点赞2次,收藏8次。Win10 安装系统跳过创建用户,直接启用 Administrator_windows10msoobe进程
PyCharm2021安装教程-程序员宅基地
文章浏览阅读10w+次,点赞653次,收藏3k次。Windows安装pycharm教程新的改变功能快捷键合理的创建标题,有助于目录的生成如何改变文本的样式插入链接与图片如何插入一段漂亮的代码片生成一个适合你的列表创建一个表格设定内容居中、居左、居右SmartyPants创建一个自定义列表如何创建一个注脚注释也是必不可少的KaTeX数学公式新的甘特图功能,丰富你的文章UML 图表FLowchart流程图导出与导入导出导入下载安装PyCharm1、进入官网PyCharm的下载地址:http://www.jetbrains.com/pycharm/downl_pycharm2021
《跨境电商——速卖通搜索排名规则解析与SEO技术》一一1.1 初识速卖通的搜索引擎...-程序员宅基地
文章浏览阅读835次。本节书摘来自异步社区出版社《跨境电商——速卖通搜索排名规则解析与SEO技术》一书中的第1章,第1.1节,作者: 冯晓宁,更多章节内容可以访问云栖社区“异步社区”公众号查看。1.1 初识速卖通的搜索引擎1.1.1 初识速卖通搜索作为速卖通卖家都应该知道,速卖通经常被视为“国际版的淘宝”。那么请想一下,普通消费者在淘宝网上购买商品的时候,他的行为应该..._跨境电商 速卖通搜索排名规则解析与seo技术 pdf