如何用FFmpeg将输出的TS流写到内存-程序员宅基地
最近需要实现一个功能:利用FFmpeg将编码出来的视频流和音频流混合封装成TS格式,然后通过自定义协议将TS流发送出去。因为发送协议是自己定义的,FFmpeg不支持这种网络协议,不能用它内置的协议。后来发现原来FFmpeg也支持将输出的流回调到给上层去处理,下面简单讲一下实现的流程。
首先,我们按照把流输出到文件的方式来处理,但是有小小的不同,下面是初始化输出流的代码:
AVOutputFormat *m_fmt;
AVFormatContext *m_oc;
AVStream *audio_st, *video_st;
typedef struct _capstuff {
UINT m_nPixelFormat; //enum PixelFormat
int m_videobitrate; //视频码率
int m_audiobitrate; //音频码率
int m_audio_samplerate; //音频采样率
int m_framerate; //帧率
UINT m_nRCMode; //视频的编码模式,0--CBR, 1--VBR
UINT m_StreamType; //0--Video, 1--Audio, 2--Video+Audio
UINT m_IFramesIntervals; //关键帧间距
UINT m_nVideoCodec;//CodecID
UINT m_nAudioCodec; //CodecID
UINT m_Quant; //质量系数
char m_szFormatName[64]; //流的封装格式,比如TS,MOV,MPG,MP4
BOOL m_bDefaultCodec;
}CAPSTUFF;
CAPSTUFF m_CapStuff[8]; //最多支持8个输入流BOOL CVideoDevice::InitFFmpeg()
{
m_fmt = NULL;
m_oc = NULL;
/* initialize libavcodec, and register all codecs and formats */
av_register_all();
char outputformat[64] = {0};
strcpy(outputformat, "1.ts"); //默认使用TS
/* allocate the output media context */
avformat_alloc_output_context2(&m_oc, NULL, NULL, outputformat);
if (!m_oc) {
TRACE("Could not deduce output format from file extension: using MPEG.\n");
avformat_alloc_output_context2(&m_oc, NULL, "mpeg", "1.mpg");
}
if (!m_oc) {
return FALSE;
}
m_fmt = m_oc->oformat;
#if 0
const char *filename = "D:\\camera_ffmpeg.ts";
strcpy(m_oc->filename, filename);
#else
const char *filename = outputformat;
unsigned char* outbuffer = NULL;
outbuffer = (unsigned char*)av_malloc(65536);
AVIOContext *avio_out = avio_alloc_context(outbuffer, 65536, 0, this, NULL, write_buffer,NULL);
m_oc->pb = avio_out;
m_oc->flags |= AVFMT_FLAG_CUSTOM_IO;
m_oc->flags |= AVFMT_FLAG_FLUSH_PACKETS;
m_fmt->flags |= AVFMT_NOFILE; //不生成文件
#endif
/* add the audio and video streams using the default format codecs
and initialize the codecs */
video_st = NULL;
audio_st = NULL;
if (m_fmt->video_codec != CODEC_ID_NONE) {
video_st = add_video_stream(m_oc,
(CodecID)m_CapStuff[0].m_nVideoCodec,
m_CapStuff[0].m_capwidth, m_CapStuff[0].m_capheight,
m_CapStuff[0].m_videobitrate, m_CapStuff[0].m_framerate,
m_CapStuff[0].m_IFramesIntervals);
}
if (m_fmt->audio_codec != CODEC_ID_NONE) {
audio_st = add_audio_stream(m_oc,
(CodecID)m_CapStuff[0].m_nAudioCodec,
m_CapStuff[0].m_audiobitrate, m_CapStuff[0].m_audio_samplerate, 2);
}
//av_dump_format(m_oc, 0, filename, 1);
/* now that all the parameters are set, we can open the audio and
video codecs and allocate the necessary encode buffers */
if (video_st)
open_video(m_oc, video_st);
if (audio_st)
open_audio(m_oc, audio_st);
#if 1
/* open the output file, if needed */
if (!(m_fmt->flags & AVFMT_NOFILE))
{
if (avio_open(&m_oc->pb, filename, AVIO_FLAG_WRITE) < 0)
{
TRACE("Could not open %s\n", filename);
return FALSE;
}
}
#endif
/* write the stream header, if any */
avformat_write_header(m_oc, NULL);
return TRUE;
}上面的CVideoDevice::InitFFmpeg()函数先生成了一个AVFormatContext类型的输出流上下文对象,并且指定输出格式为TS。然后调用avio_alloc_context函数,关键是这个函数,它指定了对流处理的几个相关的回调函数。
AVIOContext *avio_alloc_context(
                  unsigned char *buffer,
                  int buffer_size,
                  int write_flag,
                  void *opaque,
                  int (*read_packet)(void *opaque, uint8_t *buf, int buf_size),//重写该函数,指定从内存中读取的方法,将buf_size字节大小的数据保存到buf
                  int (*write_packet)(void *opaque, uint8_t *buf, int buf_size),//对应的这是写内存的函数
                  int64_t (*seek)(void *opaque, int64_t offset, int whence));
在我的应用中,需要实现write_packet回调函数,这样FFmpeg输出的流就会通过这个回调函数传递给应用层。下面是我的write_packet回调函数的实现:
int write_buffer(void *opaque, uint8_t *buf, int buf_size)
{
	CVideoDevice * pThisDev = (CVideoDevice*)opaque;

	pThisDev->m_pStreamSender->AddData(buf, buf_size, 0, 1);
	return buf_size;
}
它只是把传过来的数据送给自己的协议层去处理。
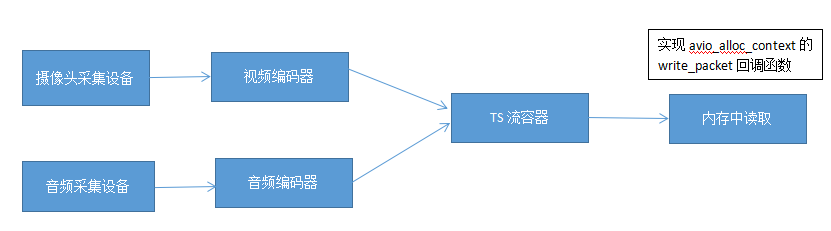
整个方案的处理流程图如下:
但是目前还没有完毕,我们要输出TS流必须调用av_interleaved_write_frame将编码器出来的数据写进TS流容器,那么write_packet回调函数才会有数据回调。下面是一段示例的代码:
void CVideoDevice::write_video_frame(AVFormatContext *oc, AVStream *st, PixelFormat pixformat, BYTE * pSrcData, DWORD dbSize, INT64 lTimeStamp)
{
	int out_size, ret = 0;
	AVCodecContext *c;

	c = st->codec;

	int	Y_PLANE_SIZE;
	int	U2_PLANE_SIZE;
	int	V2_PLANE_SIZE;

	Y_PLANE_SIZE  = c->width * c->height;
	U2_PLANE_SIZE = Y_PLANE_SIZE/4;
	V2_PLANE_SIZE = Y_PLANE_SIZE/4;

	uint8_t  *dest_y = pSrcData;
	uint8_t  *dest_u = pSrcData + Y_PLANE_SIZE;
	uint8_t  *dest_v = pSrcData + Y_PLANE_SIZE + V2_PLANE_SIZE;

	picture->linesize[0] = c->width;
	picture->linesize[1] = c->width / 2;
	picture->linesize[2] = c->width / 2;
	picture->data[0] = dest_y;
	picture->data[1] = dest_v;
	picture->data[2] = dest_u;

	int out_size = avcodec_encode_video(c, video_outbuf, video_outbuf_size, picture);

	if (out_size > 0)
	{
		picture->pts += 1;

		AVPacket pkt;
		av_init_packet(&pkt);
		pkt.data = NULL;
		pkt.size = 0;

		pkt.pts = (INT64)st->time_base.den * (lTimeStamp)/SYSTEM_CLOCK_TIME_BASE;

		if(c->coded_frame->key_frame)
			pkt.flags |= AV_PKT_FLAG_KEY;

		pkt.stream_index= st->index;
		pkt.data = video_outbuf;
		pkt.size = out_size;

		//TRACE("video pkt.pts: %ld\n",  pkt.pts);

		ret = av_interleaved_write_frame(oc, &pkt);

		//av_free_packet(&pkt);
	}
}
注意:
(1) 上面代码有个问题,如果 avio_alloc_context函数调用写成这样形式:
avio_alloc_context(outbuffer, 65536, 0, this, NULL, write_buffer,NULL);
则会卡在av_interleaved_write_frame或av_write_frame函数,并且write_buffer回调没有被调用。
这个问题卡了我好久,后来找到解决办法,解决方法是:将 avio_alloc_context的第三个参数改成1,即改为:
avio_alloc_context(outbuffer, 65536, 1, this, NULL, write_buffer,NULL);
这样就可以成功将Muxer输出的数据写到内存。
(2)avio_alloc_context的第二个参数是分配的输出缓冲区大小,如果赋值为65536,则write_buffer函数每次回调传入的字节数都是65536,但是我们可能更希望它写入了每一帧就回调当前帧的数据长度,如果是这样,必须设置AVFMT_FLAG_FLUSH_PACKETS参数,设置示例代码如下:
m_oc->flags |= AVFMT_FLAG_FLUSH_PACKETS;
下面给个较为详细的例子(将H264文件转为PS流,并输出到内存):
FILE *file = NULL;

int write_packet(void *opaque, uint8_t *buf, int buf_size)
{
	//printf("write data\n");
	if (file)
		fwrite(buf, buf_size, 1, file);//可以写文件,也可以通过协议发出去
	return 0;
}

//将一个H264文件(或其他格式)转为PS文件
int main(int argc, char **argv)
{
	fopen_s(&file, "output.dat", "ab+");//输出ps数据到文件
	if (file == NULL)
		printf("open output file failed\n");

	AVIOContext* pb = NULL;
	AVOutputFormat *ofmt = (AVOutputFormat*)av_mallocz(sizeof(AVOutputFormat));//输出格式
	AVFormatContext *ifmt_ctx = NULL, *ofmt_ctx = NULL;
	AVPacket pkt;
	const char *in_filename, *out_filename;
	int ret, i;
	in_filename = "hello.h264";//源文件

	av_register_all();

	if ((ret = avformat_open_input(&ifmt_ctx, in_filename, 0, 0)) < 0) {
		fprintf(stderr, "Could not open input file '%s'", in_filename);
		goto end;
	}
	if ((ret = avformat_find_stream_info(ifmt_ctx, 0)) < 0) {
		fprintf(stderr, "Failed to retrieve input stream information");
		goto end;
	}
	av_dump_format(ifmt_ctx, 0, in_filename, 0);

	uint8_t* buf = (uint8_t*)av_mallocz(sizeof(uint8_t)* 32768);
	pb = avio_alloc_context(buf, 32768, 1, NULL, NULL, write_packet, NULL);//注意:第3个参数赋值为1,否则write_packet回调将不能被成功调用

	avformat_alloc_output_context2(&ofmt_ctx, NULL, "dvd", NULL/*out_filename*/);//设置输出视频的格式为Mpegs-ps,在ffmpeg定义为dvd。如果需要输出TS格式,则设置为"mpegts"

	if (!ofmt_ctx) {
		fprintf(stderr, "Could not create output context\n");
		ret = AVERROR_UNKNOWN;
		goto end;
	}
	ofmt_ctx->pb = pb;//这个是关键,指定ps输出的方式
	ofmt_ctx->flags |= AVFMT_FLAG_CUSTOM_IO;

	printf("output format:%s[%s]\n", ofmt_ctx->oformat->name, ofmt_ctx->oformat->long_name);
	ofmt = ofmt_ctx->oformat;
	//输出环境上下文的初始化
	for (i = 0; i < ifmt_ctx->nb_streams; i++) {
		AVStream *in_stream = ifmt_ctx->streams[i];
		//Add a new stream to a media file
		AVStream *out_stream = avformat_new_stream(ofmt_ctx, in_stream->codec->codec);
		if (!out_stream) {
			fprintf(stderr, "Failed allocating output stream\n");
			ret = AVERROR_UNKNOWN;
			goto end;
		}
		ret = avcodec_copy_context(out_stream->codec, in_stream->codec);
		if (ret < 0) {
			fprintf(stderr, "Failed to copy context from input to output stream codec context\n");
			goto end;
		}
		out_stream->codec->codec_tag = 0;
		if (ofmt_ctx->oformat->flags & AVFMT_GLOBALHEADER)
			out_stream->codec->flags |= CODEC_FLAG_GLOBAL_HEADER;
	}
	av_dump_format(ofmt_ctx, 0, NULL, 1);
	ret = avformat_write_header(ofmt_ctx, NULL);
	if (ret < 0) {
		fprintf(stderr, "Error occurred when opening output file\n");
		goto end;
	}

	int nVideoFramesNum = 0;

	//实现REMUXING
	while (1) {
		AVStream *in_stream, *out_stream;
		ret = av_read_frame(ifmt_ctx, &pkt);
		if (ret < 0)
			break;
		in_stream = ifmt_ctx->streams[pkt.stream_index];
		out_stream = ofmt_ctx->streams[pkt.stream_index];

		if(in_stream->codec->codec_type == AVMEDIA_TYPE_VIDEO)
		{
			if(pkt.pts == AV_NOPTS_VALUE) //FIX:No PTS (Example: Raw H.264)
			{
				AVRational time_base1 = out_stream->time_base;

				//Duration between 2 frames (us)
				int64_t calc_duration =(double)AV_TIME_BASE/av_q2d(in_stream->r_frame_rate);

				pkt.pts = (double)(nVideoFramesNum*calc_duration)/(double)(av_q2d(time_base1)*AV_TIME_BASE);
				pkt.dts = pkt.pts;
				pkt.duration = (double)calc_duration/(double)(av_q2d(time_base1)*AV_TIME_BASE);
			}
			else
			{
				pkt.pts = av_rescale_q_rnd(pkt.pts, in_stream->time_base, out_stream->time_base, (AVRounding)(AV_ROUND_NEAR_INF | AV_ROUND_PASS_MINMAX));
				pkt.dts = av_rescale_q_rnd(pkt.dts, in_stream->time_base, out_stream->time_base, (AVRounding)(AV_ROUND_NEAR_INF | AV_ROUND_PASS_MINMAX));
				pkt.duration = av_rescale_q(pkt.duration, in_stream->time_base, out_stream->time_base);
				pkt.pos = -1;
			}

			nVideoFramesNum++;
		}
		else
		{
			pkt.pts = av_rescale_q_rnd(pkt.pts, in_stream->time_base, out_stream->time_base, (AVRounding)(AV_ROUND_NEAR_INF | AV_ROUND_PASS_MINMAX));
			pkt.dts = av_rescale_q_rnd(pkt.dts, in_stream->time_base, out_stream->time_base, (AVRounding)(AV_ROUND_NEAR_INF | AV_ROUND_PASS_MINMAX));
			pkt.duration = av_rescale_q(pkt.duration, in_stream->time_base, out_stream->time_base);
			pkt.pos = -1;
		}


		ret = av_interleaved_write_frame(ofmt_ctx, &pkt);
		if (ret < 0) {
			fprintf(stderr, "Error muxing packet\n");
			break;
		}
		av_free_packet(&pkt);
	}
	av_write_trailer(ofmt_ctx);
end:
	avformat_close_input(&ifmt_ctx);
	/* close output */
	if (ofmt_ctx && !(ofmt->flags & AVFMT_NOFILE))
		avio_close(ofmt_ctx->pb);
	avformat_free_context(ofmt_ctx);
	if (ret < 0 && ret != AVERROR_EOF) {
		return 1;
	}
	return 0;
}
(反过来的情况:如何让FFmpeg从内存中读取PS/TS流数据,以及怎么分离和解码视频可参考我的另外一篇博文:http://blog.csdn.net/zhoubotong2012/article/details/79349359)
智能推荐
Maven编译打包项目 mvn clean install报错ERROR_mvn clean install有errors-程序员宅基地
文章浏览阅读1.1k次。在项目的target文件夹下把之前"mvn clean package"生成的压缩包(我的是jar包)删掉重新执行"mvn clean package"再执行"mvn clean install"即可_mvn clean install有errors
navacate连接不上mysql_navicat连接mysql失败怎么办-程序员宅基地
文章浏览阅读974次。Navicat连接mysql数据库时,不断报1405错误,下面是针对这个的解决办法:MySQL服务器正在运行,停止它。如果是作为Windows服务运行的服务器,进入计算机管理--->服务和应用程序------>服务。如果服务器不是作为服务而运行的,可能需要使用任务管理器来强制停止它。创建1个文本文件(此处命名为mysql-init.txt),并将下述命令置于单一行中:SET PASSW..._nvarchar链接不上数据库
Python的requests参数及方法_python requests 参数-程序员宅基地
文章浏览阅读2.2k次。Python的requests模块是一个常用的HTTP库,用于发送HTTP请求和处理响应。_python requests 参数
近5年典型的的APT攻击事件_2010谷歌网络被极光黑客攻击-程序员宅基地
文章浏览阅读2.7w次,点赞7次,收藏50次。APT攻击APT攻击是近几年来出现的一种高级攻击,具有难检测、持续时间长和攻击目标明确等特征。本文中,整理了近年来比较典型的几个APT攻击,并其攻击过程做了分析(为了加深自己对APT攻击的理解和学习)Google极光攻击2010年的Google Aurora(极光)攻击是一个十分著名的APT攻击。Google的一名雇员点击即时消息中的一条恶意链接,引发了一系列事件导致这个搜_2010谷歌网络被极光黑客攻击
Android 开发的现状及发展前景_android现状-程序员宅基地
文章浏览阅读8.8k次,点赞3次,收藏31次。在几年前的时候,曾听过很多人说 Android 学习很简单,做个App就上手了,工作机会多,毕业后也比较容易找工作。这种观点可能是很多Android开发者最开始入行的原因之一。在工作初期,工作主要是按照业务需求实现App页面的功能,按照设计师的设计稿实现页面的效果。在实现的过程中,总是会被提如下的需求:这个字能不能大点或者醒目点儿?感觉颜色和设计稿有差别,能不能再调调?怎么老是崩溃啊,行不行啊?…所以,工作过一、两年后你会发现,自己每天重复工作内容就是将找各种各样的组件、框架,拖拖拽拽,改_android现状
php获取当月天数及当月第一天及最后一天、上月第一天及最后一天实现方法_php 判断是否月最后一天取上月月份-程序员宅基地
文章浏览阅读274次。在做查询过程中,例如要实现查上个月从第一天到最后一天的佣金(提成),那我们在程序实现过程中就要让程序在上个月的范围内查询,第一天是比较好办,但最后一天就不定,要去写段函数进行月份及年份判断来得出上个月共有多少天.那就比麻烦,还有获取当前月份,当前年份等常规日期获取函数,以下代码都是经过本公司工程师测试后的正确代码,可以放心使用. 1.获取上个月第一天及最后一天. echo date('_php 判断是否月最后一天取上月月份
随便推点
uploadify2.1.4如何能使按钮显示中文-程序员宅基地
文章浏览阅读48次。uploadify2.1.4如何能使按钮显示中文博客分类:uploadify网上关于这段话的搜索恐怕是太多了。方法多也试过了不知怎么,反正不行。最终自己想办法给解决了。当然首先还是要有fla源码。直接去管网就可以下载。[url]http://www.uploadify.com/wp-content/uploads/uploadify-v2.1.4...
戴尔服务器安装VMware ESXI6.7.0教程(U盘安装)_vmware-vcsa-all-6.7.0-8169922.iso-程序员宅基地
文章浏览阅读9.6k次,点赞5次,收藏36次。戴尔服务器安装VMware ESXI6.7.0教程(U盘安装)一、前期准备1、下载镜像下载esxi6.7镜像:VMware-VMvisor-Installer-6.7.0-8169922.x86_64.iso这里推荐到戴尔官网下载,Baidu搜索“戴尔驱动下载”,选择进入官网,根据提示输入服务器型号搜索适用于该型号服务器的所有驱动下一步选择具体类型的驱动选择一项下载即可待下载完成后打开软碟通(UItraISO),在“文件”选项中打开刚才下载好的镜像文件然后选择启动_vmware-vcsa-all-6.7.0-8169922.iso
百度语音技术永久免费的语音自动转字幕介绍 -程序员宅基地
文章浏览阅读2k次。百度语音技术永久免费的语音自动转字幕介绍基于百度语音技术,识别率97%无时长限制,无文件大小限制永久免费,简单,易用,速度快支持中文,英文,粤语永久免费的语音转字幕网站: http://thinktothings.com视频介绍 https://www.bilibili.com/video/av42750807 ...
Dyninst学习笔记-程序员宅基地
文章浏览阅读7.6k次,点赞2次,收藏9次。Instrumentation是一种直接修改程序二进制文件的方法。其可以用于程序的调试,优化,安全等等。对这个词一般的翻译是“插桩”,但这更多使用于软件测试领域。【找一些相关的例子】Dyninst可以动态或静态的修改程序的二进制代码。动态修改是在目标进程运行时插入代码(dynamic binary instrumentation)。静态修改则是直接向二进制文件插入代码(static b_dyninst
在服务器上部署asp网站,部署asp网站到云服务器-程序员宅基地
文章浏览阅读2.9k次。部署asp网站到云服务器 内容精选换一换通常情况下,需要结合客户的实际业务环境和具体需求进行业务改造评估,建议您进行服务咨询。这里仅描述一些通用的策略供您参考,主要分如下几方面进行考虑:业务迁移不管您的业务是否已经上线华为云,业务迁移的策略是一致的。建议您将时延敏感型,有快速批量就近部署需求的业务迁移至IEC;保留数据量大,且需要长期稳定运行的业务在中心云上。迁移方法请参见如何计算隔离独享计算资源..._nas asp网站
android开发之bitmap转数组的方法-程序员宅基地
文章浏览阅读4.7k次。/** 方法一 * 将bitmap转为数组的方法 * * @param bitmap 图片 * @return 返回数组 */ public byte[] getBytesByBitmap(Bitmap bitmap) { ByteBuffer buffer = ByteBuffer.allocate(bitmap.ge..._bitmap转数组