Android 硬件抽象层HAL 驱动编写方法演示_安卓hal开发用什么语言-程序员宅基地
技术标签: android android studio android11底层驱动开发入门 驱动开发 开发语言
概述
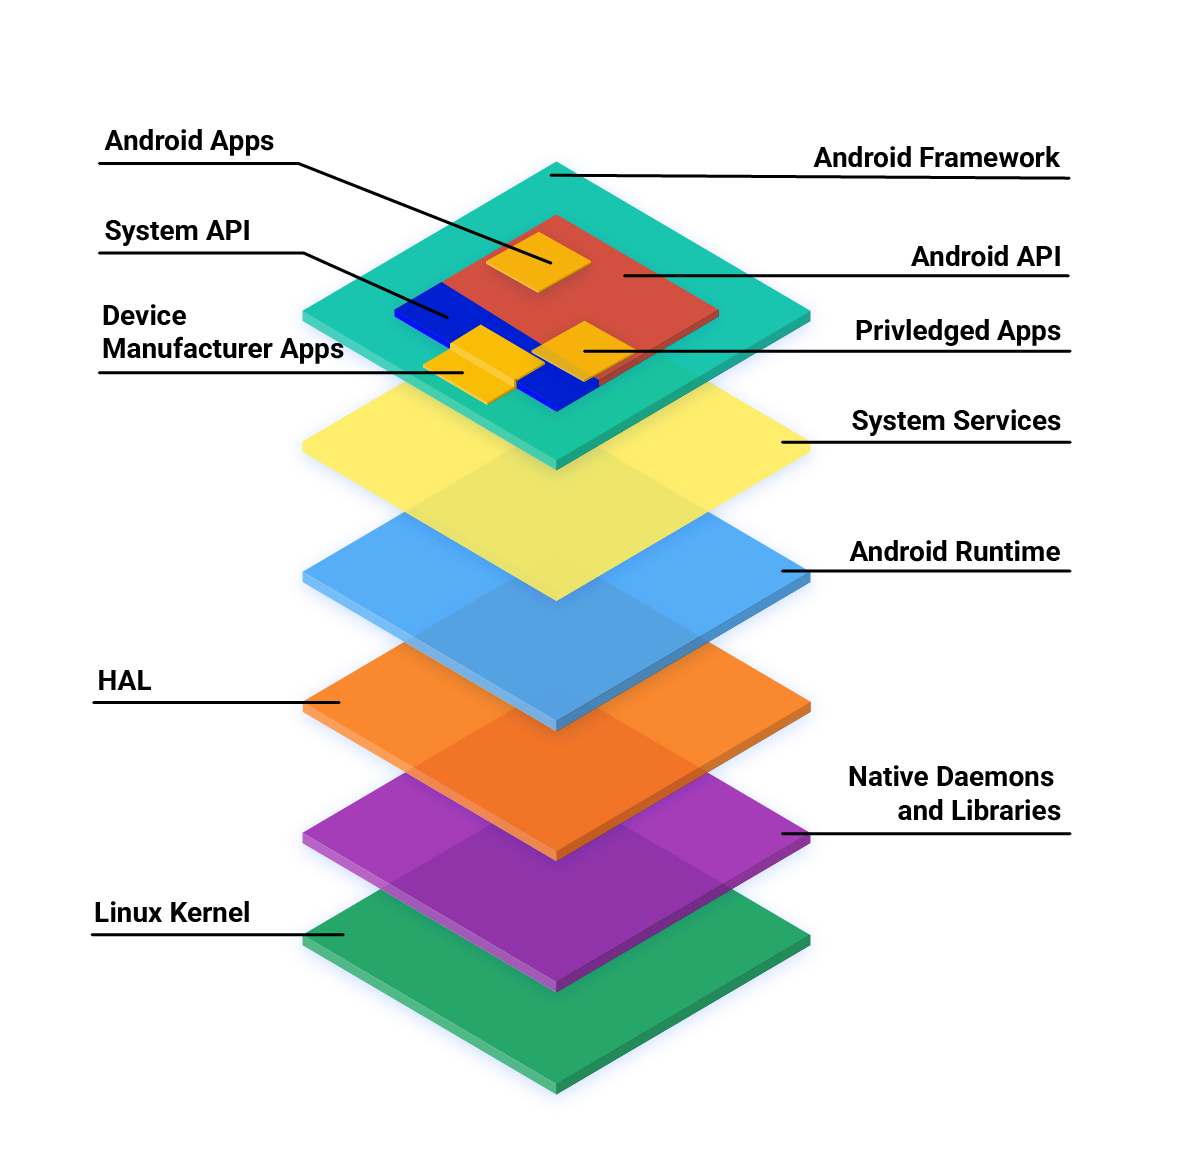
HAL 是一个抽象层,具有供硬件供应商实现的标准接口。 HAL 允许 Android 不了解较低级别的驱动程序实现。使用 HAL 允许您在不影响或修改更高级别系统的情况下实现功能。
HAL 开始语言是HIDL,它是一种接口描述语言,用与指定HAL与用户之间的接口。具体意思就是当你用HIDL语法定义好接口之后,可以自动生成c++接口代码,aosp的开发者就可以按照这些接口开发底层的功能了,而上层framework 也可以按照这个接口调用,换句话说这个就是双方约定好的一个规则,好处就是对于APP开发者来说无论底层硬件如何变化,应用程序是不需要修改的。而对于系统工程师来说,只要按照HIDL实现对应的硬件驱动即可,不需要考虑适配应用的问题,这点有点类似NDK,只不过NDK相对灵活面向应用层多一些。
值得注意的是从 Android 10 开始,HIDL 已被弃用,Android 正在迁移以在任何地方使用AIDL。
无论HIDL 还是AIDL 目的是一样的,但是运行思路有一些差异。
HIDL
HIDL 的目标是无需重新构建 HAL 即可替换 Android 框架。 HAL 将由供应商或 SOC 制造商构建,并放在设备上的/vendor分区中,从而使 Android 框架在其自己的分区中无需重新编译 HAL 即可替换为 OTA。
一般HIDL使用是直通模式,所谓直通模式就是HAL 包装在一个新的 HIDL 接口中,该接口以绑定和相同进程模式为 HAL 提供服务。这种包装对 HAL 和 Android 框架都是透明的。
直通模式仅适用于 C++ 客户端和实现。运行早期 Android 版本的设备没有用 Java 编写的 HAL,因此 Java HAL 本质上是绑定的。
HIDL也支持绑定模式,一般情况下给定一个 HAL 接口abcd@MN::IFoo,会创建2个包:
abcd@MN::IFoo-impl。包含 HAL 的实现并公开函数IFoo* HIDL_FETCH_IFoo(const char* name)。可以使用hidl-gen和-Lc++-impl和-Landroidbp-impl生成基本代码。abcd@MN::IFoo-service。打开直通 HAL 并将其自身注册为绑定服务,使相同的 HAL 实现既可用作直通,也可用作绑定服务。
HIDL C++
Android O 对 Android 操作系统的架构重新进行了设计,以在独立于设备的 Android 平台与特定于设备和供应商的代码之间定义清晰的接口。Android 已经以 HAL 接口的形式(在 hardware/libhardware 中定义为 C 头文件)定义了许多此类接口。HIDL 将这些 HAL 接口替换为带版本编号的稳定接口,它们可以是采用 C++(如下所述)或 JAVA的客户端和服务器端 HIDL 接口。
HIDL 的代码布局
HIDL 包括核心软件包和供应商软件包。
核心 HIDL 接口是指由 Google 指定的接口。此类接口所属的软件包以 android.hardware. 开头,并以子系统命名(可能采用嵌套层命名方式)。例如,NFC 软件包命名为 android.hardware.nfc,而相机软件包命名为 android.hardware.camera。一般来说,核心软件包的名称为 android.hardware.[name1].[name2]…。HIDL 软件包除了其名称之外,还有版本。例如,软件包 android.hardware.camera 的版本可以是 3.4;这一点非常重要,因为软件包的版本会影响其在源代码树中的位置。
所有核心软件包都位于构建系统中的 hardware/interfaces/ 下。$m.$n 版本的软件包 android.hardware.[name1].[name2]…位于 hardware/interfaces/name1/name2/…/$m.$n/ 下;3.4 版本的软件包 android.hardware.camera 位于目录 hardware/interfaces/camera/3.4/. 下。软件包前缀 android.hardware. 和路径 hardware/interfaces/ 之间存在硬编码映射。
非核心(供应商)软件包是指由 SoC 供应商或 ODM 开发的软件包。非核心软件包的前缀是 vendor.$(VENDOR).hardware.,其中 $(VENDOR) 是指 SoC 供应商或 OEM/ODM。此前缀会映射到源代码树中的路径 vendor/$(VENDOR)/interfaces(此映射也属于硬编码映射)。
HAL 层驱动开发演示
- 生成hidl-gen工具
# 进入安卓源码路径
$cd $AOSP
# 导入安卓源码路径环境变量
$export ANDROID_BUILD_TOP=/home/android/AOSP/buildsystem-x9-ptg3.8/android/
# 导入环境变量
$source $ANDROID_BUILD_TOP/build/envsetup.sh
# 生成hidl-gen
$make hidl-gen
# 生成路径 $ANDROID_BUILD_TOP/out/host/linux-x86/bin/
# 讲路径添加到环境变量
$export PATH=$PATH:/home/android/AOSP/buildsystem-x9-ptg3.8/android/out/host/linux-x86/bin- 创建文件
#在vendor中创建相关文件和目录
$mdkir -p $ANDROID_BUILD_TOP/vendor/sample/hardware/interfaces/helloworld/1.0
$cd $ANDROID_BUILD_TOP/vendor/sample/hardware/interfaces/helloworld/1.0
$touch  IHelloWorld.hal IHelloWorldCallback.hal types.hal
$touch $ANDROID_BUILD_TOP/vendor/sample/hardware/interfaces/Android.bp- 添加内容
helloworld/1.0/IHelloWorld.hal
package [email protected];

import IHelloWorldCallback;

interface IHelloWorld {
    initial();
    getInt() generates (int32_t i);
    setInt(int32_t val) generates (Result error);
    oneway setCallback(IHelloWorldCallback callback);
 };
helloworld/1.0/IHelloWorldCallback.hal
package [email protected];

interface IHelloWorldCallback {
    oneway onEvent(Event event);
 };
helloworld/1.0/types.hal
package [email protected];
enum Result : int32_t {
    OK,
    UNKNOWN,
    INVALID_ARGUMENTS,
};

struct Event {
    uint32_t type;
    uint32_t code;
    uint32_t value;
};- 指定HIDL包根目录
添加文件vendor/sample/hardware/interfaces/Android.bp
hidl_package_root {
    name: "sample.hardware",
    path: "vendor/sample/hardware/interfaces",
}- 生成HIDL 哈希
每个软件包根目录(即映射到 hardware/interfaces 的 android.hardware 或映射到 vendor/foo/hardware/interfaces 的 vendor.foo)都必须包含一个列出所有已发布 HIDL 接口文件的 current.txt 文件。
$hidl-gen -Lhash -rsample.hardware:vendor/sample/hardware/interfaces -randroid.hidl:system/libhidl/transport [email protected]>/home/android/AOSP/buildsystem-x9-ptg3.8/android/vendor/sample/hardware/interfaces/current.txt- 使用hidl-gen工具生成HIDL相关文件
hidl-gen -o $ANDROID_BUILD_TOP/vendor/sample/hardware/interfaces/helloworld/1.0/default -Lc++-impl -rsample.hardware:$ANDROID_BUILD_TOP/vendor/sample/hardware/interfaces -randroid.hidl:$ANDROID_BUILD_TOP/system/libhidl/transport [email protected]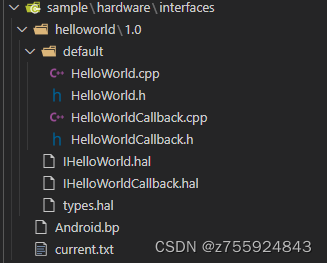
生成代码
- HelloWorld.cpp
// FIXME: your file license if you have one

#include "HelloWorld.h"

namespace sample {
namespace hardware {
namespace helloworld {
namespace V1_0 {
namespace implementation {

// Methods from ::sample::hardware::helloworld::V1_0::IHelloWorld follow.
Return<void> HelloWorld::initial() {
    // TODO implement
    return Void();
}

Return<int32_t> HelloWorld::getInt() {
    // TODO implement
    return int32_t {};
}

Return<::sample::hardware::helloworld::V1_0::Result> HelloWorld::setInt(int32_t val) {
    // TODO implement
    return ::sample::hardware::helloworld::V1_0::Result {};
}

Return<void> HelloWorld::setCallback(const sp<::sample::hardware::helloworld::V1_0::IHelloWorldCallback>& callback) {
    // TODO implement
    return Void();
}


// Methods from ::android::hidl::base::V1_0::IBase follow.

//IHelloWorld* HIDL_FETCH_IHelloWorld(const char* /* name */) {
    //return new HelloWorld();
//}
//
}  // namespace implementation
}  // namespace V1_0
}  // namespace helloworld
}  // namespace hardware
}  // namespace sample
- HelloWorld.h
// FIXME: your file license if you have one

#pragma once

#include <sample/hardware/helloworld/1.0/IHelloWorld.h>
#include <hidl/MQDescriptor.h>
#include <hidl/Status.h>

namespace sample {
namespace hardware {
namespace helloworld {
namespace V1_0 {
namespace implementation {

using ::android::hardware::hidl_array;
using ::android::hardware::hidl_memory;
using ::android::hardware::hidl_string;
using ::android::hardware::hidl_vec;
using ::android::hardware::Return;
using ::android::hardware::Void;
using ::android::sp;

struct HelloWorld : public IHelloWorld {
    // Methods from ::sample::hardware::helloworld::V1_0::IHelloWorld follow.
    Return<void> initial() override;
    Return<int32_t> getInt() override;
    Return<::sample::hardware::helloworld::V1_0::Result> setInt(int32_t val) override;
    Return<void> setCallback(const sp<::sample::hardware::helloworld::V1_0::IHelloWorldCallback>& callback) override;

    // Methods from ::android::hidl::base::V1_0::IBase follow.

};

// FIXME: most likely delete, this is only for passthrough implementations
// extern "C" IHelloWorld* HIDL_FETCH_IHelloWorld(const char* name);

}  // namespace implementation
}  // namespace V1_0
}  // namespace helloworld
}  // namespace hardware
} // namespace sample- 使用hidl-gen生成helloworld/1.0/default/Android.bp
hidl-gen -o $ANDROID_BUILD_TOP/vendor/sample/hardware/interfaces/helloworld/1.0/default -Landroidbp-impl -rsample.hardware:$ANDROID_BUILD_TOP/vendor/sample/hardware/interfaces -randroid.hidl:$ANDROID_BUILD_TOP/system/libhidl/transport [email protected]- 使用system/tools/hidl/update-makefiles-helper.sh生成helloworld/1.0/Android.bp
$source $ANDROID_BUILD_TOP/system/tools/hidl/update-makefiles-helper.sh

$do_makefiles_update sample.hardware:vendor/sample/hardware/interfaces android.hardware:hardware/interfaces android.hidl:system/libhidl/transport
helloworld/1.0/Android.bp内容如下:
hidl_interface {
    name: "[email protected]",
    root: "sample.hardware",
    product_specific: true,
    srcs: [
        "types.hal",
        "IHelloWorld.hal",
        "IHelloWorldCallback.hal",
    ],
    interfaces: [
        "[email protected]",
    ],
    gen_java: true,
}
将模块添加到device/$PROCUT_DIR/xxxboard.mk
# Overrides
PRODUCT_MANUFACTURER := SEMIDRIVE
PRODUCT_BRAND := X9
PRODUCT_NAME := $(TARGET_BOARD)
PRODUCT_DEVICE := $(TARGET_BOARD)
PRODUCT_MODEL := x9 for arm64

#SkinManager
CURRENT_PATH :=$(shell pwd)


PRODUCT_PACKAGES += \
    [email protected]
编译
$ mmm vendor/sample/hardware/interfaces/helloworld/1.0/编译hal文件生成的中间代码位于out/soong/.intermediates/vendor/sample/hardware/interfaces/helloworld/1.0/
default
[email protected]
[email protected]
[email protected]_genc++
[email protected]
[email protected]_genc++
[email protected]_genc++_headers
[email protected]_genc++
[email protected]_genc++_headers
[email protected]
[email protected]_genc++
[email protected]_genc++_headers
[email protected]
[email protected]_genc++
[email protected]_genc++_headers
[email protected]
sample.hardware.helloworld-V1.0-java
sample.hardware.helloworld-V1.0-java_gen_java
sample.hardware.helloworld-V1.0-java-shallow
test"[email protected]_genc++"目录里面可以发现hal文件转换成了C++源码 ,里面就包含Binder Bn端,Binder Bp端的代码.
编译最终会在out/target/product/$TARGET_PRODUCT/目录下面生成了以下文件:
out/target/product/$TARGET_PRODUCT/system/lib/[email protected]
out/target/product/$TARGET_PRODUCT/system/lib/[email protected]
out/target/product/$TARGET_PRODUCT/system/lib64/[email protected]
out/target/product/$TARGET_PRODUCT/system/lib64/[email protected]
out/target/product/$TARGET_PRODUCT/system/framework/sample.hardware.helloworld-V1.0-java.jar
out/target/product/$TARGET_PRODUCT/system/framework/oat/arm/sample.hardware.helloworld-V1.0-java.odex
out/target/product/$TARGET_PRODUCT/system/framework/oat/arm/sample.hardware.helloworld-V1.0-java.vdex
out/target/product/$TARGET_PRODUCT/system/framework/oat/arm64/sample.hardware.helloworld-V1.0-java.odex
out/target/product/$TARGET_PRODUCT/system/framework/oat/arm64/sample.hardware.helloworld-V1.0-java.vdex
out/target/product/$TARGET_PRODUCT/vendor/lib/[email protected]
out/target/product/$TARGET_PRODUCT/vendor/lib/[email protected]
out/target/product/$TARGET_PRODUCT/vendor/lib/[email protected]
out/target/product/$TARGET_PRODUCT/vendor/lib64/[email protected]
out/target/product/$TARGET_PRODUCT/vendor/lib64/[email protected]
out/target/product/$TARGET_PRODUCT/vendor/lib64/[email protected]
out/target/product/$TARGET_PRODUCT/vendor/bin/hw/[email protected]
out/target/product/$TARGET_PRODUCT/vendor/bin/sample.hardware.helloworld_hidl_hal_test
out/target/product/$TARGET_PRODUCT/vendor/etc/init/[email protected]
测试
将编译好的库和bin文件复制到设备中:
$ adb root
$ adb remount
$ adb push  out/target/product/$TARGET_PRODUCT/vendor/lib64/[email protected] /vendor/lib64/[email protected]
$ adb push  out/target/product/$TARGET_PRODUCT/vendor/lib64/[email protected] /vendor/lib64/[email protected]
$ adb push  out/target/product/$TARGET_PRODUCT/vendor/bin/hw/[email protected] /vendor/bin/hw/[email protected]
$ adb push  out/target/product/$TARGET_PRODUCT/vendor/bin/sample.hardware.helloworld_hidl_hal_test /vendor/bin/sample.hardware.helloworld_hidl_hal_test
启动服务和测试
# ./vendor/bin/hw/[email protected]& sample.hardware.helloworld_hidl_hal_test
initial
getInt 666
setInt result=0
HelloWorldCallback
setCallback
onEvent 0001 0001 0001
onEvent 0002 0002 0002
onEvent 0003 0003 0003智能推荐
前端开发之vue-grid-layout的使用和实例-程序员宅基地
文章浏览阅读1.1w次,点赞7次,收藏34次。vue-grid-layout的使用、实例、遇到的问题和解决方案_vue-grid-layout
Power Apps-上传附件控件_powerapps点击按钮上传附件-程序员宅基地
文章浏览阅读218次。然后连接一个数据源,就会在下面自动产生一个添加附件的组件。把这个控件复制粘贴到页面里,就可以单独使用来上传了。插入一个“编辑”窗体。_powerapps点击按钮上传附件
C++ 面向对象(Object-Oriented)的特征 & 构造函数& 析构函数_"object(cnofd[\"ofdrender\"])十条"-程序员宅基地
文章浏览阅读264次。(1) Abstraction (抽象)(2) Polymorphism (多态)(3) Inheritance (继承)(4) Encapsulation (封装)_"object(cnofd[\"ofdrender\"])十条"
修改node_modules源码,并保存,使用patch-package打补丁,git提交代码后,所有人可以用到修改后的_修改 node_modules-程序员宅基地
文章浏览阅读133次。删除node_modules,重新npm install看是否成功。在 package.json 文件中的 scripts 中加入。修改你的第三方库的bug等。然后目录会多出一个目录文件。_修改 node_modules
【】kali--password:su的 Authentication failure问题,&sudo passwd root输入密码时Sorry, try again._password: su: authentication failure-程序员宅基地
文章浏览阅读883次。【代码】【】kali--password:su的 Authentication failure问题,&sudo passwd root输入密码时Sorry, try again._password: su: authentication failure
整理5个优秀的微信小程序开源项目_微信小程序开源模板-程序员宅基地
文章浏览阅读1w次,点赞13次,收藏97次。整理5个优秀的微信小程序开源项目。收集了微信小程序开发过程中会使用到的资料、问题以及第三方组件库。_微信小程序开源模板
随便推点
Centos7最简搭建NFS服务器_centos7 搭建nfs server-程序员宅基地
文章浏览阅读128次。Centos7最简搭建NFS服务器_centos7 搭建nfs server
Springboot整合Mybatis-Plus使用总结(mybatis 坑补充)_mybaitis-plus ruledataobjectattributemapper' and '-程序员宅基地
文章浏览阅读1.2k次,点赞2次,收藏3次。前言mybatis在持久层框架中还是比较火的,一般项目都是基于ssm。虽然mybatis可以直接在xml中通过SQL语句操作数据库,很是灵活。但正其操作都要通过SQL语句进行,就必须写大量的xml文件,很是麻烦。mybatis-plus就很好的解决了这个问题。..._mybaitis-plus ruledataobjectattributemapper' and 'com.picc.rule.management.d
EECE 1080C / Programming for ECESummer 2022 Laboratory 4: Global Functions Practice_eece1080c-程序员宅基地
文章浏览阅读325次。EECE 1080C / Programming for ECESummer 2022Laboratory 4: Global Functions PracticePlagiarism will not be tolerated:Topics covered:function creation and call statements (emphasis on global functions)Objective:To practice program development b_eece1080c
洛谷p4777 【模板】扩展中国剩余定理-程序员宅基地
文章浏览阅读53次。被同机房早就1年前就学过的东西我现在才学,wtcl。设要求的数为\(x\)。设当前处理到第\(k\)个同余式,设\(M = LCM ^ {k - 1} _ {i - 1}\) ,前\(k - 1\)个的通解就是\(x + i * M\)。那么其实第\(k\)个来说,其实就是求一个\(y\)使得\(x + y * M ≡ a_k(mod b_k)\)转化一下就是\(y * M ...
android 退出应用没有走ondestory方法,[Android基础论]为何Activity退出之后,系统没有调用onDestroy方法?...-程序员宅基地
文章浏览阅读1.3k次。首先,问题是如何出现的?晚上复查代码,发现一个activity没有调用自己的ondestroy方法我表示非常的费解,于是我检查了下代码。发现再finish代码之后接了如下代码finish();System.exit(0);//这就是罪魁祸首为什么这样写会出现问题System.exit(0);////看一下函数的原型public static void exit (int code)//Added ..._android 手动杀死app,activity不执行ondestroy
SylixOS快问快答_select函数 导致堆栈溢出 sylixos-程序员宅基地
文章浏览阅读894次。Q: SylixOS 版权是什么形式, 是否分为<开发版税>和<运行时版税>.A: SylixOS 是开源并免费的操作系统, 支持 BSD/GPL 协议(GPL 版本暂未确定). 没有任何的运行时版税. 您可以用她来做任何 您喜欢做的项目. 也可以修改 SylixOS 的源代码, 不需要支付任何费用. 当然笔者希望您可以将使用 SylixOS 开发的项目 (不需要开源)或对 SylixOS 源码的修改及时告知笔者.需要指出: SylixOS 本身仅是笔者用来提升自己水平而开发的_select函数 导致堆栈溢出 sylixos