【youcans 的 OpenCV 例程200篇】147. 图像分割之孤立点检测_opencv 孤立点-程序员宅基地
技术标签: 算法 python 计算机视觉 图像处理 # OpenCV例程/youcans opencv
欢迎关注 『youcans 的 OpenCV 例程 200 篇』 系列,持续更新中
欢迎关注 『youcans 的 OpenCV学习课』 系列,持续更新中
【youcans 的 OpenCV 例程200篇】147. 图像分割之孤立点检测
1. 图像分割基本概念
图像分割就是把图像分成若干个特定的、具有独特性质的区域并提出感兴趣目标的技术和过程。图像分割是由图像处理到图像分析的关键步骤,是计算机视觉的基础,也是图像理解的重要组成部分。
所谓图像分割是指根据灰度、彩色、空间纹理、几何形状等特征把图像划分成若干个互不相交的区域,使得这些特征在同一区域内表现出一致性或相似性,而在不同区域间表现出明显的不同。简单的说就是在一副图像中,把目标从背景中分离出来。
从数学角度来看,图像分割是将数字图像划分成互不相交的区域的过程。图像分割的过程也是一个标记过程,即把属于同一区域的像索赋予相同的编号。
图像分割的基本方法是基于图像灰度值的不连续性和相似性。基于不连续性的图像分割,是根据灰度的突变检测边界,将图像分割为多个区域;基于相似性的图像分割,是根据预定义的准则将图像分割为多个相似的区域。
常用的图像分割方法有:基于阈值的分割方法、基于区域的分割方法、基于边缘的分割方法以及基于特定理论的分割方法等。
2. 点、线和边缘检测
本节基于图像灰度的不连续性,讨论根据灰度的突变检测边界,以此为基础进行图像分割。
- 边缘像素是图像中灰度突变的像素,而边缘是相连边缘像素的集合。
- 线是一条细边缘线段,其两侧的背景灰度与线段的像素灰度存在显著差异。
- 孤立的点是一个被背景像素围绕的前景像素,或一个被前景像素围绕的背景像素。
导数可以用来检测灰度的局部突变:
- 一阶导数通常产生粗边缘;
- 二阶导数对精细细节(如细线、孤立点和噪声)的响应更强;
- 二阶导数在灰度斜坡和台阶过渡处会产生双边缘响应,即二阶导数在进入和离开边缘时的符号相反;
- 二阶导数的符号可用于确定边缘的过渡是从亮到暗还是从暗到亮。
计算图像中每个像素位置的一阶导数和二阶导数的方法是空间卷积。对一个 3*3 模板,计算模板区域内灰度值与模板系数的卷积。
2.1 图像的孤立点检测
孤立点的检测,是检测嵌在一幅图像的恒定区域或亮度几乎不变的区域里的孤立点。孤立点的检测以二阶导数为基础。
二阶导数的计算可以采用拉普拉斯二阶有限差分公式:
∇ 2 f = ∂ 2 f ∂ x 2 + ∂ 2 f ∂ y 2 ∇ 2 f ( x , y ) = f ( x + 1 , y ) + f ( x − 1 , y ) + f ( x , y + 1 ) + f ( x , y − 1 ) − 4 f ( x , y ) \begin{aligned} \nabla ^2 f &= \dfrac{\partial ^2 f}{\partial x ^2} + \dfrac{\partial ^2 f}{\partial y ^2} \\ \nabla ^2 f(x,y) &= f(x+1,y) + f(x-1,y) + f(x,y+1) + f(x,y-1) - 4f(x,y) \end{aligned} ∇2f∇2f(x,y)=∂x2∂2f+∂y2∂2f=f(x+1,y)+f(x−1,y)+f(x,y+1)+f(x,y−1)−4f(x,y)
拉普拉斯差分公式可以用拉普拉斯核的卷积来实现:
K 1 = [ 0 1 0 1 − 4 1 0 1 0 ] , K 2 = [ 1 1 1 1 − 8 1 1 1 1 ] , K 3 = [ 0 − 1 0 − 1 4 − 1 0 − 1 0 ] , K 4 = [ − 1 − 1 − 1 − 1 8 − 1 − 1 − 1 − 1 ] \begin{aligned} &K1 = \begin{bmatrix} 0 & 1 &0\\ 1 & -4 &1\\ 0 & 1 &0\\ \end{bmatrix}, \ &K2 = \begin{bmatrix} 1 & 1 & 1\\ 1 & -8 & 1\\ 1 & 1 & 1\\ \end{bmatrix}, \\ &K3 = \begin{bmatrix} 0 & -1 &0\\ -1 & 4 &-1\\ 0 & -1 &0\\ \end{bmatrix}, \ &K4 = \begin{bmatrix} -1 & -1 &-1\\ -1 & 8 &-1\\ -1 & -1 &-1\\ \end{bmatrix} \end{aligned} K1=⎣⎡0101−41010⎦⎤, K3=⎣⎡0−10−14−10−10⎦⎤, K2=⎣⎡1111−81111⎦⎤,K4=⎣⎡−1−1−1−18−1−1−1−1⎦⎤
当孤立点在卷积模板的中心时,拉普拉斯滤波器的响应很强烈,而孤立点在非模板中心时,拉普拉斯滤波器响应为零。当滤波器在一个点的响应超过设定阈值 T,则认为在卷积核的中心检测到了孤立点,标记为 1,而其它点都被标记为 0,从而产生一副二值图像。
g ( x , y ) = { 1 , ∣ Z ( x , y ) ∣ > T 0 , e l s e g(x,y) = \begin{cases} 1, \quad |{Z(x,y)}| > T \\ 0, \quad else \end{cases} g(x,y)={
1,∣Z(x,y)∣>T0,else
注意:
(1)本节所称的孤立点检测,是绝对意义上的孤立点,即一个孤立的像素。人眼所能感知、识别的孤立点,通常来说其实是一个微小的区域,而不是孤立的一个像素,因此并不能用这种方法检测。
(2)使用 Laplace 算子进行图像孤立点检测,推荐使用 scipy.signal 实现卷积运算,不建议使用 cv2.filter2D 实现。后者自动将卷积结果进行归一化处理,不便于通过阈值 T 检测孤立点。
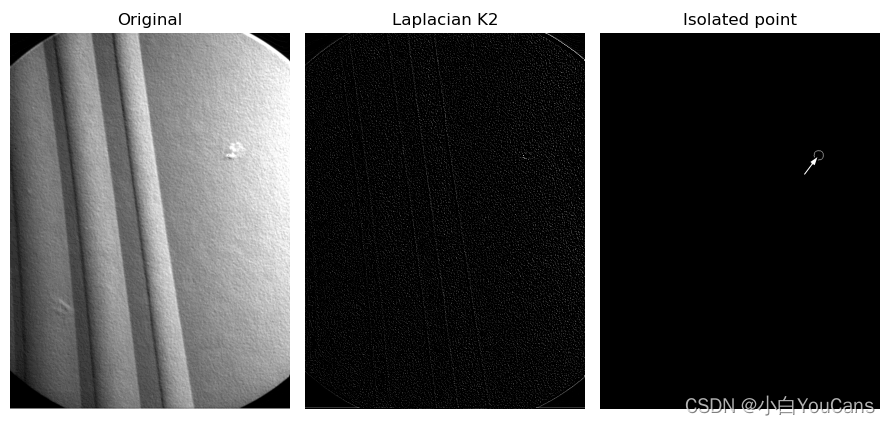
例程 11.1:图像的孤立点检测
    # 11.1 图像孤立点检测 (Laplace 算子)
    imgGray = cv2.imread("../images/Fig1004.tif", flags=0)
    hImg, wImg = imgGray.shape

    # scipy.signal 实现卷积运算 (注意:不能用 cv2.filter2D 处理)
    from scipy import signal
    kernelLaplace = np.array([[1, 1, 1], [1, -8, 1], [1, 1, 1]])  # Laplacian kernel
    imgLaplace = signal.convolve2d(imgGray, kernelLaplace, boundary='symm', mode='same')  # same 卷积

    # 在原图上用半径为 5 的圆圈标记角点
    T = 0.9 * max(imgLaplace.max(), -imgLaplace.min())
    imgPoint = np.zeros((hImg, wImg), np.uint8)  # 创建黑色图像
    for h in range(hImg):
        for w in range(wImg):
            if (imgLaplace[h, w] > T) or (imgLaplace[h, w] < -T):
                imgPoint[h, w] = 255  # 二值处理
                cv2.circle(imgPoint, (w, h), 10, 255)

    print(imgLaplace.shape, imgLaplace.max(), imgLaplace.min(), T)
    plt.figure(figsize=(9, 6))
    plt.subplot(131), plt.axis('off'), plt.title("Original")
    plt.imshow(imgGray, cmap='gray', vmin=0, vmax=255)
    plt.subplot(132), plt.axis('off'), plt.title("Laplacian K2")
    plt.imshow(imgLaplace, cmap='gray', vmin=0, vmax=255)
    plt.subplot(133), plt.axis('off'), plt.title("Isolated point")
    plt.imshow(imgPoint, cmap='gray', vmin=0, vmax=255)
    plt.tight_layout()
    plt.show()
(本节完)
版权声明:
youcans@xupt 原创作品,转载必须标注原文链接:(https://blog.csdn.net/youcans/article/details/124005009)
Copyright 2022 youcans, XUPT
Crated:2022-4-1
欢迎关注 『youcans 的 OpenCV 例程 200 篇』 系列,持续更新中
欢迎关注 『youcans 的 OpenCV学习课』 系列,持续更新中【youcans 的 OpenCV 例程200篇】01. 图像的读取(cv2.imread)
【youcans 的 OpenCV 例程200篇】02. 图像的保存(cv2.imwrite)
【youcans 的 OpenCV 例程200篇】03. 图像的显示(cv2.imshow)
【youcans 的 OpenCV 例程200篇】04. 用 matplotlib 显示图像(plt.imshow)
【youcans 的 OpenCV 例程200篇】05. 图像的属性(np.shape)
【youcans 的 OpenCV 例程200篇】06. 像素的编辑(img.itemset)
【youcans 的 OpenCV 例程200篇】07. 图像的创建(np.zeros)
【youcans 的 OpenCV 例程200篇】08. 图像的复制(np.copy)
【youcans 的 OpenCV 例程200篇】09. 图像的裁剪(cv2.selectROI)
【youcans 的 OpenCV 例程200篇】10. 图像的拼接(np.hstack)
【youcans 的 OpenCV 例程200篇】11. 图像通道的拆分(cv2.split)
【youcans 的 OpenCV 例程200篇】12. 图像通道的合并(cv2.merge)
【youcans 的 OpenCV 例程200篇】13. 图像的加法运算(cv2.add)
【youcans 的 OpenCV 例程200篇】14. 图像与标量相加(cv2.add)
【youcans 的 OpenCV 例程200篇】15. 图像的加权加法(cv2.addWeight)
【youcans 的 OpenCV 例程200篇】16. 不同尺寸的图像加法
【youcans 的 OpenCV 例程200篇】17. 两张图像的渐变切换
【youcans 的 OpenCV 例程200篇】18. 图像的掩模加法
【youcans 的 OpenCV 例程200篇】19. 图像的圆形遮罩
【youcans 的 OpenCV 例程200篇】20. 图像的按位运算
【youcans 的 OpenCV 例程200篇】21. 图像的叠加
【youcans 的 OpenCV 例程200篇】22. 图像添加非中文文字
【youcans 的 OpenCV 例程200篇】23. 图像添加中文文字
【youcans 的 OpenCV 例程200篇】24. 图像的仿射变换
【youcans 的 OpenCV 例程200篇】25. 图像的平移
【youcans 的 OpenCV 例程200篇】26. 图像的旋转(以原点为中心)
【youcans 的 OpenCV 例程200篇】27. 图像的旋转(以任意点为中心)
【youcans 的 OpenCV 例程200篇】28. 图像的旋转(直角旋转)
【youcans 的 OpenCV 例程200篇】29. 图像的翻转(cv2.flip)
【youcans 的 OpenCV 例程200篇】30. 图像的缩放(cv2.resize)
【youcans 的 OpenCV 例程200篇】31. 图像金字塔(cv2.pyrDown)
【youcans 的 OpenCV 例程200篇】32. 图像的扭变(错切)
【youcans 的 OpenCV 例程200篇】33. 图像的复合变换
【youcans 的 OpenCV 例程200篇】34. 图像的投影变换
【youcans 的 OpenCV 例程200篇】35. 图像的投影变换(边界填充)
【youcans 的 OpenCV 例程200篇】36. 直角坐标与极坐标的转换
【youcans 的 OpenCV 例程200篇】37. 图像的灰度化处理和二值化处理
【youcans 的 OpenCV 例程200篇】38. 图像的反色变换(图像反转)
【youcans 的 OpenCV 例程200篇】39. 图像灰度的线性变换
【youcans 的 OpenCV 例程200篇】40. 图像分段线性灰度变换
【youcans 的 OpenCV 例程200篇】41. 图像的灰度变换(灰度级分层)
【youcans 的 OpenCV 例程200篇】42. 图像的灰度变换(比特平面分层)
【youcans 的 OpenCV 例程200篇】43. 图像的灰度变换(对数变换)
【youcans 的 OpenCV 例程200篇】44. 图像的灰度变换(伽马变换)
【youcans 的 OpenCV 例程200篇】45. 图像的灰度直方图
【youcans 的 OpenCV 例程200篇】46. 直方图均衡化
【youcans 的 OpenCV 例程200篇】47. 图像增强—直方图匹配
【youcans 的 OpenCV 例程200篇】48. 图像增强—彩色直方图匹配
【youcans 的 OpenCV 例程200篇】49. 图像增强—局部直方图处理
【youcans 的 OpenCV 例程200篇】50. 图像增强—直方图统计量图像增强
【youcans 的 OpenCV 例程200篇】51. 图像增强—直方图反向追踪
【youcans 的 OpenCV 例程200篇】52. 图像的相关与卷积运算
【youcans 的 OpenCV 例程200篇】53. Scipy 实现图像二维卷积
【youcans 的 OpenCV 例程200篇】54. OpenCV 实现图像二维卷积
【youcans 的 OpenCV 例程200篇】55. 可分离卷积核
【youcans 的 OpenCV 例程200篇】56. 低通盒式滤波器
【youcans 的 OpenCV 例程200篇】57. 低通高斯滤波器
【youcans 的 OpenCV 例程200篇】58. 非线性滤波—中值滤波
【youcans 的 OpenCV 例程200篇】59. 非线性滤波—双边滤波
【youcans 的 OpenCV 例程200篇】60. 非线性滤波—联合双边滤波
【youcans 的 OpenCV 例程200篇】61. 导向滤波(Guided filter)
【youcans 的 OpenCV 例程200篇】62. 图像锐化——钝化掩蔽
【youcans 的 OpenCV 例程200篇】63. 图像锐化——Laplacian 算子
【youcans 的 OpenCV 例程200篇】64. 图像锐化——Sobel 算子
【youcans 的 OpenCV 例程200篇】65. 图像锐化——Scharr 算子
【youcans 的 OpenCV 例程200篇】66. 图像滤波之低通/高通/带阻/带通
【youcans 的 OpenCV 例程200篇】67. 空间域图像增强的综合应用
【youcans 的 OpenCV 例程200篇】68. 空间域图像增强的综合应用
【youcans 的 OpenCV 例程200篇】69. 连续非周期信号的傅立叶系数
【youcans 的 OpenCV 例程200篇】70. 一维连续函数的傅里叶变换
【youcans 的 OpenCV 例程200篇】71. 连续函数的取样
【youcans 的 OpenCV 例程200篇】72. 一维离散傅里叶变换
【youcans 的 OpenCV 例程200篇】73. 二维连续傅里叶变换
【youcans 的 OpenCV 例程200篇】74. 图像的抗混叠
【youcans 的 OpenCV 例程200篇】75. Numpy 实现图像傅里叶变换
【youcans 的 OpenCV 例程200篇】76. OpenCV 实现图像傅里叶变换
【youcans 的 OpenCV 例程200篇】77. OpenCV 实现快速傅里叶变换
【youcans 的 OpenCV 例程200篇】78. 频率域图像滤波基础
【youcans 的 OpenCV 例程200篇】79. 频率域图像滤波的基本步骤
【youcans 的 OpenCV 例程200篇】80. 频率域图像滤波详细步骤
【youcans 的 OpenCV 例程200篇】81. 频率域高斯低通滤波器
【youcans 的 OpenCV 例程200篇】82. 频率域巴特沃斯低通滤波器
【youcans 的 OpenCV 例程200篇】83. 频率域低通滤波:印刷文本字符修复
【youcans 的 OpenCV 例程200篇】84. 由低通滤波器得到高通滤波器
【youcans 的 OpenCV 例程200篇】85. 频率域高通滤波器的应用
【youcans 的 OpenCV 例程200篇】86. 频率域滤波应用:指纹图像处理
【youcans 的 OpenCV 例程200篇】87. 频率域钝化掩蔽
【youcans 的 OpenCV 例程200篇】88. 频率域拉普拉斯高通滤波
【youcans 的 OpenCV 例程200篇】89. 带阻滤波器的传递函数
【youcans 的 OpenCV 例程200篇】90. 频率域陷波滤波器
【youcans 的 OpenCV 例程200篇】91. 高斯噪声、瑞利噪声、爱尔兰噪声
【youcans 的 OpenCV 例程200篇】92. 指数噪声、均匀噪声、椒盐噪声
【youcans 的 OpenCV 例程200篇】93. 噪声模型的直方图
【youcans 的 OpenCV 例程200篇】94. 算术平均滤波器
【youcans 的 OpenCV 例程200篇】95. 几何均值滤波器
【youcans 的 OpenCV 例程200篇】96. 谐波平均滤波器
【youcans 的 OpenCV 例程200篇】97. 反谐波平均滤波器
【youcans 的 OpenCV 例程200篇】98. 统计排序滤波器
【youcans 的 OpenCV 例程200篇】99. 修正阿尔法均值滤波器
【youcans 的 OpenCV 例程200篇】100. 自适应局部降噪滤波器
【youcans 的 OpenCV 例程200篇】101. 自适应中值滤波器
【youcans 的 OpenCV 例程200篇】102. 陷波带阻滤波器的传递函数
【youcans 的 OpenCV 例程200篇】103. 陷波带阻滤波器消除周期噪声干扰
【youcans 的 OpenCV 例程200篇】104. 运动模糊退化模型
【youcans 的 OpenCV 例程200篇】105. 湍流模糊退化模型
【youcans 的 OpenCV 例程200篇】106. 退化图像的逆滤波
【youcans 的 OpenCV 例程200篇】107. 退化图像的维纳滤波
【youcans 的 OpenCV 例程200篇】108. 约束最小二乘方滤波
【youcans 的 OpenCV 例程200篇】109. 几何均值滤波
【youcans 的 OpenCV 例程200篇】110. 投影和雷登变换
【youcans 的 OpenCV 例程200篇】111. 雷登变换反投影重建图像
【youcans 的 OpenCV 例程200篇】112. 滤波反投影重建图像
【youcans 的 OpenCV 例程200篇】113. 形态学操作之腐蚀
【youcans 的 OpenCV 例程200篇】114. 形态学操作之膨胀
【youcans 的 OpenCV 例程200篇】115. 形态学操作之开运算
【youcans 的 OpenCV 例程200篇】116. 形态学操作之闭运算
【youcans 的 OpenCV 例程200篇】117. 形态学操作之顶帽运算
【youcans 的 OpenCV 例程200篇】118. 形态学操作之底帽运算
【youcans 的 OpenCV 例程200篇】119. 图像的形态学梯度
【youcans 的 OpenCV 例程200篇】120. 击中-击不中变换
【youcans 的 OpenCV 例程200篇】121. 击中-击不中用于特征识别
【youcans 的 OpenCV 例程200篇】122. 形态算法之边界提取
【youcans 的 OpenCV 例程200篇】123. 形态算法之孔洞填充
【youcans 的 OpenCV 例程200篇】124. 孔洞填充的泛洪算法
【youcans 的 OpenCV 例程200篇】125. 形态算法之提取连通分量
【youcans 的 OpenCV 例程200篇】126. 形态算法之凸壳
【youcans 的 OpenCV 例程200篇】127. 形态算法之细化
【youcans 的 OpenCV 例程200篇】128. 形态算法之骨架 (skimage)
【youcans 的 OpenCV 例程200篇】129. 形态算法之骨架 (重建开运算)
【youcans 的 OpenCV 例程200篇】130. 形态学之提取水平和垂直线
【youcans 的 OpenCV 例程200篇】131. 形态学重建之竖线字符提取
【youcans 的 OpenCV 例程200篇】132. 形态学重建之孔洞填充算法
【youcans 的 OpenCV 例程200篇】133. 形态学重建之边界清除
【youcans 的 OpenCV 例程200篇】134. 形态学重建之细胞计数
【youcans 的 OpenCV 例程200篇】135. 形态学重建之粒度测定
【youcans 的 OpenCV 例程200篇】136. 灰度腐蚀和灰度膨胀
【youcans 的 OpenCV 例程200篇】137. 灰度开运算和灰度闭运算原理
【youcans 的 OpenCV 例程200篇】138. 灰度开运算和灰度闭运算
【youcans 的 OpenCV 例程200篇】139. 灰度顶帽变换校正阴影
【youcans 的 OpenCV 例程200篇】140. 灰度底帽变换校正光照
【youcans 的 OpenCV 例程200篇】141. 灰度底帽变换的三维地形图
【youcans 的 OpenCV 例程200篇】142. 基于灰度形态学的图像平滑
【youcans 的 OpenCV 例程200篇】143. 基于灰度形态学的粒度测定
【youcans 的 OpenCV 例程200篇】144. 基于灰度形态学的纹理分割
【youcans 的 OpenCV 例程200篇】145. 形态学之边缘和角点检测
【youcans 的 OpenCV 例程200篇】146. 基于灰度形态学的复杂背景图像重建
【youcans 的 OpenCV 例程200篇】147. 图像分割之孤立点检测
智能推荐
Prometheus监控,生产可用告警规则(可获取主机名)_prometheus yaml 设置 nodename 主机名字-程序员宅基地
文章浏览阅读5.6k次,点赞2次,收藏6次。以下是生产环境中prometheus.rules.yml告警规则用例,在此记录一下,相关信息已做脱敏处理。有需要的小伙伴可以直接拷贝使用。groups: - name: 成都服务器告警 rules: - alert: 服务器宕机告警 expr: up == 0 for: 2m labels: region: 成都 annotations: summary: "{{$labels.instance}} 宕_prometheus yaml 设置 nodename 主机名字
正确安装 cuda, cudnn-程序员宅基地
文章浏览阅读156次。再根据安装的cuda版本、cudnn名称中包含的信息,确定要下载的cudnn版本。根据系统、架构、机器最大支持的cuda版本确定要下载的cuda版本;末尾加上对应版本的cuda路径。下载cuda的.run版本,
GB文件下载脚本_gb688下载脚本-程序员宅基地
文章浏览阅读3.2k次。国标文件下载代码脚本_gb688下载脚本
rk3399 安装 postgresql(交叉编译)_postgresql aarch64交叉编译-程序员宅基地
文章浏览阅读989次。文章目录平台SDK路径交叉编译1. zlibbuild.shrun.sh编译输出2. opensslbuild.shrun.sh编译输出3. postgresqlbuild.shrun.sh编译输出安装平台rk3399ubuntu 16.04 x64SDK路径/data/project/rockchip/fireflyrk3399/src需要去掉firefly交叉编译1. zlibbuild.sh#! /bin/bashif [ ! -f ./zlib-1.2.11.tar.xz_postgresql aarch64交叉编译
最轻量级前端模板Micro-Templating, 源码解析-程序员宅基地
文章浏览阅读970次,点赞27次,收藏13次。前端模板,react, vuejs都有其影子,今天一起来逐行分析jQuery创始人John Resig的最轻量级前端模板Micro-Templating。
Endnote 插入文献时显示 无法编辑range - “Cannot edit range 及解决方法_endnote引用中文显示无法编辑-程序员宅基地
文章浏览阅读1.2k次。Endnote 插入文献时显示 无法编辑range - “Cannot edit range 及解决方法_endnote引用中文显示无法编辑
随便推点
【Comet OJ - Contest #14 E 飞翔的小鸟】【图论】_comet 飞翔的小鸟-程序员宅基地
文章浏览阅读226次。题意给一个nnn个点mmm条边的有向图,对每个点xxx求从111到xxx的所有路径中边权极差最大是多少。n≤200000,m≤500000n\le200000,m\le500000n≤200000,m≤500000分析先缩点,这样新图里的点也有了点权。假设先经过最小值再经过最大值,那么枚举经过最大值之前经过的最后一条边,预处理fxf_xfx表示走到xxx经过的最大权值,就可以知道每一条..._comet 飞翔的小鸟
从内核驱动到android app_inux驱动为android提供接口-程序员宅基地
文章浏览阅读5.1k次,点赞8次,收藏10次。了解android驱动开发。_inux驱动为android提供接口
Unity3D技术栈-程序员宅基地
文章浏览阅读308次,点赞7次,收藏5次。这款引擎支持多种编程语言,包括C#、UnityScript和Boo,使得开发者可以根据自己的习惯和需求选择合适的工具。同时,Unity3D还提供了丰富的API和工具集,包括物理引擎、动画系统、音频处理、UI设计等,使得开发者能够轻松地构建出高质量的游戏和应用程序。它以其强大的功能、友好的界面和高效的性能,赢得了广大开发者的青睐。但Unity3D的魅力远不止于此,它更是一个完整的技术栈,涵盖了从游戏设计到最终发布的每一个环节。它以其强大的功能、友好的界面和高效的性能,为开发者提供了从设计到发布的全方位支持。
工控: WinCC之OPCUA 使用总结_wincc opc ua服务器设置-程序员宅基地
文章浏览阅读1.6k次。4. 将 C:\Program Files\Siemens\WinCC\opc\UAWrapper\PKI\CA\rejected\certs\ OPC.SimaticNET.S7.der。拷贝到 C:\Program Files\Siemens\WinCC\opc\UAWrapper\PKI\CA\certs 并且安装。3. wincc变量管理 -> opc -> opc groups -> opc条目管理器 -> opc ua 服务器 -> 浏览服务器。_wincc opc ua服务器设置
逍遥模拟器配合fiddler爬取抖音视频!开源免费!_逍遥模拟器 哪个版本支持抖音-程序员宅基地
文章浏览阅读4.4k次,点赞3次,收藏16次。## 五、总结:**(1)抖音属于手机APP,电脑上没有办法直接得到访问路径请求,需要下载fiddler链接抓取包! fiddler配置及下载信任证书并信任!(2)下载模拟器,模拟手机操作抖音,fiddler实时监控模拟器上的动作,得到请求地址! 模拟器上下载fiddler证书并信任,模拟器上下载抖音,模仿手机操作, !让抖音平台认为是用户手机浏览操作(3)分享得到的地址中的josn数据包中的数据,找到自己想要的数据! awenm_list----->{}----->video-_逍遥模拟器 哪个版本支持抖音
用Grub启动ISO镜像-程序员宅基地
文章浏览阅读1.3k次。用Grub启动ISO镜像如果你想要使用多个Linux发行版,你没有那么多的选择。你要么安装到你的物理机或虚拟机中,要么以live模式从ISO文件启动。第二个选择,对硬盘空间需求较小,只是有点麻烦,因为你需要将ISO文件写入到U盘或CD/DVD中来启动。不过,这里还有另外一个可选的折中方案:把ISO镜像放在硬盘中,然后以live模式来启动。该方案比完全..._grub启动做iso