View UI (iview)动态表单 使用教程_view ui 表格动态列-程序员宅基地
View UI,即原先的 iView,从 2019 年 10 月起正式更名为 View UI,并使用全新的 Logo
本文介绍 View UI (iview)动态表单的使用。在项目开发中,有些数据的数量是动态的,不确定的,可能是1条,也可能是多条。如人的证件,工作经历,项目经验等。在做这些数据的添加时就要使用动态表单
1、使用介绍
首先将 iview 官方的动态表单的代码全部复制出来,粘贴到项目里,看一下运行效果
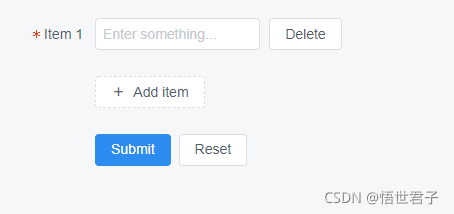
代码如下
<template>
    <Form ref="formDynamic" :model="formDynamic" :label-width="80" style="width: 300px">
        <FormItem
                v-for="(item, index) in formDynamic.items"
                v-if="item.status"
                :key="index"
                :label="'Item ' + item.index"
                :prop="'items.' + index + '.value'"
                :rules="{required: true, message: 'Item ' + item.index +' can not be empty', trigger: 'blur'}">
            <Row>
                <Col span="18">
                    <Input type="text" v-model="item.value" placeholder="Enter something..."></Input>
                </Col>
                <Col span="4" offset="1">
                    <Button @click="handleRemove(index)">Delete</Button>
                </Col>
            </Row>
        </FormItem>
        <FormItem>
            <Row>
                <Col span="12">
                    <Button type="dashed" long @click="handleAdd" icon="md-add">Add item</Button>
                </Col>
            </Row>
        </FormItem>
        <FormItem>
            <Button type="primary" @click="handleSubmit('formDynamic')">Submit</Button>
            <Button @click="handleReset('formDynamic')" style="margin-left: 8px">Reset</Button>
        </FormItem>
    </Form>
</template>
<script>
    export default {
        data () {
            return {
                index: 1,
                formDynamic: {
                    items: [
                        {
                            value: '',
                            index: 1,
                            status: 1
                        }
                    ]
                }
            }
        },
        methods: {
            handleSubmit (name) {
                this.$refs[name].validate((valid) => {
                    if (valid) {
                        this.$Message.success('Success!');
                    } else {
                        this.$Message.error('Fail!');
                    }
                })
            },
            handleReset (name) {
                this.$refs[name].resetFields();
            },
            handleAdd () {
                this.index++;
                this.formDynamic.items.push({
                    value: '',
                    index: this.index,
                    status: 1
                });
            },
            handleRemove (index) {
                this.formDynamic.items[index].status = 0;
            }
        }
    }
</script>
代码讲解
这里核心的内容是vue data中定义的 formDynamic 这个对象,这个对象的 items 数组表示动态表单里的内容,如果items中有1个对象,则表示默认页面上会有1个输入框,示例代码就是默认1个输入框
items中的内容示例给了3个,value表示输入框的值,读者可根据自己的需求添加页面元素,并在data中进行添加元素对应的值;index是每一项的序号,示例是从1开始,如果项目不需要可以去掉这个index;status 是显示的控制,通过分析添加和删除的代码示例,可以知道status= 1是显示,status=0是不显示,示例给出的删除只是删除了页面显示,实际 items数组里的数据并没有删除,因此读者在开发时要在删除的方法 handleRemove 中,删除对应在items数组中的值
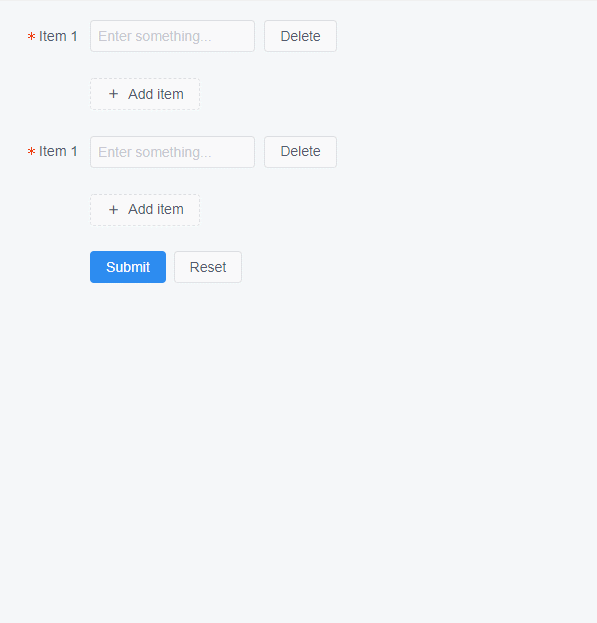
2、扩展
在实际开发中,可能出现同一form表单中有多个动态表单的情况,这里需要注意一点,就是 vue 的 for 循环的 key 的问题
先看代码
<template>
    <Form ref="formDynamic" :model="formDynamic" :label-width="80" style="width: 300px">
        <FormItem
                v-for="(item, index) in formDynamic.items"
                v-if="item.status"
                :key="index"
                :label="'Item ' + item.index"
                :prop="'items.' + index + '.value'"
                :rules="{required: true, message: 'Item ' + item.index +' can not be empty', trigger: 'blur'}">
            <Row>
                <Col span="18">
                    <Input type="text" v-model="item.value" placeholder="Enter something..."></Input>
                </Col>
                <Col span="4" offset="1">
                    <Button @click="handleRemove(index)">Delete</Button>
                </Col>
            </Row>
        </FormItem>
        <FormItem>
            <Row>
                <Col span="12">
                    <Button type="dashed" long @click="handleAdd" icon="md-add">Add item</Button>
                </Col>
            </Row>
        </FormItem>

        <FormItem
                v-for="(item, index) in formDynamic.items2"
                v-if="item.status"
                :key="index"
                :label="'Item ' + item.index"
                :prop="'items2.' + index + '.value'"
                :rules="{required: true, message: 'Item ' + item.index +' can not be empty', trigger: 'blur'}">
            <Row>
                <Col span="18">
                    <Input type="text" v-model="item.value" placeholder="Enter something..."></Input>
                </Col>
                <Col span="4" offset="1">
                    <Button @click="handleRemove2(index)">Delete</Button>
                </Col>
            </Row>
        </FormItem>
        <FormItem>
            <Row>
                <Col span="12">
                    <Button type="dashed" long @click="handleAdd2" icon="md-add">Add item</Button>
                </Col>
            </Row>
        </FormItem>

        <FormItem>
            <Button type="primary" @click="handleSubmit('formDynamic')">Submit</Button>
            <Button @click="handleReset('formDynamic')" style="margin-left: 8px">Reset</Button>
        </FormItem>
    </Form>
</template>
<script>
    export default {
        data () {
            return {
                index: 1,
                index2: 1,
                formDynamic: {
                    items: [
                        {
                            value: '',
                            index: 1,
                            status: 1
                        }
                    ],
                    items2: [
                        {
                            value: '',
                            index: 1,
                            status: 1
                        }
                    ]
                }
            }
        },
        methods: {
            handleSubmit (name) {
                this.$refs[name].validate((valid) => {
                    if (valid) {
                        this.$Message.success('Success!');
                    } else {
                        this.$Message.error('Fail!');
                    }
                })
            },
            handleReset (name) {
                this.$refs[name].resetFields();
            },
            handleAdd () {
                this.index++;
                this.formDynamic.items.push({
                    value: '',
                    index: this.index,
                    status: 1
                });
            },
            handleRemove (index) {
                this.formDynamic.items[index].status = 0;
            },
            handleAdd2 () {
                this.index2++;
                this.formDynamic.items2.push({
                    value: '',
                    index: this.index2,
                    status: 1
                });
            },
            handleRemove2 (index) {
                this.formDynamic.items2[index].status = 0;
            }
        }
    }
</script>
这里笔者添加了items2这个数组,并添加了它的添加和删除的方法
运行效果如下
这里在功能上没有问题,但是打开浏览器的开发者工具就会看到有1个警告
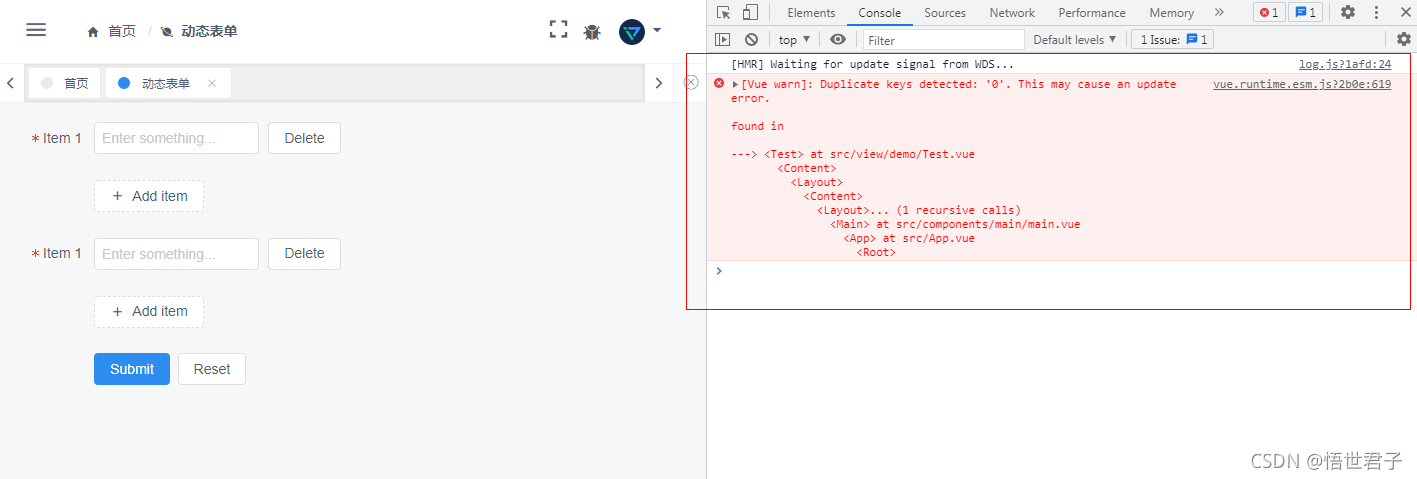
为什么会产生这个警告呢?原因是这样的,items 和 items2 在 v-for 进行遍历时,都使用 index 作为 key,而 index 都是0,所有产生了这个警告
那么如何解决呢?其实很简单,只要不使用相同的 key 就行了,这里可以自定义一个id,用id来作为 key,代码实现如下
<template>
    <Form ref="formDynamic" :model="formDynamic" :label-width="80" style="width: 300px">
        <FormItem
                v-for="(item, index) in formDynamic.items"
                v-if="item.status"
                :key="index"
                :label="'Item ' + item.index"
                :prop="'items.' + index + '.value'"
                :rules="{required: true, message: 'Item ' + item.index +' can not be empty', trigger: 'blur'}">
            <Row>
                <Col span="18">
                    <Input type="text" v-model="item.value" placeholder="Enter something..."></Input>
                </Col>
                <Col span="4" offset="1">
                    <Button @click="handleRemove(index)">Delete</Button>
                </Col>
            </Row>
        </FormItem>
        <FormItem>
            <Row>
                <Col span="12">
                    <Button type="dashed" long @click="handleAdd" icon="md-add">Add item</Button>
                </Col>
            </Row>
        </FormItem>

        <FormItem
                v-for="(item, index) in formDynamic.items2"
                v-if="item.status"
                :key="item.id"
                :label="'Item ' + item.index"
                :prop="'items2.' + index + '.value'"
                :rules="{required: true, message: 'Item ' + item.index +' can not be empty', trigger: 'blur'}">
            <Row>
                <Col span="18">
                    <Input type="text" v-model="item.value" placeholder="Enter something..."></Input>
                </Col>
                <Col span="4" offset="1">
                    <Button @click="handleRemove2(index)">Delete</Button>
                </Col>
            </Row>
        </FormItem>
        <FormItem>
            <Row>
                <Col span="12">
                    <Button type="dashed" long @click="handleAdd2" icon="md-add">Add item</Button>
                </Col>
            </Row>
        </FormItem>

        <FormItem>
            <Button type="primary" @click="handleSubmit('formDynamic')">Submit</Button>
            <Button @click="handleReset('formDynamic')" style="margin-left: 8px">Reset</Button>
        </FormItem>
    </Form>
</template>
<script>
    export default {
        data () {
            return {
                index: 1,
                index2: 1,
                formDynamic: {
                    items: [
                        {
                            value: '',
                            index: 1,
                            status: 1
                        }
                    ],
                    items2: [
                        {
                            value: '',
                            index: 1,
                            status: 1,
                            id: 'items2_id_' + 1
                        }
                    ]
                }
            }
        },
        methods: {
            handleSubmit (name) {
                this.$refs[name].validate((valid) => {
                    if (valid) {
                        this.$Message.success('Success!');
                        console.log(JSON.stringify(this.formDynamic))
                    } else {
                        this.$Message.error('Fail!');
                    }
                })
            },
            handleReset (name) {
                this.$refs[name].resetFields();
            },
            handleAdd () {
                this.index++;
                this.formDynamic.items.push({
                    value: '',
                    index: this.index,
                    status: 1
                });
            },
            handleRemove (index) {
                this.formDynamic.items[index].status = 0;
            },
            handleAdd2 () {
                this.index2++;
                let id = 'items2_id_' + this.index2
                this.formDynamic.items2.push({
                    value: '',
                    index: this.index2,
                    status: 1,
                    id: id
                });
            },
            handleRemove2 (index) {
                this.formDynamic.items2[index].status = 0;
            }
        }
    }
</script>
上面代码笔者实现了自定义 id 的添加,以字符串 items2_id_ 为前缀,加上数字组成 id,读者可根据自己的业务进行自定义命名前缀,道理是相同的
运行效果如下
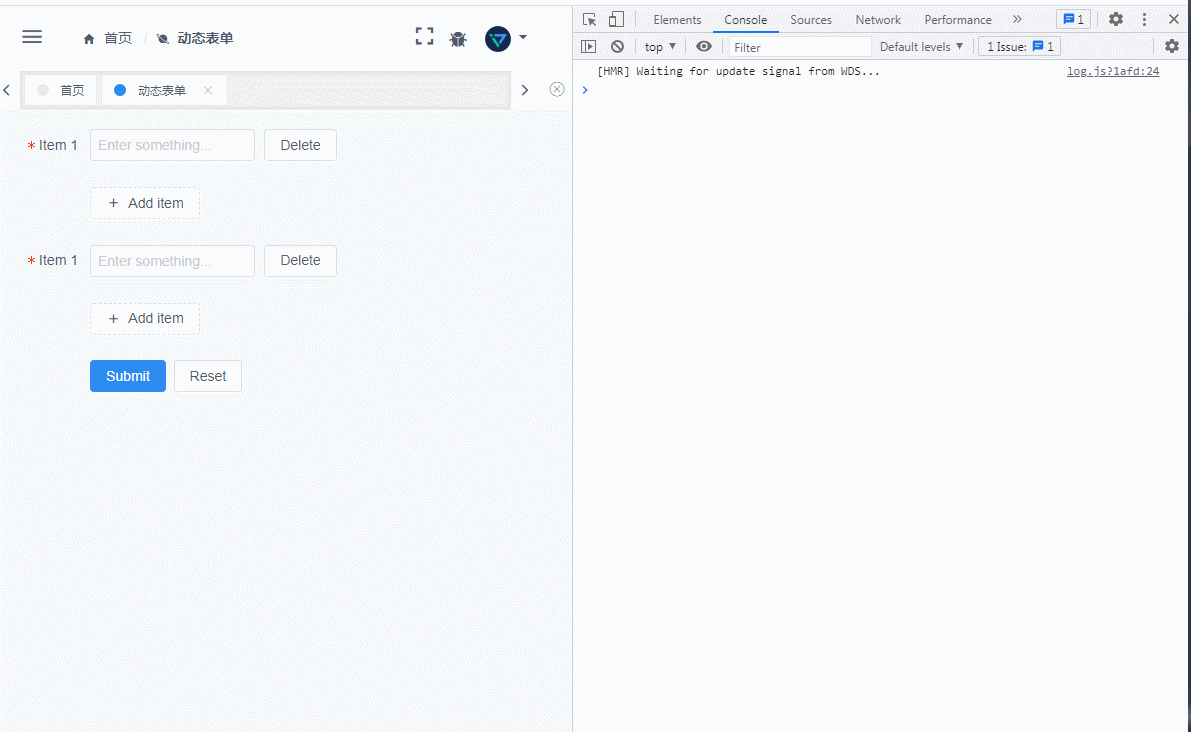
没有了警告
至此完
智能推荐
python编码问题之encode、decode、codecs模块_python中encode在什么模块-程序员宅基地
文章浏览阅读2.1k次。原文链接先说说编解码问题编码转换时,通常需要以unicode作为中间编码,即先将其他编码的字符串解码(decode)成unicode,再从unicode编码(encode)成另一种编码。 Eg:str1.decode('gb2312') #将gb2312编码的字符串转换成unicode编码str2.encode('gb2312') #将unicode编码..._python中encode在什么模块
Java数据流-程序员宅基地
文章浏览阅读949次,点赞21次,收藏15次。本文介绍了Java中的数据输入流(DataInputStream)和数据输出流(DataOutputStream)的使用方法。
ie浏览器无法兼容的问题汇总_ie 浏览器 newdate-程序员宅基地
文章浏览阅读111次。ie无法兼容_ie 浏览器 newdate
想用K8s,还得先会Docker吗?其实完全没必要-程序员宅基地
文章浏览阅读239次。这篇文章把 Docker 和 K8s 的关系给大家做了一个解答,希望还在迟疑自己现有的知识储备能不能直接学 K8s 的,赶紧行动起来,K8s 是典型的入门有点难,后面越用越香。
ADI中文手册获取方法_adi 如何查看数据手册-程序员宅基地
文章浏览阅读561次。ADI中文手册获取方法_adi 如何查看数据手册
React 分页-程序员宅基地
文章浏览阅读1k次,点赞4次,收藏3次。React 获取接口数据实现分页效果以拼多多接口为例实现思路加载前 加载动画加载后 判断有内容的时候 无内容的时候用到的知识点1、动画效果(用在加载前,加载之后就隐藏或关闭,用开关效果即可)2、axios请求3、map渲染页面4、分页插件(antd)代码实现import React, { Component } from 'react';//引入axiosimport axios from 'axios';//引入antd插件import { Pagination }_react 分页
随便推点
关于使用CryPtopp库进行RSA签名与验签的一些说明_cryptopp 签名-程序员宅基地
文章浏览阅读449次,点赞9次,收藏7次。这个变量与验签过程中的SignatureVerificationFilter::PUT_MESSAGE这个宏是对应的,SignatureVerificationFilter::PUT_MESSAGE,如果在签名过程中putMessage设置为true,则在验签过程中需要添加SignatureVerificationFilter::PUT_MESSAGE。项目中使用到了CryPtopp库进行RSA签名与验签,但是在使用过程中反复提示无效的数字签名。否则就会出现文章开头出现的数字签名无效。_cryptopp 签名
新闻稿的写作格式_新闻稿时间应该放在什么位置-程序员宅基地
文章浏览阅读848次。新闻稿是新闻从业者经常使用的一种文体,它的格式与内容都有着一定的规范。本文将从新闻稿的格式和范文两个方面进行介绍,以帮助读者更好地了解新闻稿的写作_新闻稿时间应该放在什么位置
Java中的转换器设计模式_java转换器模式-程序员宅基地
文章浏览阅读1.7k次。Java中的转换器设计模式 在这篇文章中,我们将讨论 Java / J2EE项目中最常用的 Converter Design Pattern。由于Java8 功能不仅提供了相应类型之间的通用双向转换方式,而且还提供了转换相同类型对象集合的常用方法,从而将样板代码减少到绝对最小值。我们使用Java8 功能编写了..._java转换器模式
应用k8s入门-程序员宅基地
文章浏览阅读150次。1,kubectl run创建pods[root@master ~]# kubectl run nginx-deploy --image=nginx:1.14-alpine --port=80 --replicas=1[root@master ~]# kubectl get podsNAME READY STATUS REST...
PAT菜鸡进化史_乙级_1003_1003 pat乙级 最优-程序员宅基地
文章浏览阅读128次。PAT菜鸡进化史_乙级_1003“答案正确”是自动判题系统给出的最令人欢喜的回复。本题属于 PAT 的“答案正确”大派送 —— 只要读入的字符串满足下列条件,系统就输出“答案正确”,否则输出“答案错误”。得到“答案正确”的条件是: 1. 字符串中必须仅有 P、 A、 T这三种字符,不可以包含其它字符; 2. 任意形如 xPATx 的字符串都可以获得“答案正确”,其中 x 或者是空字符串,或..._1003 pat乙级 最优
CH340与Android串口通信_340串口小板 安卓给安卓发指令-程序员宅基地
文章浏览阅读5.6k次。CH340与Android串口通信为何要将CH340的ATD+Eclipse上的安卓工程移植到AndroidStudio移植的具体步骤CH340串口通信驱动函数通信过程中重难点还存在的问题为何要将CH340的ATD+Eclipse上的安卓工程移植到AndroidStudio为了在这个工程基础上进行改动,验证串口的数据和配置串口的参数,我首先在Eclipse上配置了安卓开发环境,注意在配置环境是..._340串口小板 安卓给安卓发指令