UVM常用类及树形结构_uvm_component_utils-程序员宅基地
目录
三、UVM常用类
1.1uvm_component和uvm_object
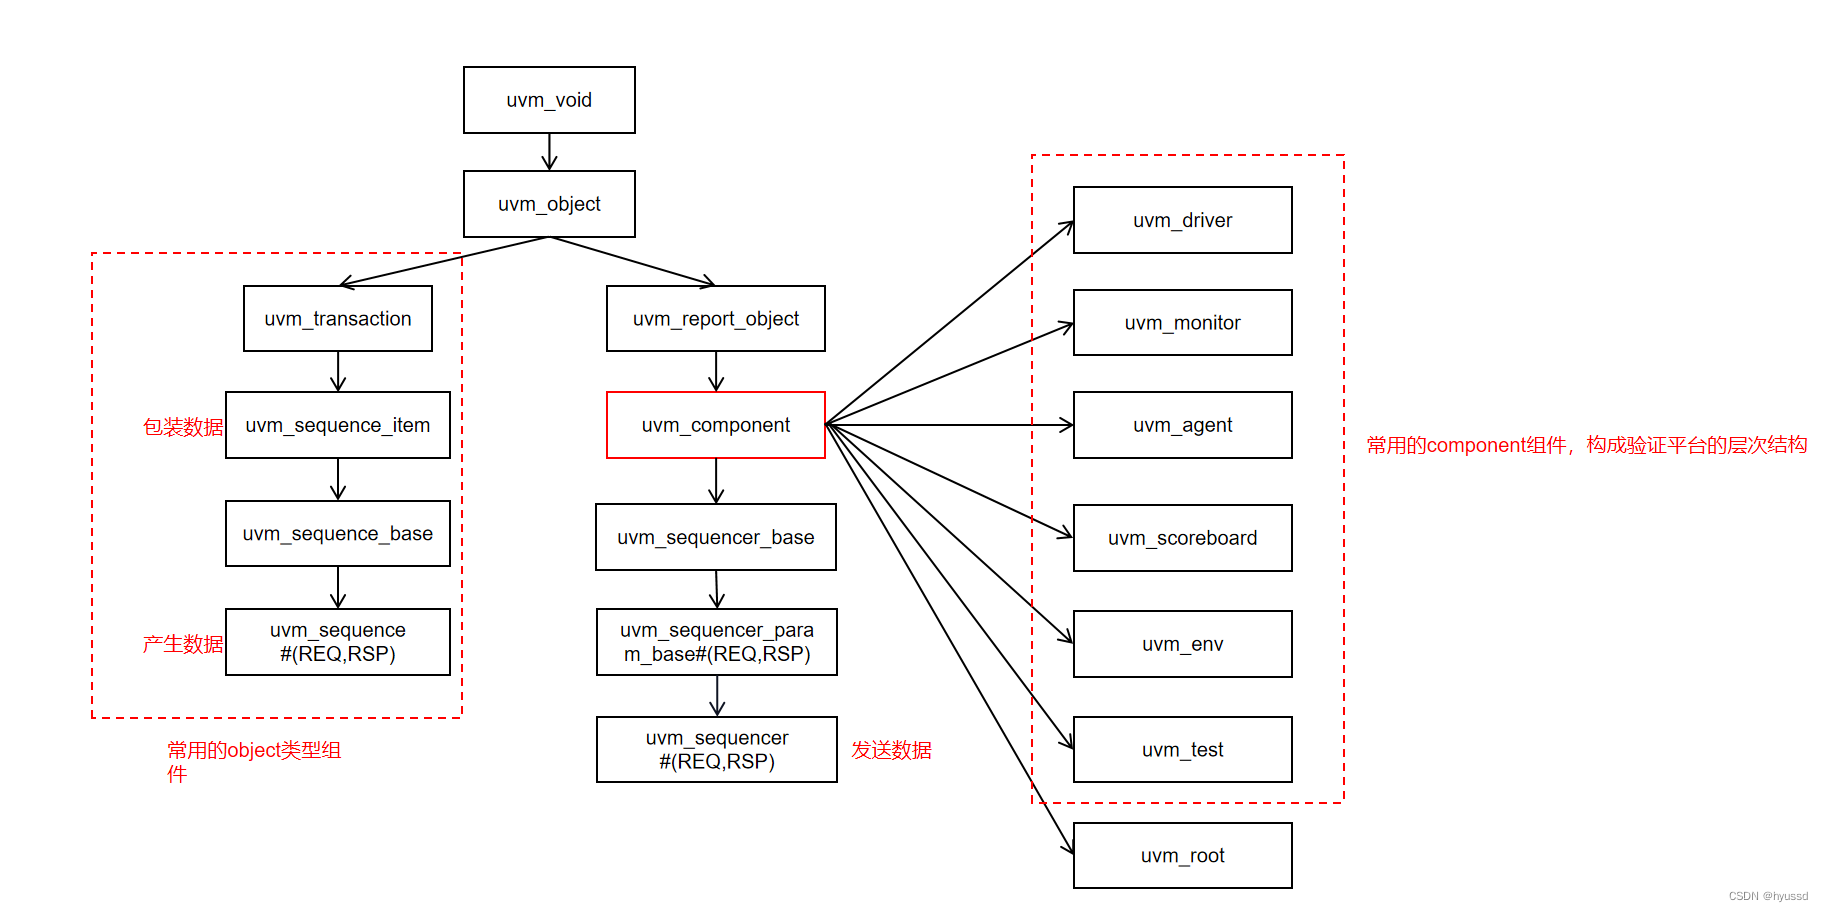
图1 UVM常用类的继承关系
UVM中两大基本概念就是component和object,uvm_object是UVM中最基本的类,几乎所有的类都继承于uvm_object,其中包括uvm_component。因此uvm_component拥有uvm_object的基本特性,但又有自己独特的特性:
1.uvm_component通过在new时指定parent参数来形成一种树形组织结构,这是uvm_object所没有的,因此只有uvm_component及其派生类可以成为树形结构的结点;
2.uvm_component拥有phase自动执行的特点,整个树形结构按照phase机制自动执行结点的各个phase;
1.2常用的uvm_object类
uvm_sequence_item:所有的transaction要从uvm_sequence_item派生,事实上uvm_sequence_item派生自uvm_transaction,但其增加了很多实用的成员变量和方法,因此transaction从uvm_sequence_item派生,可以直接使用这些新增加的变量和方法;
//transaction派生自uvm_sequence_item
class my_transaction extends uvm_sequence_item;
//定义数据包
    typedef enum{WR,RD} opt_e;
    rand bit[7:0] data;
    rand opt_e opt;
//注册factory
    `uvm_object_utils_begin(my_transaction)
//加入field_automatic
        `uvm_field_int(data,UVM_ALL_ON)
        `uvm_field_enum(opt_e,opt,UVM_ALL_ON)
    `uvm_object_utils_end
//new函数
    function new(string name="my_transaction");
        super.new(name);
    endfunction
    function my_transaction my_copy(my_transaction tr);
        this.data=tr.data;
        this.opt=tr.opt;
    endfunction
    function void my_print(my_transaction tr);
        $write("data=%0d",tr.data);
        $write("opt=%s",tr.opt.name());
    endfunction
//重写pre_randomize和post_randomize函数
    extern function void pre_randomize();
    extern function void post_randomize();
endclass
uvm_sequence:所有sequence要从uvm_sequence派生,sequence就是sequence_item的组合,在task body中通过`uvm_do(my_trans)自动创建transaction的实例my_trans并将其随机化,最终发送给sequencer;
//sequence派生自uvm_sequencer
class my_sequence extends uvm_sequence #(my_transaction);
//声明transaction句柄
    my_transaction tr;
//new函数
    function new(string name="my_sequence");
        super.new(name);
    endfunction
//在task body中产生随机transaction
    virtual task body();
//使用starting_phase提起和撤销objection
        if(starting_phase!=null)
            starting_phase.raise_objection(this);
        repeat(10) begin
            `uvm_do(tr)
        end
        #100;
        if(starting_phase!=null)
            starting_phase.drop_objection(this);
    endtask
//注册factory
    `uvm_object_utils(my_sequence)
endclassconfig:config一般直接从uvm_object派生,它的作用是将所有的参数放在一个object(对象)中,然后通过config_db的方式设置给所有需要这些参数的component;
uvm_reg_item:派生自uvm_sequence_item,用于register model当中;
uvm_phase:派生自uvm_object,用于控制component的行为方式,使component按照规范执行各个不同的phase;
1.3常用的uvm_component类
uvm_driver:所有的driver都要派生自uvm_driver。driver的功能主要是向sequencer索要sequence_item(transaction),通过seq_item_port.get_next_item(req)向sequencer索要transaction,并驱动到DUT端口,完成从事务级到端口级的转换。
//driver派生自uvm_driver
class my_driver extends uvm_driver #(my_transaction);
//声明virtual interface
    virtual my_if vif;
//new函数
    function new(string name="my_driver",uvm_component parent=null);
        super.new(name,parent);
    endfunction
//加入factory
    `uvm_component_param_utils(my_driver)
//build_phase中进行接口连接和创建实例
    virtual function void build_phase(uvm_phase phase);
        super.build_phase(phase);
        uvm_config_db#(virtual my_if)::get(this,"","vif",vif);//接口连接
    endfunction
//task main_phase中向sequencer请求transaction并驱动到DUT
    task main_phase(uvm_phase phase);
        super.main_phase(phase);
        vif.data<='b0;
        vif.winc<=1'b0;
        while(!vif.wrst_n)
            @(posedge vif.wclk);
        while(1) begin//使用while(1)循环,只要有transaction即驱动
            seq_item_port.get_next_item(req);//try_next_item为非阻塞
            drive_one_pkt(req);
            seq_item_port.item_done();
        end
    endtask
//驱动方式需要满足总线协议
    extern virtual task drive_one_pkt(my_transaction tr);
endclassuvm_monitor:所有monitor都要派生自uvm_monitor。monitor主要功能是从DUT端口接收数据,并将接收到的数据转换为transaction级的sequence_item,最终发送给scoreboard进行比较;
//monitor继承自uvm_monitor
class my_monitor extends uvm_monitor;
//声明虚接口
    virtual my_if vif;
//声明发信端口将采样的数据发送给scoreboard
    uvm_analysis_port#(my_transaction) ap;
//注册工厂
    `uvm_component_utils(my_monitor)
//new函数
    function new(string name="my_monitor",uvm_component parent=null);
        super.new(name,parent);
    endfunction
//接口连接和创建实例
    virtual function void build_phase(uvm_phase phase);
        super.build_phase(phase);
        ap=new("ap",this);//例化通信端口
        uvm_config_db#(virtual my_if)::get(this,"","vif",vif);//接口连接
    endfunction
//main_phase中实现DUT数据采样
    task main_phase(uvm_phase phase);
        super.main_phase(phase);
        my_transaction tr;
        while(1) begin
            tr=new("tr");
            collect_one_pkt(tr);
            ap.write(tr);//通过端口发送至scoreboard
        end
    endtask
//采样方式满足总线协议
    extern virtual task collect_one_pkt(my_transaction tr);
endclassuvm_sequencer:所有sequencer都要派生自uvm_sequencer。sequencer的功能是组织管理sequence,当driver请求数据时,它就把sequence发送的sequence_item转发给driver;
//sequencer继承自uvm_sequencer
class my_sequencer extends uvm_sequencer #(my_transaction);
//注册工厂
    `uvm_component_utils(my_sequencer)
//new函数
    function new(string name="my_sequencer",uvm_component parent=null);
        super.new(name,parent);
    endfunction
endclassuvm_scoreboard:一般scoreboard派生自uvm_scoreboard。scoreboard的功能是接收reference model和monitor发送来的数据,并进行比较,根据比较结果判断DUT功能是否正常;
//scoreboard继承自uvm_scoreboard
class my_scoreboard extends uvm_scoreboard;
//声明队列存放期望值
    my_transaction expect_queue[$];
//声明收信端口
    uvm_blocking_get_port #(my_transaction) exp_port;
    uvm_blocking_get_port #(my_transaction) act_port;
//注册工厂
    `uvm_component_utils(my_scoreboard)
//new函数
    function new(string name="my_scoreboard",uvm_component parent=null);
        super.new(name,parent);
    endfunction
//build_phase中创建实例
    function void build_phase(uvm_phase phase);
        super.build_phase(phase);
        exp_port=new("exp_port",this);
        act_port=new("act_port",this);
    endfunction
//mian_phase中实现期望和实际结果的比较,并产生比较结果
    task main_phase(uvm_phase phase);
        super.main_phase(phase);
        my_transaction expect,actual,tmp;//定义期望、实际、中转事务
        bit result;//定义对比结果
        fork//期望结果存储与对比同时进行
            while(1) begin
                exp_port.get(expect);//接收reference model产生的期望结果
                expect_queue.push_back(expect);//存放期望结果
            end
            while(1) begin
                act_port.get(actual);//从monitor接收DUT输出结果
                if(expect_queue.size()>0) begin
                    tmp=expect_queue.pop_front();//取出期望数据
                    result=actual.compare(tmp);//比较期望和实际结果
                    if(result) begin
                        `uvm_info("my_scoreboard","compare successful",UVM_LOW)
                    end
                    else begin
                        `uvm_error("my_scoreboard","compare failed")
                        $display("the expect pkt is");
                        tmp.my_print();
                        $display("this actual pkt is");
                        actual.my_print();
                    end
                end
                else begin
                    `uvm_error("my_scoreboard","received from DUT,while expect_queue is empty")
                end
            end
        join
    endtask
endclass
reference model:reference_model一般直接派生自uvm_component。通过高级语言如SV实现和DUT相同的功能,并发送输出结果供scoreboard进行比较。也通过DPI接口进行调用C或其他高级语言model;
//reference model继承自uvm_component
class my_model extends uvm_component;
//声明通信端口句柄
    uvm_blocking_get_port #(my_transaction) port;
    uvm_analysis_port #(my_transaction) ap;
//注册工厂
    `uvm_component_utils(my_model)
//new函数
    function new(string name="my_model",uvm_component parent=null);
        super.new(name,parent);
    endfunction
//创建实例
    function void build_phase(uvm_phase phase);
        super.build_phase(phase);
        port=new("port",this);
        ap=new("ap",this);
    endfunction
//main_phase接收DUT输入数据并实现DUT功能,产生期望结果发送给scoreboard
    virtual task main_phase(uvm_phase phase);
        super.main_phase(phase);
        my_transaction tr;
        my_transaction tr_new;
        while(1) begin
            port.get(tr);
            tr_new=new("tr_new");
            tr_new.my_copy(tr);
            tr_new.my_print();
            ap.write(tr_new);
        end
    endtask
endclassuvm_agent:所有的agent派生自uvm_agent。它的作用是将driver和monitor封装在一起,其引入了枚举变量is_active,用于控制实际例化的对象;
//agent继承自uvm_agent
class my_agent extends uvm_agent;
//声明driver、monitor、sequencer句柄
    my_driver    drv;
    my_monitor   mon;
    my_sequencer sqr;
//声明通信端口
    uvm_analysis_port #(my_transaction) ap;
//注册工厂
    `uvm_component_utils(my_agent)
//new函数
    function new(string name="my_agent",uvm_component parent=null);
        super.new(name,parent);
    endfunction
//build_phase中创建实例,agent中内置成员变量is_active
    function void build_phase(uvm_phase phase);
        super.build_phase(phase);
        if(is_active==UVM_ACTIVE) begin
            sqr=my_sequencer::type_id::create("sqr",this);
            drv=my_driver::type_id::create("drv",this);
        end
        mon=my_monitor::type_id::create("mon",this);
    endfunction
//端口连接
    function void connect_phase(uvm_phase phase);
        super.connect_phase(phase);
        if(is_active==UVM_ACTIVE) begin
            drv.seq_item_port.connect(sqr.seq_item_export);//driver与sequencer通信端口连接
        end
        ap=mon.ap;//agent发信端口指向monitor发信端口
    endfunction
endclassuvm_env:所有的env都派生自uvm_env。env作用是将验证平台固定不变的component封装在一起,提高验证平台的复用性。当要运行不同测试用例时,只需例化env即可生成相同的验证组件;
//env继承自uvm_env
class my_env extends uvm_env;
//声明in/out agent、reference model及scoreboard句柄
    my_agent i_agt,o_agt;
    my_model mdl;
    my_scoreboard scb;
//fifo用于缓存发向reference model的输入采样数据
    uvm_tlm_analysis_fifo #(my_transaction) agt_mdl_fifo;
//注册工厂
    `uvm_component_utils(my_env)
//new函数
    function new(string name="my_env",uvm_component parent=null);
        super.new(name,parent);
    endfunction
//build_phase创建实例并指定agent.is_active值
    function void build_phase(uvm_phase phase);
        super.build_phase(phase);
        i_agt=my_agent::type_id::create("i_agt",this);
        o_agt=my_agent::type_id::create("o_agt",this);
        mdl  =my_model::type_id::create("mdl",this);
        scb  =my_scoreboard::type_id::create("scb",this);
        i_agt.is_active=UVM_ACTIVE;
        o_agt.is_active=UVM_PASSIVE;
    endfunction
//connect_phase中进行component的通信端口连接
    function void connect_phase(uvm_phase phase);
        super.connect_phase(phase);
//model通过fifo接收来自monitor的输入采样数据
        i_agt.ap.connect(agt_mdl_fifo.analysis_export);
        mdl.port.connect(agt_mdl_fifo.blocking_get_export);
//mdl产生的期望结果发送给scoreboard的exp_port
        mdl.ap.connect(scb.exp_port);
//monitor采样的输出数据发送给scoreboard的act_port
        o_agt.ap.connect(scb.act_port);
    endfunction
enclass
uvm_test:所有的testcase都要派生自uvm_test或其派生类。通常会从uvm_test派生出base_test,例化env并设置sequencer的default_sequence,并进行验证平台的基础设置或参数设置,实际的test_case派生自base_test,然后根据测试点进行针对性修改。可以通过命令行参数+UVM_TESTNAME=<case_name>指定运行的case;
//base_test继承自uvm_test
class base_test extends uvm_test;
//声明env句柄
    my_env env;
//new函数
    function new(string name="base_test",uvm_component parent=null);
        super.new(name,parent);
    endfunction
//build_phase中创建实例并启动sequence
    function void build_phase(uvm_phase phase);
        super.build_phase(phase);
        env=my_env::type_id::create("env",this);
//启动default_sequence
        uvm_config_db#(uvm_object_wrapper)::set(this,
                                                "env.i_agt.sqr.main_phase",
                                                "default_sequence",
                                                my_sequence::type_id::get());
    endfunction
//report_phase进行仿真后报告
    function void report_phase(uvm_phase);
        super.report_phase(phase);
        uvm_report_server server;
        int err_num;
        server=get_report_server();
        err_num=server.get_severity_count(UVM_ERROR);//获取UVM_ERROR数量
        if(err_num!=0) begin
            $display("TEST CASE IS ERROR");
        end
        else begin
            $diaplay("TEST CASE IS PASSED");
        end
    endfunction
endclass
top_tb:验证的顶层模块,进行接口发信、DUT例化以及case运行;
`timescale 1ns/1ps
`include "uvm_macros.svh"
import uvm_pkg::*;
`include "dut.v"
`include "my_if.sv"
import tb.pkg::*;
//tb顶层模块
module top_tb;
//定义公共信号clk、rst_n等
    reg clk,rst_n;
//声明接口
    my_if.INPUT  input_if;
    my_if.OUTPUT output_if;
    my_if vif(clk,rst_n);
//driver、monitor的接口发信
    initial begin
        uvm_config_db#(virtual my_if)::set(null,"uvm_test_top.i_agt.drv","vif",input_if);
        uvm_config_db#(virtual my_if)::set(null,"uvm_test_top.i_agt.mon","vif",input_if);
        uvm_config_db#(virtual my_if)::set(null,"uvm_test_top.o_agt.mon","vif",outpur_if);
    end
//clk
    initial begin
        clk=0;
        forever #10 clk=~clk;
    end
//rst_n
    initial begin
        rst_n=1'b0;
        #100;
        rst_n=1'b1;
    end
//运行case
    initial begin
        run_test();
    end
//例化DUT
    dut inst_dut(vif);
endmodule
1.4UVM树形结构
UVM采样树形的组织结构管理验证平台的各个component。所有的component类如sequencer、driver、monitor、agent、model、scoreboard、env、case都是树的一个结点。它们在new时都需要指定一个uvm_component类型的变量parent,及它们的上一层级(父结点),通常都在component的上一层级创建实例,因此parent参数为this。
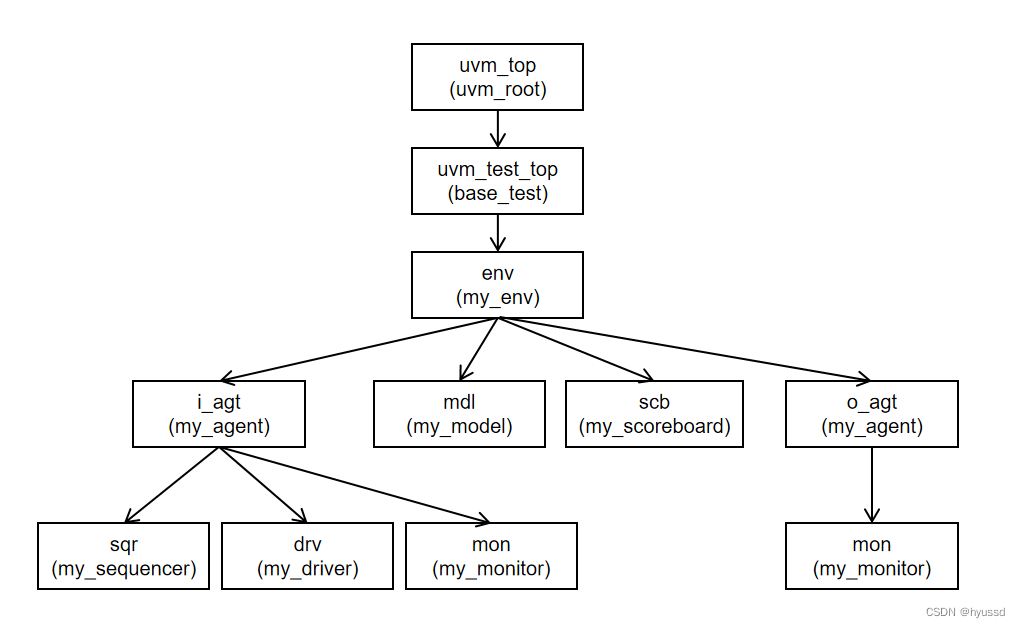
图2 UVM树形结构
如果component例化时指定其父结点parent为null,那么这个component的parent将会被系统设置为系统中唯一的uvm_root的实例uvm_top。uvm_root的存在确保了整个验证平台只有一颗UVM树,所有的结点都是uvm_top的子结点。使用uvm_top.print_topology()函数可以打印整个UVM树的拓扑结构。通过comp.get_full_name()可以返回任意结点的路径索引。
uvm_top.print_topology();//打印拓扑结构
`uvm_info("drv_full_name",get_full_name(),UVM_LOW)//打印路径uvm_test_top.env.i_agt.drv
使用comp.get_parent()返回component的parent类,使用comp.get_child(string name)返回指定的child类,comp.get_num_children()函数用于返回当前component所有child的数量。
//UVM源代码
extern virtual function uvm_component get_parent();
extern function uvm_component get_child(string name);
extern function int get_num_children();智能推荐
Python魔法方法、魔法属性_magicattribute-程序员宅基地
文章浏览阅读243次。magic method魔法方法Magic attribute魔法属性_magicattribute
Hive自定义GenericUDF函数_使用genericudf自定义函数-程序员宅基地
文章浏览阅读1.1k次,点赞9次,收藏5次。*** 自定义函数:将字符串转换为大写*//*** 初始化函数* @param arguments 函数参数的ObjectInspector数组* @return 函数返回值的ObjectInspector* @throws UDFArgumentException 如果参数数量不正确*/@Override// 检查参数数量是否为1= 1) {// 获取参数的ObjectInspector并创建Converter。_使用genericudf自定义函数
论软件设计模式及应用(系统架构师2024新版)_论软件设计模式的应用及其与软件质量之间的关系 csdn-程序员宅基地
文章浏览阅读5.3k次。2019年10月,本人所在保险公司启动了超级销售APP项目,该项目通过运用先进的销售工具、客户管理、营销活动管理等功能以达到提升销售人员的效能,加大业务驱动的目标。在该项目中我担任系统架构师,负责系统的架构设计工作。本文以该项目为例,主要论述了软件设计模式在开发中的具体应用。通过抽象工厂模式,实现出单流程车+人联合销售模块间的对象解耦,符合设计模式迪米特法则;通过外观模式,实现保费支付实名认证生物识别、手机号校验隐藏系统的复杂性,系统中的接口提供一致的界面;_论软件设计模式的应用及其与软件质量之间的关系 csdn
STM32 EC200 物联网项目实操 第2篇 FTP OTA升级_ftp 服务器ota升级-程序员宅基地
文章浏览阅读1k次,点赞14次,收藏9次。记录了STM32F0系统单片机 BOOT引导程序通过4G模块进行OTA升级的实操过程使用EC200 4G物联网模块,使用MD5算法校验OTA升级文件正确性。BOOT实现了FTP服务器OTA bin文件获取,跳转APP主程序的功能。硬件环境软件开发环境IAR 8.32.1VSCODESTM32 CUBE软件支持包ST HAL库4G模块EC200N-CN。_ftp 服务器ota升级
【A情感文本分类实战】2024 Pytorch+Bert/Roberta+TextCNN/BiLstm/Lstm+Prompt-Tuning等实现IMDB情感文本分类完整项目(项目已开源)_roberta文本分类-程序员宅基地
文章浏览阅读3.1w次,点赞64次,收藏241次。顶会的代码干净利索,借鉴其完成了以下工程本工程采用Pytorch框架,使用上游语言模型下游网络模型的结构实现IMDB情感分析预训练大语言模型可选择Bert、Roberta下游网络模型可选择BiLSTM、LSTM、TextCNN、GRU、Attention以及其组合语言模型和网络模型扩展性较好,可以此为BaseLine再使用你的数据集,模型最终的准确率均在90%以上项目已开源,clone下来再配个简单环境就能跑。_roberta文本分类
阿里云的海外虚拟云主机能否使用谷歌服务-程序员宅基地
文章浏览阅读485次。阿里云的海外虚拟云主机可以使用谷歌服务,但是需要注意地区和政策限制。_阿里云国外服务器可以访问谷歌吗
随便推点
强烈推荐 10 本我私藏的数据库书单,附读书方法_数据库书籍-程序员宅基地
文章浏览阅读1.2w次,点赞25次,收藏130次。二哥有推荐的数据库书单吗?关于 MySQL 和 Oracle 的,谢谢了。读者小猫私信问了我上面这个问题,我觉得问题挺典型的,值得写篇文章分享一下。因为对于 Java 程序员来说,几乎不可避免地要和数据库打交道,MySQL 和 Oracle 恰好又是两个使用最广泛的数据库。MySQL 和 Oracle 都属于关系型数据库,现在都隶属于甲骨文公司,这家公司的产品很牛逼,CEO 拉里埃尔森也很牛逼,和史蒂夫乔布斯是铁哥们。Oracle 相对 MySQL 更沉重一些,属于企业级应用。而 MySQL 是开源._数据库书籍
[mysql]约束_不能对自增列使用check约束-程序员宅基地
文章浏览阅读380次。sre_不能对自增列使用check约束
NodeJS之Koa框架_nodejskoa框架-程序员宅基地
文章浏览阅读3.4k次,点赞2次,收藏28次。文章目录1 koa简介1.1 Koa应用1.2 中间件1.3 多个中间件的合并1.4 路由1.5 context对象1.6 错误处理机制1.7 cookie1.8 session1.9 Request对象1.9.1 this.request.header1.9.2 this.request.method1.9.3 this.request.length1.9.4 this.request.path..._nodejskoa框架
File “C:\python\Scripts\pip.exe\__main__.py“, line 4, in <module>安装了pip却无法使用解决_file "d:\python\python39\scripts\jupyter-lab.exe\_-程序员宅基地
文章浏览阅读8.5k次,点赞6次,收藏5次。问题不难,庆幸你看到这个博客我找了一下午才找到原因原因是环境变量没有配好这样配 然后重新打开页面就可以了_file "d:\python\python39\scripts\jupyter-lab.exe\__main__.py", line 4, in
WPF,解决Listbox,按住ListboxItem向下拖出Listbox,横向滚动条跑到最后。-程序员宅基地
文章浏览阅读186次。类似这种样式的控件,。,在横向滚动条隐藏的情况下有这样的问题。(横向滚动条显示的时候也会,,目前不知道怎么解决。)因为这个控件偏移是利用ListBox的ItemsPanelTemplate模版里的StackPanel的宽度通过设置"(UIElement.RenderTransform).(TranslateTransform.X)"来偏移到指定位置。所以的横向滚动条必须在最前面不..._wpf listbox获取滚动条位置
virtualbox安装xp后无网络_virtualbox的网络里面什么也没有-程序员宅基地
文章浏览阅读8k次,点赞2次,收藏2次。在ubuntu中的virtualbox中安装好了xp后却发现无法上网,网络连接中也没有任何网络可设置,网上搜到的答案都是如何配置virtualbox的网络连接方式,偶有一个人问到和我一样的问题,回答的也不知所云。后来想既然网络连接中什么也没有,该不会是网卡没安装好吧,果然,在设备管理器中网卡图标是打问号的。于是尝试安装网卡,先选了个Intel pro/1000 mt desktop (82540E_virtualbox的网络里面什么也没有