Android Studio开发:简单的登录注册界面_android studio 登录注册页面-程序员宅基地
技术标签: Android开发
Android开发:编写简单的登录界面与注册界面
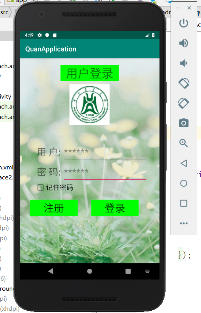
1.登录界面布局
1.1主布局的布局方式是垂直布局,第一个TextView控件在顶部居中布置,显示“用户登录
”字样
<TextView
        android:layout_width="wrap_content"
        android:layout_height="wrap_content"
        android:layout_marginTop="20dp"
        android:layout_gravity="center"
        android:paddingLeft="16dp"
        android:paddingRight="16dp"
        android:background="#00FF00"
        android:textSize="35dp"
        android:text="@string/login_text" />
第二个ImageView控件位于TextView控件下方
<ImageView
        android:layout_width="wrap_content"
        android:layout_height="wrap_content"
        android:layout_gravity="center"
        android:layout_marginTop="10dp"
        android:src="@mipmap/school4"/>
1.2添加第一个子布局,布局方式是水平布局,包含一个TextView控件和一个EditView控件,显示“用户”,和获取用户账号信息。
<LinearLayout
        android:layout_width="wrap_content"
        android:layout_height="wrap_content"
        android:orientation="horizontal">

        <TextView
            android:layout_width="wrap_content"
            android:layout_height="wrap_content"
            android:layout_marginTop="50dp"
            android:layout_marginLeft="50dp"
            android:text="@string/username_text"
            android:textSize="28dp" />

        <EditText
            android:layout_width="250dp"
            android:layout_height="wrap_content"
            android:id="@+id/input_user_text"
            android:layout_marginTop="50dp"
            android:layout_marginLeft="5dp"
            android:maxLines="1"
            android:textSize="28dp"
            android:hint="@string/input_user_text"
            />

    </LinearLayout>
1.3第二个子布局和第一个子布局类似,稍微改一下.xml文件就可以,用于显示“密码”和获取密码信息
<LinearLayout
        android:layout_width="wrap_content"
        android:layout_height="wrap_content"
        android:orientation="horizontal">

        <TextView
            android:layout_width="wrap_content"
            android:layout_height="wrap_content"
            android:layout_marginLeft="50dp"
            android:text="@string/key_text"
            android:textSize="28dp" />

        <EditText
            android:layout_width="250dp"
            android:layout_height="wrap_content"
            android:id="@+id/input_key_text"
            android:layout_marginLeft="5dp"
            android:maxLines="1"
            android:textSize="28dp"
            android:hint="@string/input_key_text"
            />

    </LinearLayout>
1.4第三个子布局是加入一个CheckBox控件,用于记住账号和密码信息
<LinearLayout
        android:layout_width="wrap_content"
        android:layout_height="wrap_content"
        android:orientation="horizontal">
        <CheckBox
            android:layout_width="wrap_content"
            android:layout_height="wrap_content"
            android:id="@+id/checkbox_text"
            android:orientation="vertical"
            android:layout_marginLeft="45dp"
            android:checked="true"
            android:textSize="20dp"
            android:text="@string/checkbox_text"/>

    </LinearLayout>
1.5最后一个子布局是两个Button控件,用于显示“注册”按钮和“登录”按钮
<LinearLayout
        android:layout_width="wrap_content"
        android:layout_height="wrap_content"
        android:layout_marginTop="20dp"
        android:orientation="horizontal">

        <Button
            android:layout_width="wrap_content"
            android:layout_height="wrap_content"
            android:id="@+id/register_button"
            android:layout_marginLeft="30dp"
            android:background="#00FF00"
            android:paddingLeft="40dp"
            android:paddingRight="40dp"
            android:textSize="30dp"
            android:text="@string/register_button" />

        <Button
            android:layout_width="wrap_content"
            android:layout_height="wrap_content"
            android:id="@+id/login_button"
            android:layout_marginLeft="40dp"
            android:background="#00FF00"
            android:paddingLeft="40dp"
            android:paddingRight="40dp"
            android:textSize="30dp"
            android:text="@string/login_button"/>

    </LinearLayout>
1.6 背景图片都是我自己从网上找的,这个不重要
1.7 activity_main.xml文件
<?xml version="1.0" encoding="utf-8"?>
<LinearLayout xmlns:android="http://schemas.android.com/apk/res/android"


    android:layout_width="match_parent"
    android:layout_height="match_parent"
    android:orientation="vertical"
    android:background="@mipmap/bgj">


    <TextView
        android:layout_width="wrap_content"
        android:layout_height="wrap_content"
        android:layout_marginTop="20dp"
        android:layout_gravity="center"
        android:paddingLeft="16dp"
        android:paddingRight="16dp"
        android:background="#00FF00"
        android:textSize="35dp"
        android:text="@string/login_text" />

    <ImageView
        android:layout_width="wrap_content"
        android:layout_height="wrap_content"
        android:layout_gravity="center"
        android:layout_marginTop="10dp"
        android:src="@mipmap/school4"/>

    <LinearLayout
        android:layout_width="wrap_content"
        android:layout_height="wrap_content"
        android:orientation="horizontal">

        <TextView
            android:layout_width="wrap_content"
            android:layout_height="wrap_content"
            android:layout_marginTop="50dp"
            android:layout_marginLeft="50dp"
            android:text="@string/username_text"
            android:textSize="28dp" />

        <EditText
            android:layout_width="250dp"
            android:layout_height="wrap_content"
            android:id="@+id/input_user_text"
            android:layout_marginTop="50dp"
            android:layout_marginLeft="5dp"
            android:maxLines="1"
            android:textSize="28dp"
            android:hint="@string/input_user_text"
            />

    </LinearLayout>

    <LinearLayout
        android:layout_width="wrap_content"
        android:layout_height="wrap_content"
        android:orientation="horizontal">

        <TextView
            android:layout_width="wrap_content"
            android:layout_height="wrap_content"
            android:layout_marginLeft="50dp"
            android:text="@string/key_text"
            android:textSize="28dp" />

        <EditText
            android:layout_width="250dp"
            android:layout_height="wrap_content"
            android:id="@+id/input_key_text"
            android:layout_marginLeft="5dp"
            android:maxLines="1"
            android:textSize="28dp"
            android:hint="@string/input_key_text"
            />

    </LinearLayout>

    <LinearLayout
        android:layout_width="wrap_content"
        android:layout_height="wrap_content"
        android:orientation="horizontal">
        <CheckBox
            android:layout_width="wrap_content"
            android:layout_height="wrap_content"
            android:id="@+id/checkbox_text"
            android:orientation="vertical"
            android:layout_marginLeft="45dp"
            android:checked="true"
            android:textSize="20dp"
            android:text="@string/checkbox_text"/>

    </LinearLayout>

    <LinearLayout
        android:layout_width="wrap_content"
        android:layout_height="wrap_content"
        android:layout_marginTop="20dp"
        android:orientation="horizontal">

        <Button
            android:layout_width="wrap_content"
            android:layout_height="wrap_content"
            android:id="@+id/register_button"
            android:layout_marginLeft="30dp"
            android:background="#00FF00"
            android:paddingLeft="40dp"
            android:paddingRight="40dp"
            android:textSize="30dp"
            android:text="@string/register_button" />

        <Button
            android:layout_width="wrap_content"
            android:layout_height="wrap_content"
            android:id="@+id/login_button"
            android:layout_marginLeft="40dp"
            android:background="#00FF00"
            android:paddingLeft="40dp"
            android:paddingRight="40dp"
            android:textSize="30dp"
            android:text="@string/login_button"/>

    </LinearLayout>

</LinearLayout>
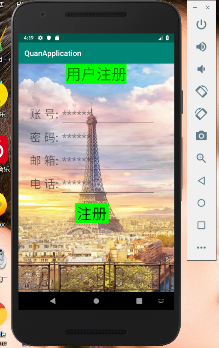
2.注册界面布局
2.1主布局为垂直布局,第一个TextView控件在顶部居中布置,显示“用户注册”字样
<TextView
        android:layout_width="wrap_content"
        android:layout_height="wrap_content"
        android:text="@string/register_surface"
        android:textSize="40dp"
        android:background="#00FF00"
        android:layout_gravity="center"
        />
2.2第一个LinearLayout控件,包含一个TextView控件和EditView控件,用于提醒用户输入和获取账号信息
<LinearLayout
        android:layout_width="wrap_content"
        android:layout_height="wrap_content"
        android:orientation="horizontal">

        <TextView
            android:layout_width="wrap_content"
            android:layout_height="wrap_content"
            android:text="@string/identity_text"
            android:textSize="30dp"
            android:layout_marginTop="50dp"
            android:layout_marginLeft="30dp"/>

        <EditText
            android:id="@+id/input_identity_text"
            android:layout_width="250dp"
            android:layout_height="wrap_content"
            android:layout_marginTop="50dp"
            android:layout_marginLeft="5dp"
            android:textSize="30dp"
            android:maxLines="1"
            android:hint="******"/>
    </LinearLayout>
2.2 第二个、第三个以及第四个LinearLayout控件,组件和第一个LinearLayout控件是相同的,分别用于提醒用户输入和系统获取密码、邮箱、电话等信息
<LinearLayout
        android:layout_width="wrap_content"
        android:layout_height="wrap_content"
        android:orientation="horizontal">

        <TextView
            android:layout_width="wrap_content"
            android:layout_height="wrap_content"
            android:text="@string/password_text"
            android:textSize="30dp"
            android:layout_marginLeft="30dp"/>

        <EditText
            android:id="@+id/input_password_text"
            android:layout_width="250dp"
            android:layout_height="wrap_content"
            android:layout_marginLeft="5dp"
            android:textSize="30dp"
            android:maxLines="1"
            android:hint="******"/>
    </LinearLayout>

    <LinearLayout
        android:layout_width="wrap_content"
        android:layout_height="wrap_content"
        android:orientation="horizontal">

        <TextView
            android:layout_width="wrap_content"
            android:layout_height="wrap_content"
            android:text="@string/mailbox_text"
            android:textSize="30dp"
            android:layout_marginLeft="30dp"/>

        <EditText
            android:id="@+id/input_mailbox_text"
            android:layout_width="250dp"
            android:layout_height="wrap_content"
            android:layout_marginLeft="5dp"
            android:textSize="30dp"
            android:maxLines="1"
            android:hint="******"/>
    </LinearLayout>

    <LinearLayout
        android:layout_width="wrap_content"
        android:layout_height="wrap_content"
        android:orientation="horizontal">

        <TextView
            android:layout_width="wrap_content"
            android:layout_height="wrap_content"
            android:text="@string/phonenumber_text"
            android:textSize="30dp"
            android:layout_marginLeft="30dp"/>

        <EditText
            android:id="@+id/input_phonenumber_text"
            android:layout_width="250dp"
            android:layout_height="wrap_content"
            android:layout_marginLeft="5dp"
            android:textSize="30dp"
            android:maxLines="1"
            android:hint="******"/>
    </LinearLayout>
2.3 最后一个LinearLayout控件只有Button这一个控件,显示“注册”,用于点击注册
<LinearLayout
        android:layout_width="wrap_content"
        android:layout_height="wrap_content"
        android:orientation="horizontal">
    <Button
        android:id="@+id/surface2_register_button"
        android:layout_width="wrap_content"
        android:layout_height="wrap_content"
        android:textSize="40dp"
        android:background="#00FF00"
        android:layout_marginLeft="150dp"
        android:layout_marginTop="20dp"
        android:text="@string/surface2_register_button"
        />

    </LinearLayout>
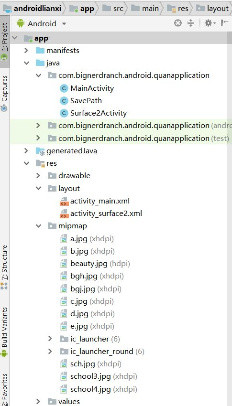
3.代码
3.1 项目结构
3.2 activity_surface2.xml
<?xml version="1.0" encoding="utf-8"?>
<LinearLayout xmlns:android="http://schemas.android.com/apk/res/android"

    android:layout_width="match_parent"
    android:layout_height="match_parent"
    android:orientation="vertical"
    android:background="@mipmap/bgh">

    <TextView
        android:layout_width="wrap_content"
        android:layout_height="wrap_content"
        android:text="@string/register_surface"
        android:textSize="40dp"
        android:background="#00FF00"
        android:layout_gravity="center"
        />

    <LinearLayout
        android:layout_width="wrap_content"
        android:layout_height="wrap_content"
        android:orientation="horizontal">

        <TextView
            android:layout_width="wrap_content"
            android:layout_height="wrap_content"
            android:text="@string/identity_text"
            android:textSize="30dp"
            android:layout_marginTop="50dp"
            android:layout_marginLeft="30dp"/>

        <EditText
            android:id="@+id/input_identity_text"
            android:layout_width="250dp"
            android:layout_height="wrap_content"
            android:layout_marginTop="50dp"
            android:layout_marginLeft="5dp"
            android:textSize="30dp"
            android:maxLines="1"
            android:hint="******"/>
    </LinearLayout>

    <LinearLayout
        android:layout_width="wrap_content"
        android:layout_height="wrap_content"
        android:orientation="horizontal">

        <TextView
            android:layout_width="wrap_content"
            android:layout_height="wrap_content"
            android:text="@string/password_text"
            android:textSize="30dp"
            android:layout_marginLeft="30dp"/>

        <EditText
            android:id="@+id/input_password_text"
            android:layout_width="250dp"
            android:layout_height="wrap_content"
            android:layout_marginLeft="5dp"
            android:textSize="30dp"
            android:maxLines="1"
            android:hint="******"/>
    </LinearLayout>

    <LinearLayout
        android:layout_width="wrap_content"
        android:layout_height="wrap_content"
        android:orientation="horizontal">

        <TextView
            android:layout_width="wrap_content"
            android:layout_height="wrap_content"
            android:text="@string/mailbox_text"
            android:textSize="30dp"
            android:layout_marginLeft="30dp"/>

        <EditText
            android:id="@+id/input_mailbox_text"
            android:layout_width="250dp"
            android:layout_height="wrap_content"
            android:layout_marginLeft="5dp"
            android:textSize="30dp"
            android:maxLines="1"
            android:hint="******"/>
    </LinearLayout>

    <LinearLayout
        android:layout_width="wrap_content"
        android:layout_height="wrap_content"
        android:orientation="horizontal">

        <TextView
            android:layout_width="wrap_content"
            android:layout_height="wrap_content"
            android:text="@string/phonenumber_text"
            android:textSize="30dp"
            android:layout_marginLeft="30dp"/>

        <EditText
            android:id="@+id/input_phonenumber_text"
            android:layout_width="250dp"
            android:layout_height="wrap_content"
            android:layout_marginLeft="5dp"
            android:textSize="30dp"
            android:maxLines="1"
            android:hint="******"/>
    </LinearLayout>

    <LinearLayout
        android:layout_width="wrap_content"
        android:layout_height="wrap_content"
        android:orientation="horizontal">
    <Button
        android:id="@+id/surface2_register_button"
        android:layout_width="wrap_content"
        android:layout_height="wrap_content"
        android:textSize="40dp"
        android:background="#00FF00"
        android:layout_marginLeft="150dp"
        android:layout_marginTop="20dp"
        android:text="@string/surface2_register_button"
        />

    </LinearLayout>

</LinearLayout>
3.3 strings.xml
<resources>
    <string name="app_name">QuanApplication</string>
    <string name="login_text">用户登录</string>
    <string name="checkbox_text">记住密码</string>
    <string name="username_text">用 户:</string>
    <string name="input_user_text">******</string>
    <string name="key_text">密 码:</string>
    <string name="input_key_text">******</string>
    <string name="register_button">注册</string>
    <string name="login_button">登录</string>

    <string name="message1">账号或者密码不能为空</string>
    <string name="message2">保存成功</string>

    <string name="press_login_button1">欢迎登录!</string>
    <string name="press_login_button2">登录失败!</string>
    <string name="press_register_button">欢迎注册!</string>

    <string name="register_surface">用户注册</string>
    <string name="identity_text">账 号:</string>
    <string name="input_identity_text">******</string>
    <string name="password_text">密 码:</string>
    <string name="input_password_text"></string>
    <string name="mailbox_text">邮 箱:</string>
    <string name="input_mailbox_text"></string>
    <string name="phonenumber_text">电 话:</string>
    <string name="input_phonenumber_text"></string>
    <string name="surface2_register_button">注册</string>
    <string name="register_message">注册成功!</string>
    <string name="surface2_message">不能为空!</string>
</resources>
3.4 MainActivity.java
package com.bignerdranch.android.quanapplication;

import android.support.v7.app.AppCompatActivity;
import android.os.Bundle;
import android.view.View;
import android.widget.Button;
import android.widget.EditText;
import android.widget.Toast;
import android.app.Activity;
import android.app.Service;
import android.text.TextUtils;
import android.view.Menu;
import android.view.View;
import android.widget.CheckBox;
import java.util.Map;
import android.content.Intent;


public class MainActivity extends AppCompatActivity {

    private CheckBox mCheckBox;
    private Button mRegisterButton;//注册按钮
    private Button mLoginButton;//登录按钮

    private EditText mUser;
    private EditText mKey;

    @Override
    protected void onCreate(Bundle savedInstanceState) {
        super.onCreate(savedInstanceState);
        setContentView(R.layout.activity_main);

        mUser=(EditText)findViewById(R.id.input_user_text);
        mKey=(EditText)findViewById(R.id.input_key_text);
        mRegisterButton=(Button)findViewById(R.id.register_button);
        mLoginButton=(Button)findViewById(R.id.login_button);
        mCheckBox=(CheckBox)findViewById(R.id.checkbox_text);
        //检查是否有账号密码,如果有,需要回显
        Map<String, String> map=SavePath.Get(this);
        if(map!=null){
            mUser.setText(map.get("user"));
            mKey.setText(map.get("key"));
        }


        mLoginButton.setOnClickListener(new View.OnClickListener(){
            @Override
            public void onClick(View v)  //给登录按钮设置监听器
            {
                String username = mUser.getText().toString();
                String userpassword = mKey.getText().toString();
                String username1=Surface2Activity.Getusername();//获取注册值
                String userpassword1=Surface2Activity.Getuserpassword();//获取注册值

                //if(!username.equals(username1))//验证
                //{Toast.makeText(MainActivity.this, username1,
                       // Toast.LENGTH_SHORT).show();}


                if(TextUtils.isEmpty(username)||TextUtils.isEmpty(userpassword)){
                    Toast.makeText(MainActivity.this, R.string.message1,
                            Toast.LENGTH_SHORT).show();
                }
                if(mCheckBox.isChecked()){
                    boolean result=SavePath.Save(MainActivity.this,username,userpassword);
                    if(result){
                        Toast.makeText(MainActivity.this, R.string.message2,
                                Toast.LENGTH_SHORT).show();
                    }
                }

                if(username.equals(username1)&&userpassword.equals(userpassword1)) {
                    Toast.makeText(MainActivity.this, R.string.press_login_button1,
                            Toast.LENGTH_SHORT).show();//事件触发,显示欢迎信息
                    //下面跳转问卷界面
                }
                else {
                    Toast.makeText(MainActivity.this,R.string.press_login_button2,
                            Toast.LENGTH_SHORT).show();//事件触发,显示登录失败
                }

            }
        });

        mRegisterButton.setOnClickListener(new View.OnClickListener(){
            @Override
            public void onClick(View v)
            {
                Intent intent = new Intent();
                intent.setClass(MainActivity.this, Surface2Activity.class);
                startActivity(intent);//跳转注册界面

                finish();
            }
        });

    }
}
3.5 Surface2Activity.java
package com.bignerdranch.android.quanapplication;

import android.support.v7.app.AppCompatActivity;
import android.os.Bundle;
import android.view.View;
import android.widget.Button;
import android.widget.EditText;
import android.widget.Toast;
import android.app.Activity;
import android.app.Service;
import android.text.TextUtils;
import android.view.Menu;
import android.view.View;
import android.widget.CheckBox;
import java.util.Map;
import android.content.Intent;


public class MainActivity extends AppCompatActivity {

    private CheckBox mCheckBox;
    private Button mRegisterButton;//注册按钮
    private Button mLoginButton;//登录按钮

    private EditText mUser;
    private EditText mKey;

    @Override
    protected void onCreate(Bundle savedInstanceState) {
        super.onCreate(savedInstanceState);
        setContentView(R.layout.activity_main);

        mUser=(EditText)findViewById(R.id.input_user_text);
        mKey=(EditText)findViewById(R.id.input_key_text);
        mRegisterButton=(Button)findViewById(R.id.register_button);
        mLoginButton=(Button)findViewById(R.id.login_button);
        mCheckBox=(CheckBox)findViewById(R.id.checkbox_text);
        //检查是否有账号密码,如果有,需要回显
        Map<String, String> map=SavePath.Get(this);
        if(map!=null){
            mUser.setText(map.get("user"));
            mKey.setText(map.get("key"));
        }


        mLoginButton.setOnClickListener(new View.OnClickListener(){
            @Override
            public void onClick(View v)  //给登录按钮设置监听器
            {
                String username = mUser.getText().toString();
                String userpassword = mKey.getText().toString();
                String username1=Surface2Activity.Getusername();//获取注册值
                String userpassword1=Surface2Activity.Getuserpassword();//获取注册值

                //if(!username.equals(username1))//验证
                //{Toast.makeText(MainActivity.this, username1,
                       // Toast.LENGTH_SHORT).show();}


                if(TextUtils.isEmpty(username)||TextUtils.isEmpty(userpassword)){
                    Toast.makeText(MainActivity.this, R.string.message1,
                            Toast.LENGTH_SHORT).show();
                }
                if(mCheckBox.isChecked()){
                    boolean result=SavePath.Save(MainActivity.this,username,userpassword);
                    if(result){
                        Toast.makeText(MainActivity.this, R.string.message2,
                                Toast.LENGTH_SHORT).show();
                    }
                }

                if(username.equals(username1)&&userpassword.equals(userpassword1)) {
                    Toast.makeText(MainActivity.this, R.string.press_login_button1,
                            Toast.LENGTH_SHORT).show();//事件触发,显示欢迎信息
                    //下面跳转问卷界面
                }
                else {
                    Toast.makeText(MainActivity.this,R.string.press_login_button2,
                            Toast.LENGTH_SHORT).show();//事件触发,显示登录失败
                }

            }
        });

        mRegisterButton.setOnClickListener(new View.OnClickListener(){
            @Override
            public void onClick(View v)
            {
                Intent intent = new Intent();
                intent.setClass(MainActivity.this, Surface2Activity.class);
                startActivity(intent);//跳转注册界面

                finish();
            }
        });

    }
}
3.6 SavePath.java
package com.bignerdranch.android.quanapplication;

import java.io.BufferedReader;
import java.io.File;
import java.io.FileInputStream;
import java.io.FileNotFoundException;
import java.io.FileOutputStream;
import java.io.IOException;
import java.io.InputStreamReader;
import java.util.HashMap;
import java.util.Map;

import android.content.Context;
import android.os.Environment;

public class SavePath {
    public static boolean Save(Context context,String user,String key){

        try {

            File f= new File(context.getFilesDir(),"info.txt");
            FileOutputStream fs=new FileOutputStream(f);
            fs.write((user+"#####"+key).getBytes());
            fs.close();
            return true;
        } catch (Exception e) {
            // TODO Auto-generated catch block
            e.printStackTrace();
            return false;
        }
    }
    public static Map<String,String> Get(Context context){
        File f= new File(context.getFilesDir(),"info.txt");
        try {
            BufferedReader br= new BufferedReader(new InputStreamReader(new FileInputStream(f)));
            String s=br.readLine();
            String[] srinfo=s.split("#####");
            Map<String,String> map=new HashMap<String, String>();
            map.put("user",srinfo[0]);
            map.put("key",srinfo[1]);
            return map;
        } catch (Exception e) {
            // TODO Auto-generated catch block
            e.printStackTrace();
            return null;
        }


    }

}
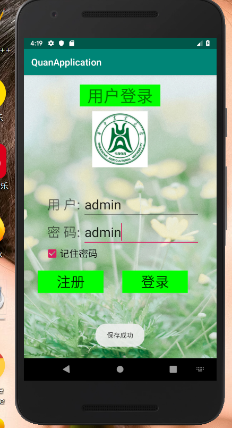
4.代码运行截图

5.参考博客地址
https://blog.csdn.net/lx144630/article/details/82768759
https://blog.csdn.net/as4061218/article/details/50295673
https://blog.csdn.net/mjyy10181103/article/details/78261500
欢迎使用Markdown编辑器
你好! 这是你第一次使用 Markdown编辑器 所展示的欢迎页。如果你想学习如何使用Markdown编辑器, 可以仔细阅读这篇文章,了解一下Markdown的基本语法知识。
新的改变
我们对Markdown编辑器进行了一些功能拓展与语法支持,除了标准的Markdown编辑器功能,我们增加了如下几点新功能,帮助你用它写博客:
- 全新的界面设计 ,将会带来全新的写作体验;
- 在创作中心设置你喜爱的代码高亮样式,Markdown 将代码片显示选择的高亮样式 进行展示;
- 增加了 图片拖拽 功能,你可以将本地的图片直接拖拽到编辑区域直接展示;
- 全新的 KaTeX数学公式 语法;
- 增加了支持甘特图的mermaid语法1 功能;
- 增加了 多屏幕编辑 Markdown文章功能;
- 增加了 焦点写作模式、预览模式、简洁写作模式、左右区域同步滚轮设置 等功能,功能按钮位于编辑区域与预览区域中间;
- 增加了 检查列表 功能。
功能快捷键
撤销:Ctrl/Command + Z
重做:Ctrl/Command + Y
加粗:Ctrl/Command + B
斜体:Ctrl/Command + I
标题:Ctrl/Command + Shift + H
无序列表:Ctrl/Command + Shift + U
有序列表:Ctrl/Command + Shift + O
检查列表:Ctrl/Command + Shift + C
插入代码:Ctrl/Command + Shift + K
插入链接:Ctrl/Command + Shift + L
插入图片:Ctrl/Command + Shift + G
合理的创建标题,有助于目录的生成
直接输入1次#,并按下space后,将生成1级标题。
输入2次#,并按下space后,将生成2级标题。
以此类推,我们支持6级标题。有助于使用TOC语法后生成一个完美的目录。
如何改变文本的样式
强调文本 强调文本
加粗文本 加粗文本
标记文本
删除文本
引用文本
H2O is是液体。
210 运算结果是 1024.
插入链接与图片
链接: link.
图片: 
带尺寸的图片: ![]()
居中的图片: 
居中并且带尺寸的图片: ![]()
当然,我们为了让用户更加便捷,我们增加了图片拖拽功能。
如何插入一段漂亮的代码片
去博客设置页面,选择一款你喜欢的代码片高亮样式,下面展示同样高亮的 代码片.
// An highlighted block
var foo = 'bar';
生成一个适合你的列表
- 项目
- 项目
- 项目
- 项目
- 项目1
- 项目2
- 项目3
- 计划任务
- 完成任务
创建一个表格
一个简单的表格是这么创建的:
| 项目 | Value |
|---|---|
| 电脑 | $1600 |
| 手机 | $12 |
| 导管 | $1 |
设定内容居中、居左、居右
使用:---------:居中
使用:----------居左
使用----------:居右
| 第一列 | 第二列 | 第三列 |
|---|---|---|
| 第一列文本居中 | 第二列文本居右 | 第三列文本居左 |
SmartyPants
SmartyPants将ASCII标点字符转换为“智能”印刷标点HTML实体。例如:
| TYPE | ASCII | HTML |
|---|---|---|
| Single backticks | 'Isn't this fun?' |
‘Isn’t this fun?’ |
| Quotes | "Isn't this fun?" |
“Isn’t this fun?” |
| Dashes | -- is en-dash, --- is em-dash |
– is en-dash, — is em-dash |
创建一个自定义列表
-
Markdown
- Text-to- HTML conversion tool Authors
- John
- Luke
如何创建一个注脚
一个具有注脚的文本。2
注释也是必不可少的
Markdown将文本转换为 HTML。
KaTeX数学公式
您可以使用渲染LaTeX数学表达式 KaTeX:
Gamma公式展示 Γ ( n ) = ( n − 1 ) ! ∀ n ∈ N \Gamma(n) = (n-1)!\quad\forall n\in\mathbb N Γ(n)=(n−1)!∀n∈N 是通过欧拉积分
Γ ( z ) = ∫ 0 ∞ t z − 1 e − t d t   . \Gamma(z) = \int_0^\infty t^{z-1}e^{-t}dt\,. Γ(z)=∫0∞tz−1e−tdt.
你可以找到更多关于的信息 LaTeX 数学表达式here.
新的甘特图功能,丰富你的文章
- 关于 甘特图 语法,参考 这儿,
UML 图表
可以使用UML图表进行渲染。 Mermaid. 例如下面产生的一个序列图::
这将产生一个流程图。:
- 关于 Mermaid 语法,参考 这儿,
FLowchart流程图
我们依旧会支持flowchart的流程图:
- 关于 Flowchart流程图 语法,参考 这儿.
导出与导入
导出
如果你想尝试使用此编辑器, 你可以在此篇文章任意编辑。当你完成了一篇文章的写作, 在上方工具栏找到 文章导出 ,生成一个.md文件或者.html文件进行本地保存。
导入
如果你想加载一篇你写过的.md文件或者.html文件,在上方工具栏可以选择导入功能进行对应扩展名的文件导入,
继续你的创作。
注脚的解释 ︎
智能推荐
已解决(selenium操作火狐浏览器报错)TypeError: __init__() got an unexpected keyword argument ‘firefox_options‘-程序员宅基地
文章浏览阅读1.6w次,点赞8次,收藏18次。已解决(selenium操作火狐浏览器报错)TypeError: __init__() got an unexpected keyword argument ‘firefox_options‘_typeerror: __init__() got an unexpected keyword argument 'chrome_options
python方差_Python编程:方差、标准差、均方差、均方根值、均方误差、均方根误差...-程序员宅基地
文章浏览阅读315次。python实现代码# -*- coding: utf-8 -*-import mathdef get_average(records):"""平均值"""return sum(records) / len(records)def get_variance(records):"""方差 反映一个数据集的离散程度"""average = get_average(records)return sum(..._pycharm方差计算代码
jmeter接口测试实例(五)对cookies的自动管理,实现登录后修改用户信息_jmeter中post请求如何更改每次的用户名-程序员宅基地
文章浏览阅读902次。一、前提:cookie是保存在本地,用来记录用户信息,最典型的作用是判断用户是否已经登录。如果一个接口,需要用户登录后,才能进行操作,如下,修改用户信息那么这时候,就需要用到cookie去识别这个登录的用户,因为要修改的是这个登录的用户的信息。二、使用1、jmeter.properties 中 将CookieManager.save.cookies 设置为true。完成后重启jmet..._jmeter中post请求如何更改每次的用户名
python新建项目没有venv_pycharm配置venv虚拟环境-程序员宅基地
文章浏览阅读7.5k次,点赞2次,收藏2次。虚拟环境的好处:搭建独立的python运行环境,不与其他产生冲突虚拟环境有助于包的管理和防止版本冲突3.删除卸载方便虚拟环境的搭建:1.进入python的Scripts下,执行:pip3 install virtualenv2.选择建立虚拟环境的文件夹,我这边是直接在D盘software下面创建了一个virtualenv,如图:image.png3.创建虚拟环境:virtualenv --no-s..._pycharm没有venv怎么办
M1芯片的Mac在开发iOS项目时遇到的问题汇总(模拟器无法运行,Cocoapods错误等)_oc cocospods 安装依赖库之后不能使用模拟器了-程序员宅基地
文章浏览阅读2.3k次。--pod install时报错,且错误提示中有“ffi”字眼,提示错误:/Library/Ruby/Gems/2.6.0/gems/ffi-1.15.3/lib/ffi/library.rb:275: [BUG] Bus Error at 0x00000001042fc000 ruby 2.6.3p62 (2019-04-16 revision 67580) [universal.arm64e-darwin20]解决方案:juejin.cn/post/698064…--pod repo upd_oc cocospods 安装依赖库之后不能使用模拟器了
编辑器VSCode使用心得-程序员宅基地
文章浏览阅读540次。工欲善其事必先利其器,趁手的工具会使我们开发事半功倍。市面上的编辑器我用过许多,编辑器使用经历Notepad++,(开源)这个应该是最轻量级的吧,查看代码还好,编辑代码就算了官网地址:https://notepad-plus-plus.org/Brackets,(开源)这个也不错,github-star:30k了,上次发布版本是6月..._vscode nextick
随便推点
西部数码mysql怎么用织梦_[原创]织梦程序(DeDeCms)常见问题集锦-程序员宅基地
文章浏览阅读95次。前言:织梦程序是最知名的cms程序,使用广泛,但很多朋友对织梦还不太熟悉,通过工单分析得知,经常容易出现本文中的问题,本次统一整理出来,希望对新手朋友有帮助,本文写的非常详细,请仔细阅读,一、描述:“dedecms错误警告:连接数据库失败,可能数据库密码不对或数据库服务器出错”如图:分析:用织梦程序制作的站点做迁移服务器后容易出现这个问题,原因是程序中设置的数据库连接信息有误连接不到数据库,解决方..._西部数码支不支持织梦的程序
免安装mysql启动3534错误处理_mysql 免安装版本启动时 3534出错_mysql-程序员宅基地
文章浏览阅读295次。上午在win7下安装MYSQL,只到“net start mysql”这一步报错:3534的错误:于是在百度中搜索关键字“mysql服务无法启动3534”。参考以下两个链接中的方法,解决了3534启动失败的问题:mysql服务无法启动3534错误。http://jingyan.baidu.com/article/219f4bf7e978fcde442d38a9.htmlhttp://blog.cs..._免安装mysql启动失败
评测了10款画流程图软件,这4款最好用!(完全免费)_好用的流程图软件免费-程序员宅基地
文章浏览阅读5.1w次,点赞58次,收藏295次。最近在做项目和复习的时候,用了不少流程图软件给我帮了大忙,所以今天就来分享分享你在网上搜索一下流程图软件,能找到很多很多:但这些软件多数并不是专门绘制流程图的软件,它可能是一些思维导图软件、或者说一些产品交互原型图软件,使用时或多或少有些麻烦。而且,普遍这些软件缺点也很多,比如:只有在线版:ProcessOn(https://www.processon.com)导出功能收费:迅捷流程图软件体积庞大:VISIO就没有一款简单易用、绿色免费的流程图软件吗?阿虚花了不少时间,挨着_好用的流程图软件免费
在CentOS6.9安装Azkaban3.50.0_centos6.9 azkaban-程序员宅基地
文章浏览阅读1.4k次。cd /data/install_pkgwget https://github.com/azkaban/azkaban/archive/3.50.0.tar.gztar -zxvf 3.50.0.tar.gzvi /data/install_pkg/azkaban-3.50.0/azkaban-common/src/main/java/azkaban/utils/EmailMessage..._centos6.9 azkaban
Java项目基于ssm+vue.js的学生宿舍维修服务平台附带文章和源代码设计说明文档ppt-程序员宅基地
文章浏览阅读586次,点赞23次,收藏30次。博主介绍:CSDN特邀作者、985计算机专业毕业、某互联网大厂高级全栈开发程序员、码云/掘金/华为云/阿里云/InfoQ/StackOverflow/github等平台优质作者、专注于Java、小程序、前端、python等技术领域和毕业项目实战,以及程序定制化开发、全栈讲解、就业辅导、面试辅导、简历修改。精彩专栏 推荐订阅2023-2024年最值得选的微信小程序毕业设计选题大全:100个热门选题推荐2023-2024年最值得选的Java毕业设计选题大全:500个热门选题推荐。
ultralytics的YOLOv8改为自用版本_from ultralytics.utils.plotting import annotator, -程序员宅基地
文章浏览阅读944次。由于需要用pyqt给yolov8做一个界面,而ultralytics一层嵌一层,不是很好用,所以对它的这个源码进行精简,具体代码我放到了这里,ultralytics使用的版本是8.0.54。具体代码如下,需要根据自己的情况来修改data的配置文件以及权值文件,在代码的49和50行。_from ultralytics.utils.plotting import annotator, colors, save_one_box modul