5.2 创建个人中心页面-前端部分_个人中心前端代码-程序员宅基地
技术标签: Java 前端 vue.js javascript
如果写的可以帮到你,可以点个赞吗,你的支持就是我写下去的动力。
本文阅读大概 10 分钟, 自己写加思考大概 1 ~ 2 小时。建议:代码可以手抄, 但不要复制。
1. 整体框架
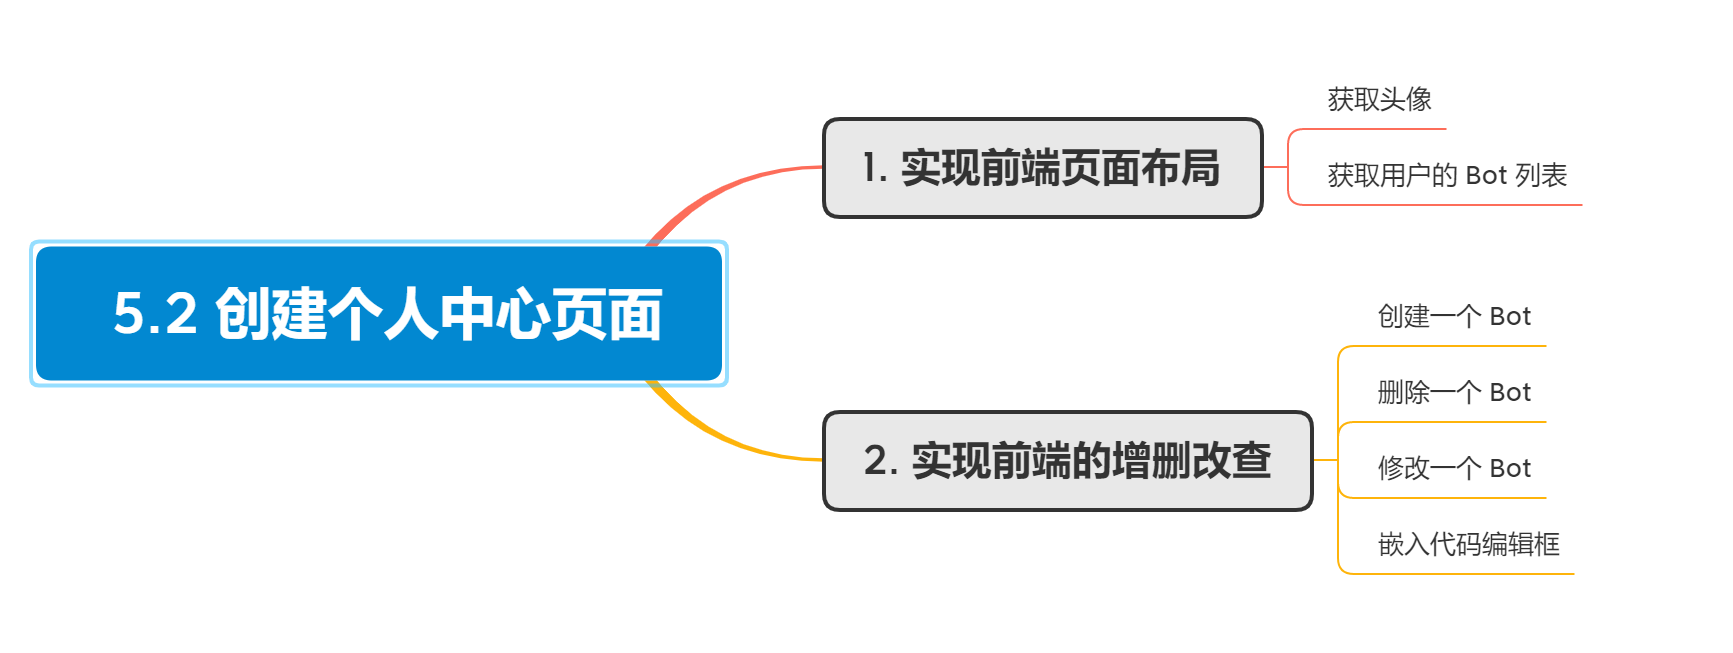
2. 前端页面布局
使用 bootstrap 的 grids system 进行布局。页面规划如下:
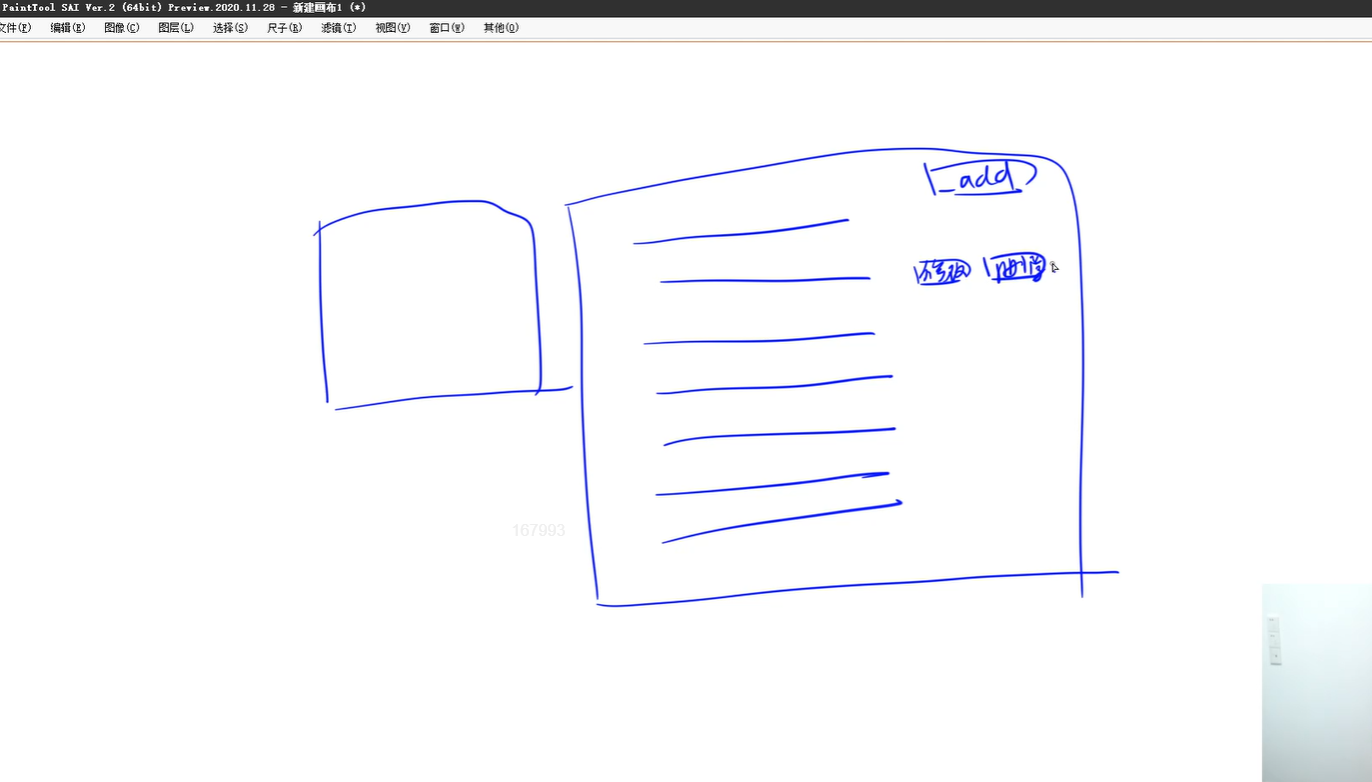
在 bootstrap 的网址搜索 grids system。
一行分为12份,左边3份,为头像;右边9份,白色区域 cards,加上按钮创建 bot,获取 Bot 列表
在 views.user.bot.UserBotIndexView.vue 下修改,实现基本的个人 bot 信息展示。
<template>

    <div class="container">
        <div class="row">
            <div class="col-3">
                <div class="card" style="margin-top: 20px;">
                    <div class="card-body">
                        <img :src="$store.state.user.photo" alt="" style="width: 100%;">
                    </div>
                </div>
            </div>
            <div class="col-9">
                <div class="card" style="margin-top: 20px;">
                    <div class="card-header">
                        <span style="font-size: 130%;">我的Bot</span>
                        <button type="button" class="btn btn-primary float-end">
                            创建Bot
                        </button>
                    </div>
                    <div class="card-body">
                        <thead>
                                <tr>
                                    <th>名称</th>
                                    <th>创建时间</th>
                                    <th>操作</th>
                                </tr>
                            	<tbody>
                                 <tr>
                                    <td>{
    {
     bot.title }}</td>
                                    <td>{
    {
     bot.createtime }}</td>
                                    <td>

                                        <button type="button" class="btn btn-secondary" style="margin-right: 10px;">修改</button>
                                        <button type="button" class="btn btn-danger">删除</button>
                                    </td>
                                </tr>
                            </tbody>
                         </thead>
                    </div>
                </div>
            </div>
        </div>
    </div>

</template>
实现 refresh_bot,获取上节课的 API: /user/bot/getlist/ 查询 bot 列表,通过获取后端信息把数据展示在前端上。
<script>
import {
     ref, reactive } from 'vue'
import $ from 'jquery'
import {
     useStore } from 'vuex'

export default {


        const store = useStore();

        const refresh_bots = () => {

                $.ajax({

                    url: "http://127.0.0.1:8080/user/bot/getlist/",
                    type: "get",
                    headers: {

                        Authorization: "Bearer " + store.state.user.token,
                    },
                    success(resp) {

                        bots.value = resp;
                    }
                })
            }


        refresh_bots();
    }
}
</script>
获取用户信息成功:
3. 前端页面创建、修改、删除 Bot
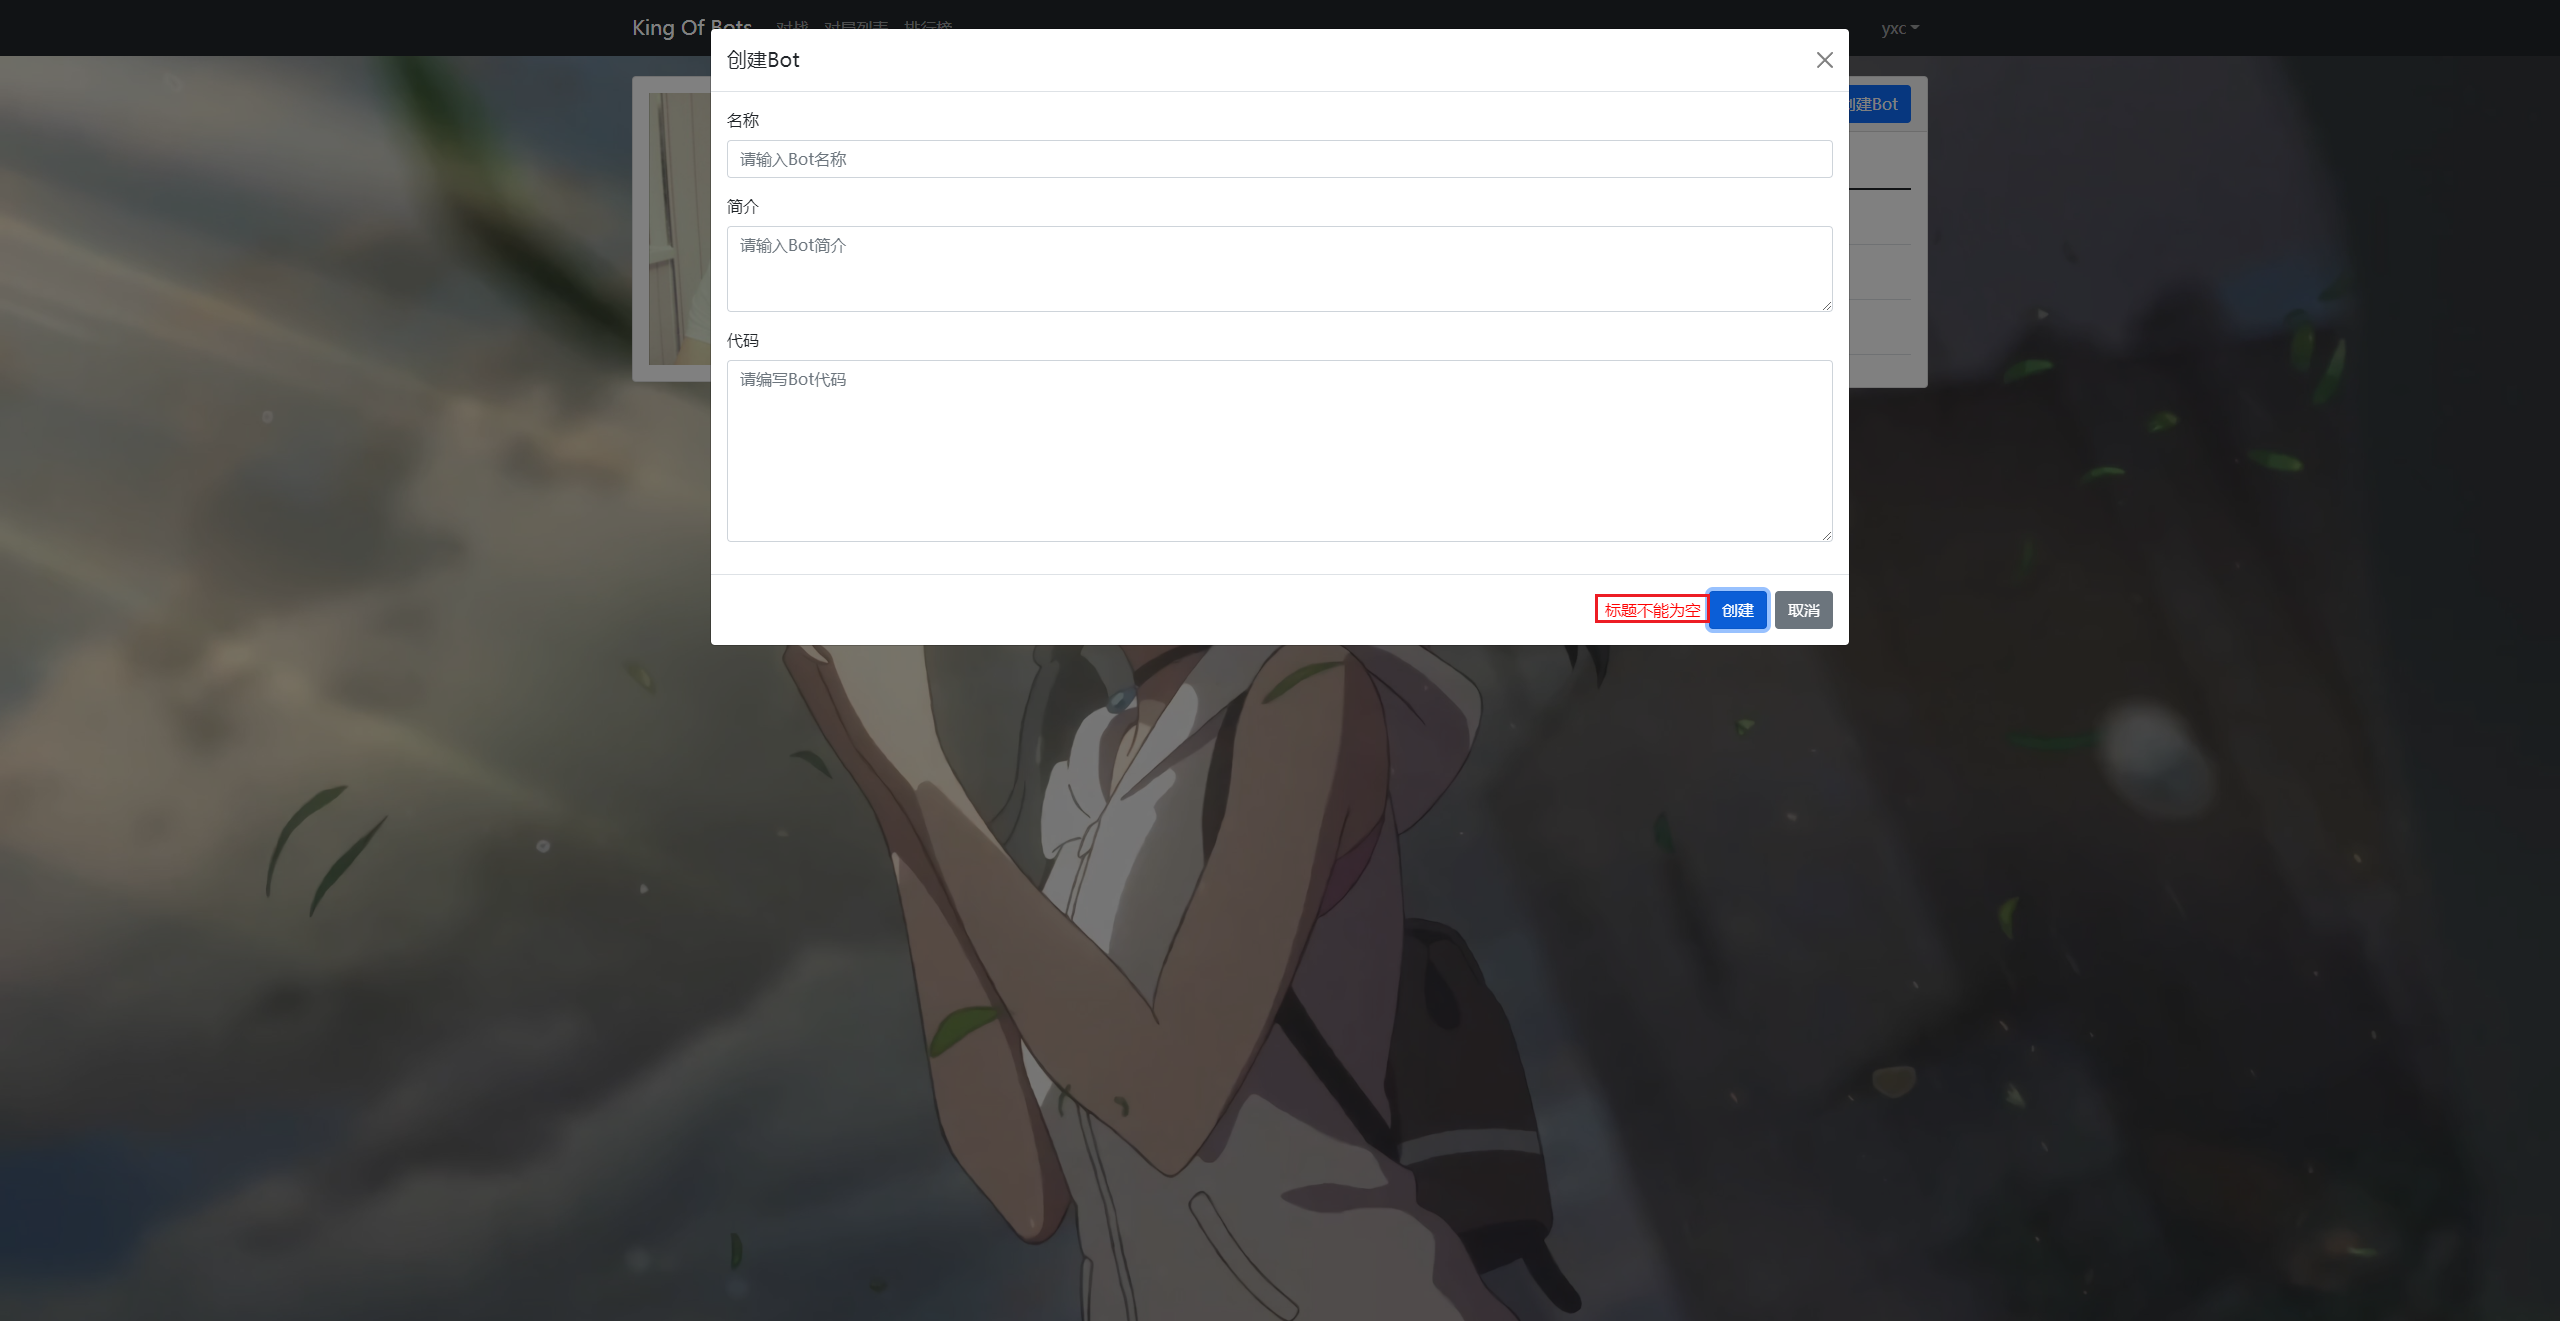
3.1 创建一个 Bot
在点击 创建Bot 按钮的时候需要一个弹窗。在 bootstrap 中寻找一个 modals :
在 views.user.bot.UserBotIndexView.vue 下修改,增加一个模态框,然后丰富模态框的内容。
<template>

    <div class="container">
        <div class="row">
            <div class="col-3">
                <div class="card" style="margin-top: 20px;">
                    <div class="card-body">
                        <img :src="$store.state.user.photo" alt="" style="width: 100%;">
                    </div>
                </div>
            </div>
            <div class="col-9">
                <div class="card" style="margin-top: 20px;">
                    <div class="card-header">
                        <span style="font-size: 130%;">我的Bot</span>
                        <button type="button" class="btn btn-primary float-end">
                            创建Bot
                        </button>

                        //增加一个模态框
                        <div class="modal fade" id="add-bot-btn" tabindex="-1">
                            <div class="modal-dialog modal-xl">
                                <div class="modal-content">
                                <div class="modal-header">
                                    <h5 class="modal-title" id="exampleModalLabel">创建Bot</h5>
                                    <button type="button" class="btn-close" data-bs-dismiss="modal" aria-label="Close"></button>
                                </div>
                                <div class="modal-body">
                                    <div class="mb-3">
                                        <label for="add-bot-title" class="form-label">名称</label>
                                        <input v-model="botadd.title" type="text" class="form-control" id="add-bot-title" placeholder="请输入Bot名称">
                                    </div>
                                    <div class="mb-3">
                                        <label for="add-bot-description" class="form-label">简介</label>
                                        <textarea v-model="botadd.sescription" class="form-control" id="add-bot-description" rows="3" placeholder="请输入Bot简介"></textarea>
                                    </div>
                                    <div class="mb-3">
                                        <label for="add-bot-code" class="form-label">代码</label>
                                        <textarea v-model="botadd.content" class="form-control" id="add-bot-content" rows="3" placeholder="请输入Bot代码"></textarea>

                                    </div>
                                </div>
                                <div class="modal-footer">
                                    //增加报错信息
                                    <div class="error-message">{
    {
     botadd.error_message }}</div>
                                    <button type="button" class="btn btn-primary" @click="add_bot">创建</button>
                                    <button type="button" class="btn btn-secondary" data-bs-dismiss="modal">取消</button>
                                </div>
                                </div>
                            </div>
                        </div>
                    </div>
                    <div class="card-body">
                        <thead>
                                <tr>
                                    <th>名称</th>
                                    <th>创建时间</th>
                                    <th>操作</th>
                                </tr>
                            	<tbody>
                                 <tr>
                                    <td>{
    {
     bot.title }}</td>
                                    <td>{
    {
     bot.createtime }}</td>
                                    <td>

                                        <button type="button" class="btn btn-secondary" style="margin-right: 10px;">修改</button>
                                        <button type="button" class="btn btn-danger">删除</button>
                                    </td>
                                </tr>
                            </tbody>
                         </thead>
                    </div>
                </div>
            </div>
        </div>
    </div>

</template>
增加一个 add_bot 函数:
<script>
import {
     ref, reactive } from 'vue'
import $ from 'jquery'
import {
     useStore } from 'vuex'

export default {


        const store = useStore();

		const botadd = reactive({

            title: "",
            description: "",
            content: "",
            error_message: "",
        });


        const refresh_bots = () => {

                $.ajax({

                    url: "http://127.0.0.1:8080/user/bot/getlist/",
                    type: "get",
                    headers: {

                        Authorization: "Bearer " + store.state.user.token,
                    },
                    success(resp) {

                        bots.value = resp;
                    }
                })
            }


        refresh_bots();

		//创建一个 bot
        const add_bot = () => {

                    botadd.error_message = "";
                    $.ajax({

                        url: "http://127.0.0.1:8080/user/bot/add/",
                        type: "post",
                        data: {

                            title: botadd.title,
                            description: botadd.description,
                            content: botadd.content,
                        },
                        headers: {

                            Authorization: "Bearer " + store.state.user.token,
                        },
                        success(resp) {

                            if (resp.error_message === "success") {

                                botadd.title = "";
                                botadd.description = "";
                                botadd.content = "";
                                Modal.getInstance("#add-bot-btn").hide();
                                refresh_bots();
                            } else {

                                botadd.error_message = resp.error_message;
                            }
                        }
                    })
                }

         return {

            bots,
            botadd,
            add_bot,
        }
    }
}
</script>
创建完成后需要绑定前端的信息。在前面的地方加上 v-model,同时增加一个 触发事件。
<div class="modal-body">
                                    <div class="mb-3">
                                        <label for="add-bot-title" class="form-label">名称</label>
                                        <input v-model="botadd.title" type="text" class="form-control" id="add-bot-title" placeholder="请输入Bot名称">
                                    </div>
                                    <div class="mb-3">
                                        <label for="add-bot-description" class="form-label">简介</label>
                                        <textarea v-model="botadd.sescription" class="form-control" id="add-bot-description" rows="3" placeholder="请输入Bot简介"></textarea>
                                    </div>
                                    <div class="mb-3">
                                        <label for="add-bot-code" class="form-label">代码</label>
                                        <textarea v-model="botadd.content" class="form-control" id="add-bot-content" rows="3" placeholder="请输入Bot代码"></textarea>

                                    </div>
                                </div>


<div class="modal-footer">
                                    //增加报错信息
                                    <div class="error-message">{
    {
     botadd.error_message }}</div>
                                    <button type="button" class="btn btn-primary" @click="add_bot">创建</button>
                                    <button type="button" class="btn btn-secondary" data-bs-dismiss="modal">取消</button>
                                </div>
如果创建 Bot 的时候时间出现问题:在后端的 pojo 里修改,加上时区:
package com.kob.backend.pojo;

import com.baomidou.mybatisplus.annotation.IdType;
import com.baomidou.mybatisplus.annotation.TableId;
import com.fasterxml.jackson.annotation.JsonFormat;
import lombok.AllArgsConstructor;
import lombok.Data;
import lombok.NoArgsConstructor;

import java.util.Date;

@Data
@NoArgsConstructor
@AllArgsConstructor

public class Bot {

    @TableId(type = IdType.AUTO)
    private Integer id; //在pojo里最好用Integer,否则会报警告
    private Integer userId; //pojo里要用驼峰命名法和数据库的下划线对应
    private String title;
    private String description;
    private String Content;
    private Integer rating;
    @JsonFormat(pattern = "yyyy-MM-dd HH:mm:ss", timezone = "Asia/Shanghai")
    private Date createtime;
    @JsonFormat(pattern = "yyyy-MM-dd HH:mm:ss", timezone = "Asia/Shanghai")
    private Date modifytime;
}
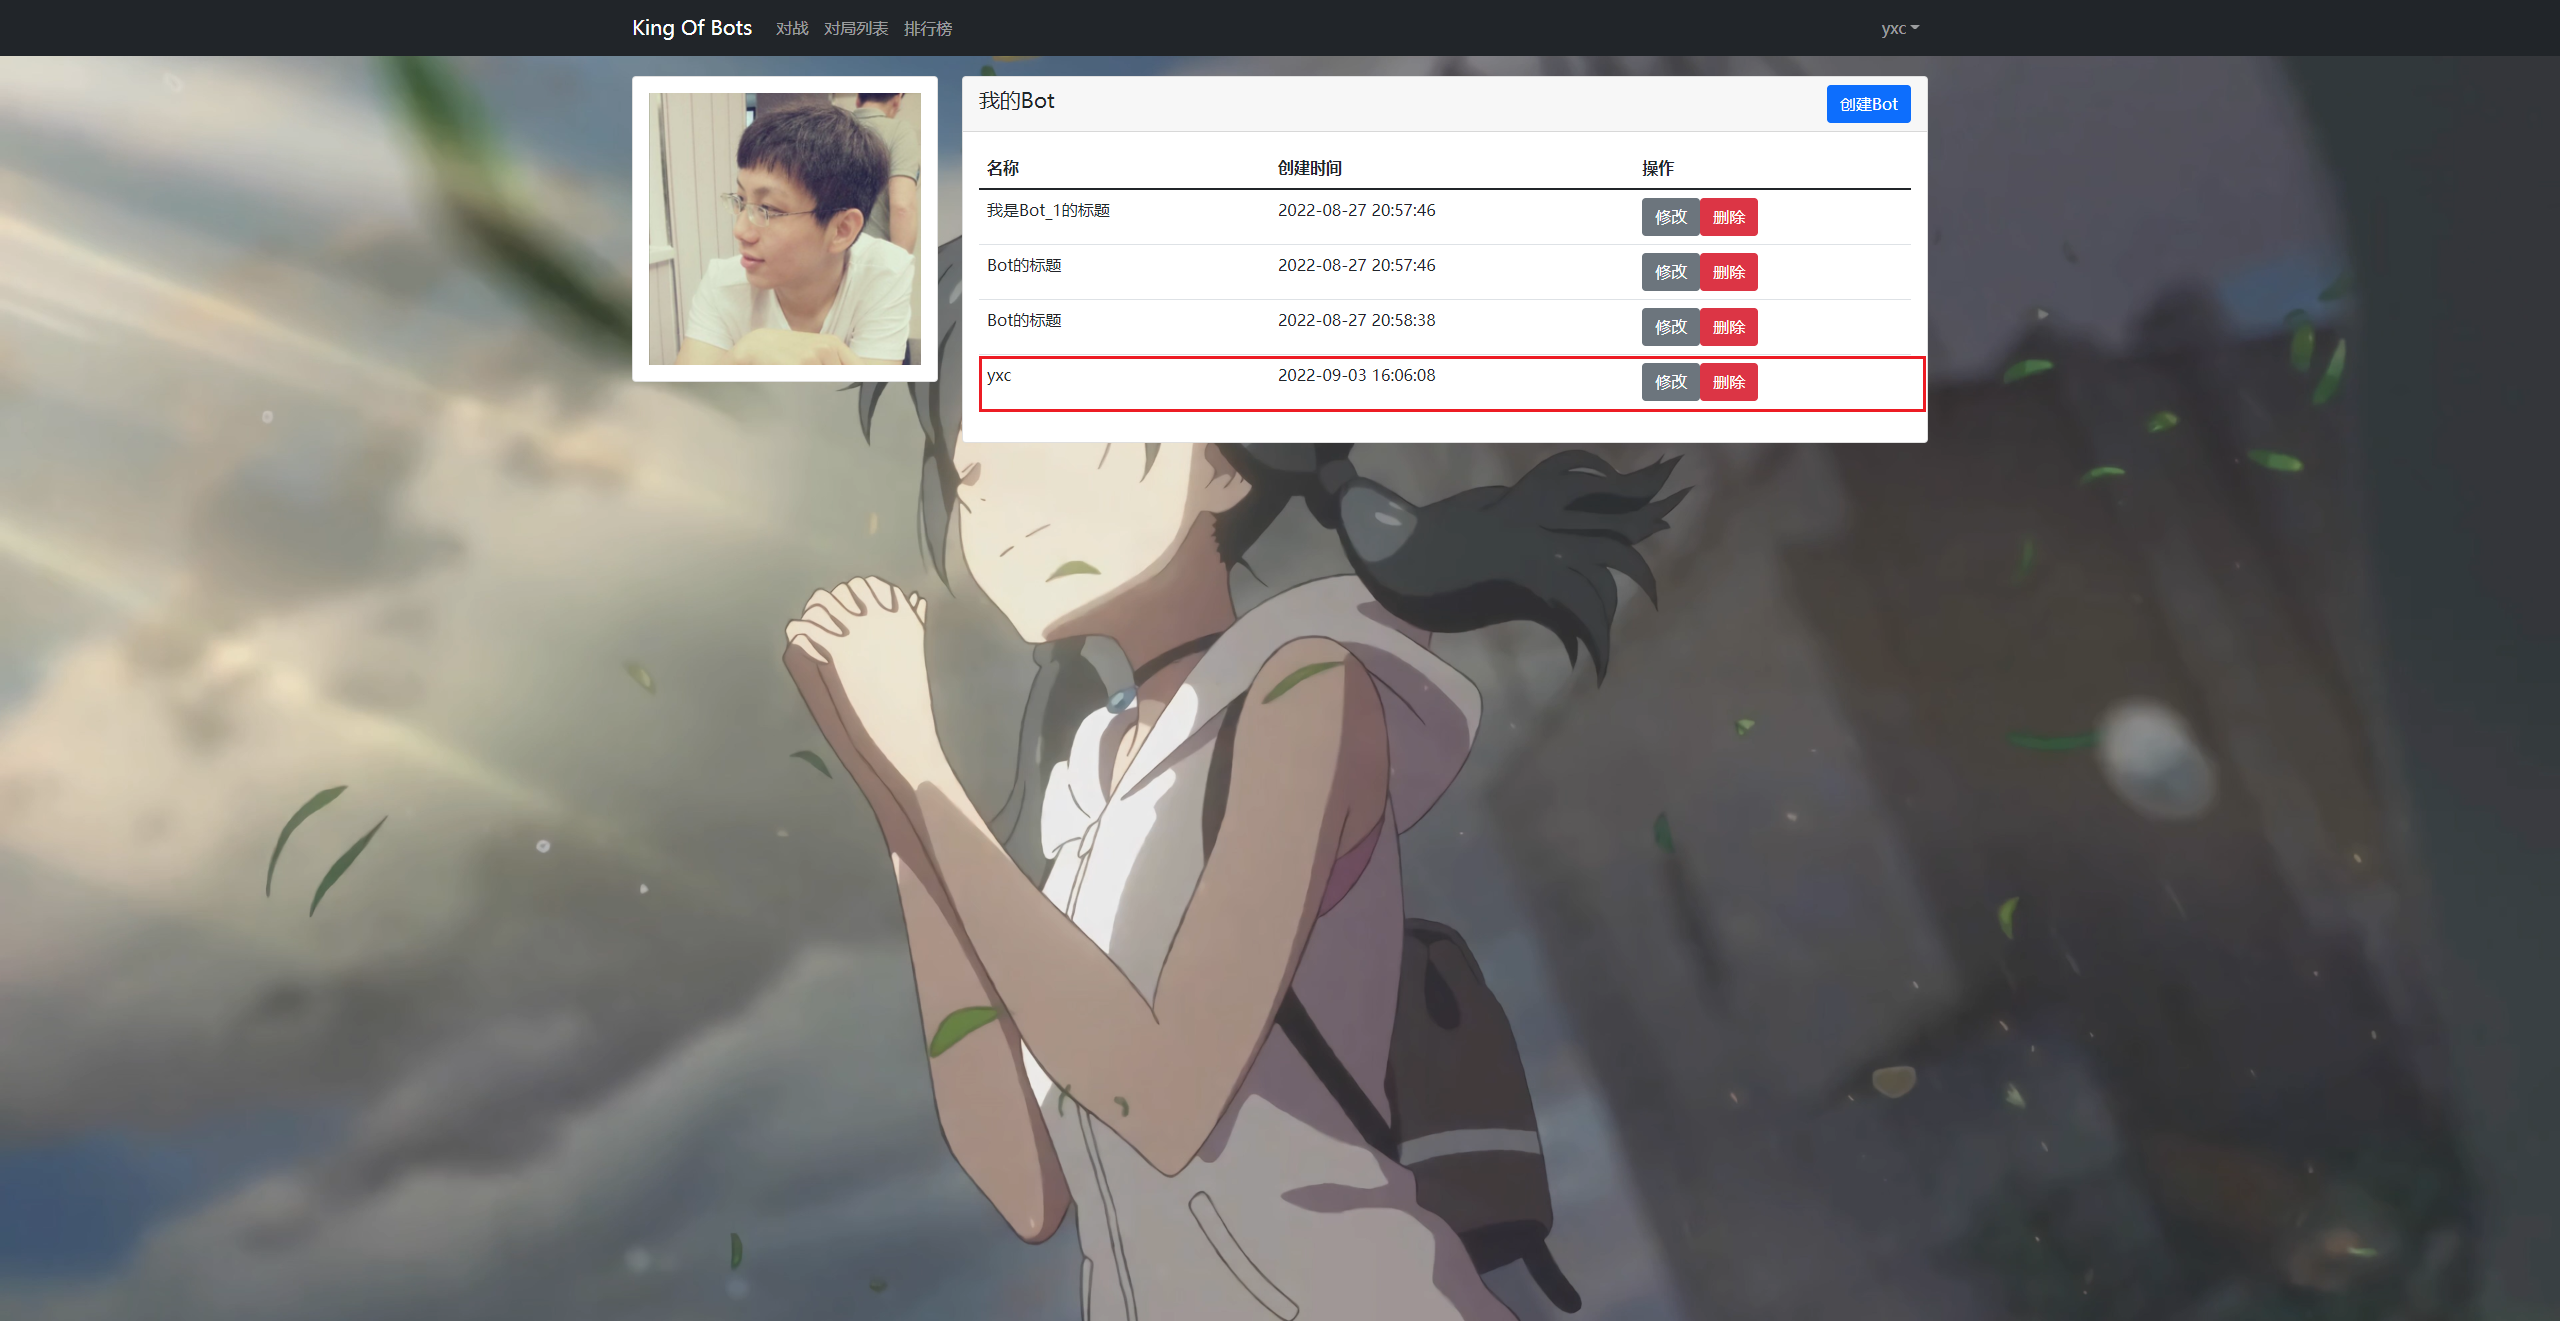
成功效果如下:

3.2 删除一个 Bot
增加一个 删除 bot 的函数:
<script>
import {
     ref, reactive } from 'vue'
import $ from 'jquery'
import {
     useStore } from 'vuex'

export default {


        const store = useStore();

		const botadd = reactive({

            title: "",
            description: "",
            content: "",
            error_message: "",
        });


        const refresh_bots = () => {

                $.ajax({

                    url: "http://127.0.0.1:8080/user/bot/getlist/",
                    type: "get",
                    headers: {

                        Authorization: "Bearer " + store.state.user.token,
                    },
                    success(resp) {

                        bots.value = resp;
                    }
                })
            }


        refresh_bots();

		//创建一个 bot
        const add_bot = () => {

                    botadd.error_message = "";
                    $.ajax({

                        url: "http://127.0.0.1:8080/user/bot/add/",
                        type: "post",
                        data: {

                            title: botadd.title,
                            description: botadd.description,
                            content: botadd.content,
                        },
                        headers: {

                            Authorization: "Bearer " + store.state.user.token,
                        },
                        success(resp) {

                            if (resp.error_message === "success") {

                                botadd.title = "";
                                botadd.description = "";
                                botadd.content = "";
                                Modal.getInstance("#add-bot-btn").hide();
                                refresh_bots();
                            } else {

                                botadd.error_message = resp.error_message;
                            }
                        }
                    })
                }

        //删除一个 bot
        const remove_bot = (bot) => {

            $.ajax({

                url: "http://127.0.0.1:8080/user/bot/remove/",
                type: "post",
                data: {

                    bot_id: bot.id,
                },
                headers: {

                    Authorization: "Bearer " + store.state.user.token,
                },
                success(resp) {

                    console.log(resp);
                    if (resp.error_message === "success") {

                        refresh_bots();
                    }
                }
            })
        }

         return {

            bots,
            botadd,
            add_bot,
            remove_bot,
        }
    }
}
</script>
同时需要在上文绑定 删除 按钮。
<div class="card-body">
                        <thead>
                                <tr>
                                    <th>名称</th>
                                    <th>创建时间</th>
                                    <th>操作</th>
                                </tr>
                            	<tbody>
                                 <tr>
                                    <td>{
   { bot.title }}</td>
                                    <td>{
   { bot.createtime }}</td>
                                    <td>

                                        <button type="button" class="btn btn-secondary" style="margin-right: 10px;">修改</button>
                                        <button type="button" class="btn btn-danger" @click="remove_bot(bot)">删除</button>
                                    </td>
                                </tr>
                            </tbody>
                         </thead>
                    </div>
如果删除的时候提示没有权限,可能是因为后端的 RemoveServiceImpl.java 文件出错,在里面修改即可。
成功效果:


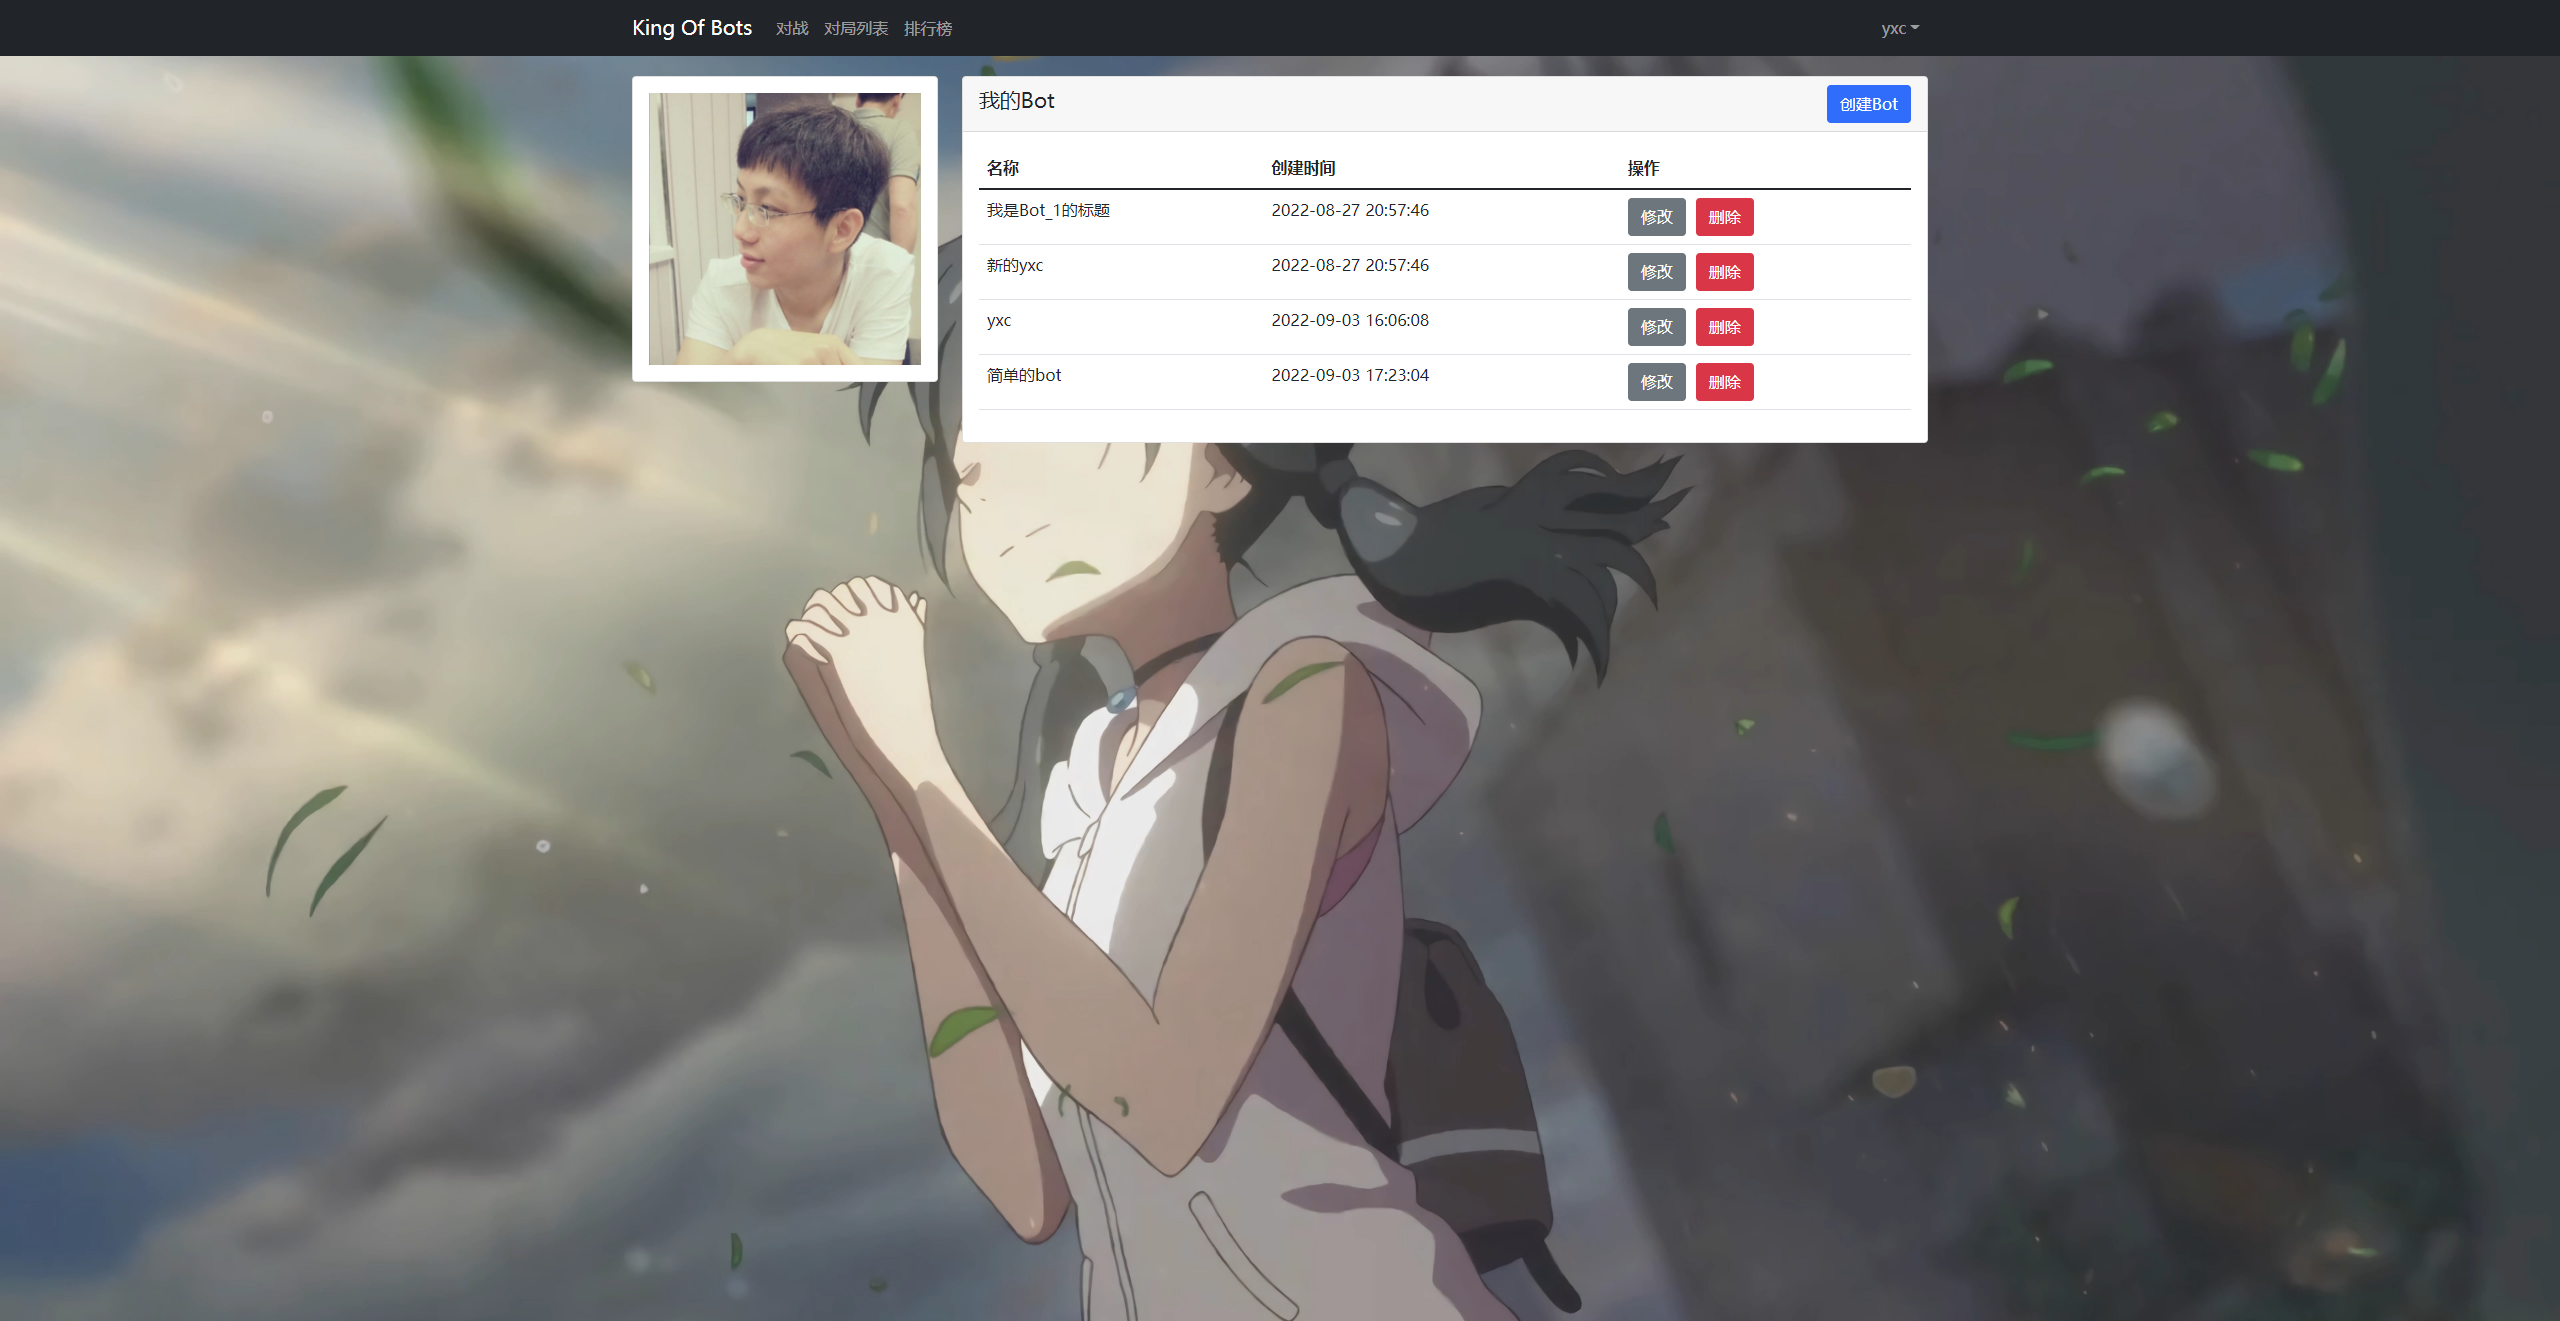
3.3 修改一个 Bot
在 views.user.bot.UserBotIndexView.vue 下修改。
<script>
import {
     ref, reactive } from 'vue'
import $ from 'jquery'
import {
     useStore } from 'vuex'

export default {


        const store = useStore();

		const botadd = reactive({

            title: "",
            description: "",
            content: "",
            error_message: "",
        });


        const refresh_bots = () => {

                $.ajax({

                    url: "http://127.0.0.1:8080/user/bot/getlist/",
                    type: "get",
                    headers: {

                        Authorization: "Bearer " + store.state.user.token,
                    },
                    success(resp) {

                        bots.value = resp;
                    }
                })
            }


        refresh_bots();

		//创建一个 bot
        const add_bot = () => {

                    botadd.error_message = "";
                    $.ajax({

                        url: "http://127.0.0.1:8080/user/bot/add/",
                        type: "post",
                        data: {

                            title: botadd.title,
                            description: botadd.description,
                            content: botadd.content,
                        },
                        headers: {

                            Authorization: "Bearer " + store.state.user.token,
                        },
                        success(resp) {

                            if (resp.error_message === "success") {

                                botadd.title = "";
                                botadd.description = "";
                                botadd.content = "";
                                Modal.getInstance("#add-bot-btn").hide();
                                refresh_bots();
                            } else {

                                botadd.error_message = resp.error_message;
                            }
                        }
                    })
                }

        //删除一个 bot
        const remove_bot = (bot) => {

            $.ajax({

                url: "http://127.0.0.1:8080/user/bot/remove/",
                type: "post",
                data: {

                    bot_id: bot.id,
                },
                headers: {

                    Authorization: "Bearer " + store.state.user.token,
                },
                success(resp) {

                    console.log(resp);
                    if (resp.error_message === "success") {

                        refresh_bots();
                    }
                }
            })
        }
        const update_bot = (bot) => {

            botadd.error_message = "";
            $.ajax({

                url: "http://127.0.0.1:8080/user/bot/update/",
                type: "post",
                data: {

                    bot_id: bot.id,
                    title: bot.title,
                    description: bot.description,
                    content: bot.content,
                },
                headers: {

                    Authorization: "Bearer " + store.state.user.token,
                },
                success(resp) {

                    if (resp.error_message === "success") {

                        Modal.getInstance('#update-bot-modal-' + bot.id).hide();
                        refresh_bots();
                    } else {

                        botadd.error_message = resp.error_message;
                    }
                }
            })
        }

         return {

            bots,
            botadd,
            add_bot,
            remove_bot,
            update_bot,
        }
    }
}
</script>
修改每一个 bot 的时候需要有对应单独的一个模态框。
<template>

    <div class="container">
        <div class="row">
            <div class="col-3">
                <div class="card" style="margin-top: 20px;">
                    <div class="card-body">
                        <img :src="$store.state.user.photo" alt="" style="width: 100%;">
                    </div>
                </div>
            </div>
            <div class="col-9">
                <div class="card" style="margin-top: 20px;">
                    <div class="card-header">
                        <span style="font-size: 130%;">我的Bot</span>
                        <button type="button" class="btn btn-primary float-end" data-bs-toggle="modal" data-bs-target="#add-bot-btn">
                            创建Bot
                        </button>

                        <div class="modal fade" id="add-bot-btn" tabindex="-1">
                            <div class="modal-dialog modal-xl">
                                <div class="modal-content">
                                <div class="modal-header">
                                    <h5 class="modal-title" id="exampleModalLabel">创建Bot</h5>
                                    <button type="button" class="btn-close" data-bs-dismiss="modal" aria-label="Close"></button>
                                </div>
                                <div class="modal-body">
                                    <div class="mb-3">
                                        <label for="add-bot-title" class="form-label">名称</label>
                                        <input v-model="botadd.title" type="text" class="form-control" id="add-bot-title" placeholder="请输入Bot名称">
                                    </div>
                                    <div class="mb-3">
                                        <label for="add-bot-description" class="form-label">简介</label>
                                        <textarea v-model="botadd.sescription" class="form-control" id="add-bot-description" rows="3" placeholder="请输入Bot简介"></textarea>
                                    </div>
                                    <div class="mb-3">
                                        <label for="add-bot-code" class="form-label">代码</label>
                                        <VAceEditor
                                    </div>
                                </div>
                                <div class="modal-footer">
                                    <div class="error-message">{
    {
     botadd.error_message }}</div>
                                    <button type="button" class="btn btn-primary" @click="add_bot">创建</button>
                                    <button type="button" class="btn btn-secondary" data-bs-dismiss="modal">取消</button>
                                </div>
                                </div>
                            </div>
                        </div>


                    </div>
                    <div class="card-body">
                        <table class="table table-hover">
                             <thead>
                                <tr>
                                    <th>名称</th>
                                    <th>创建时间</th>
                                    <th>操作</th>
                                </tr>
                            </thead>
                            <tbody>
                                 <tr v-for="bot in bots" :key="bot.id">
                                    <td>{
    {
     bot.title }}</td>
                                    <td>{
    {
     bot.createtime }}</td>
                                    <td>

                                        <button type="button" class="btn btn-secondary" style="margin-right: 10px;" data-bs-toggle="modal" :data-bs-target="'#update-bot-modal-' + bot.id">修改</button>
                                        <button type="button" class="btn btn-danger" @click="remove_bot(bot)">删除</button>


                                        <div class="modal fade" :id="'update-bot-modal-' + bot.id" tabindex="-1">
                                            <div class="modal-dialog modal-xl">
                                                <div class="modal-content">
                                                <div class="modal-header">
                                                    <h5 class="modal-title" id="exampleModalLabel">修改Bot</h5>
                                                    <button type="button" class="btn-close" data-bs-dismiss="modal" aria-label="Close"></button>
                                                </div>
                                                <div class="modal-body">
                                                    <div class="mb-3">
                                                        <label for="add-bot-title" class="form-label">名称</label>
                                                        <input v-model="bot.title" type="text" class="form-control" id="add-bot-title" placeholder="请输入Bot名称">
                                                    </div>
                                                    <div class="mb-3">
                                                        <label for="add-bot-description" class="form-label">简介</label>
                                                        <textarea v-model="bot.sescription" class="form-control" id="add-bot-description" rows="3" placeholder="请输入Bot简介"></textarea>
                                                    </div>
                                                    <div class="mb-3">
                                                        <label for="add-bot-code" class="form-label">代码</label>

                                                    </div>
                                                </div>
                                                <div class="modal-footer">
                                                    <div class="error-message">{
    {
     bot.error_message }}</div>
                                                    <button type="button" class="btn btn-primary" @click="update_bot(bot)">保存修改</button>
                                                    <button type="button" class="btn btn-secondary" data-bs-dismiss="modal">取消</button>
                                                </div>
                                                </div>
                                            </div>
                                        </div>

                                    </td>
                                </tr>
                            </tbody>
                        </table>
                    </div>
                </div>
            </div>
        </div>
    </div>

</template>
成功效果如下:
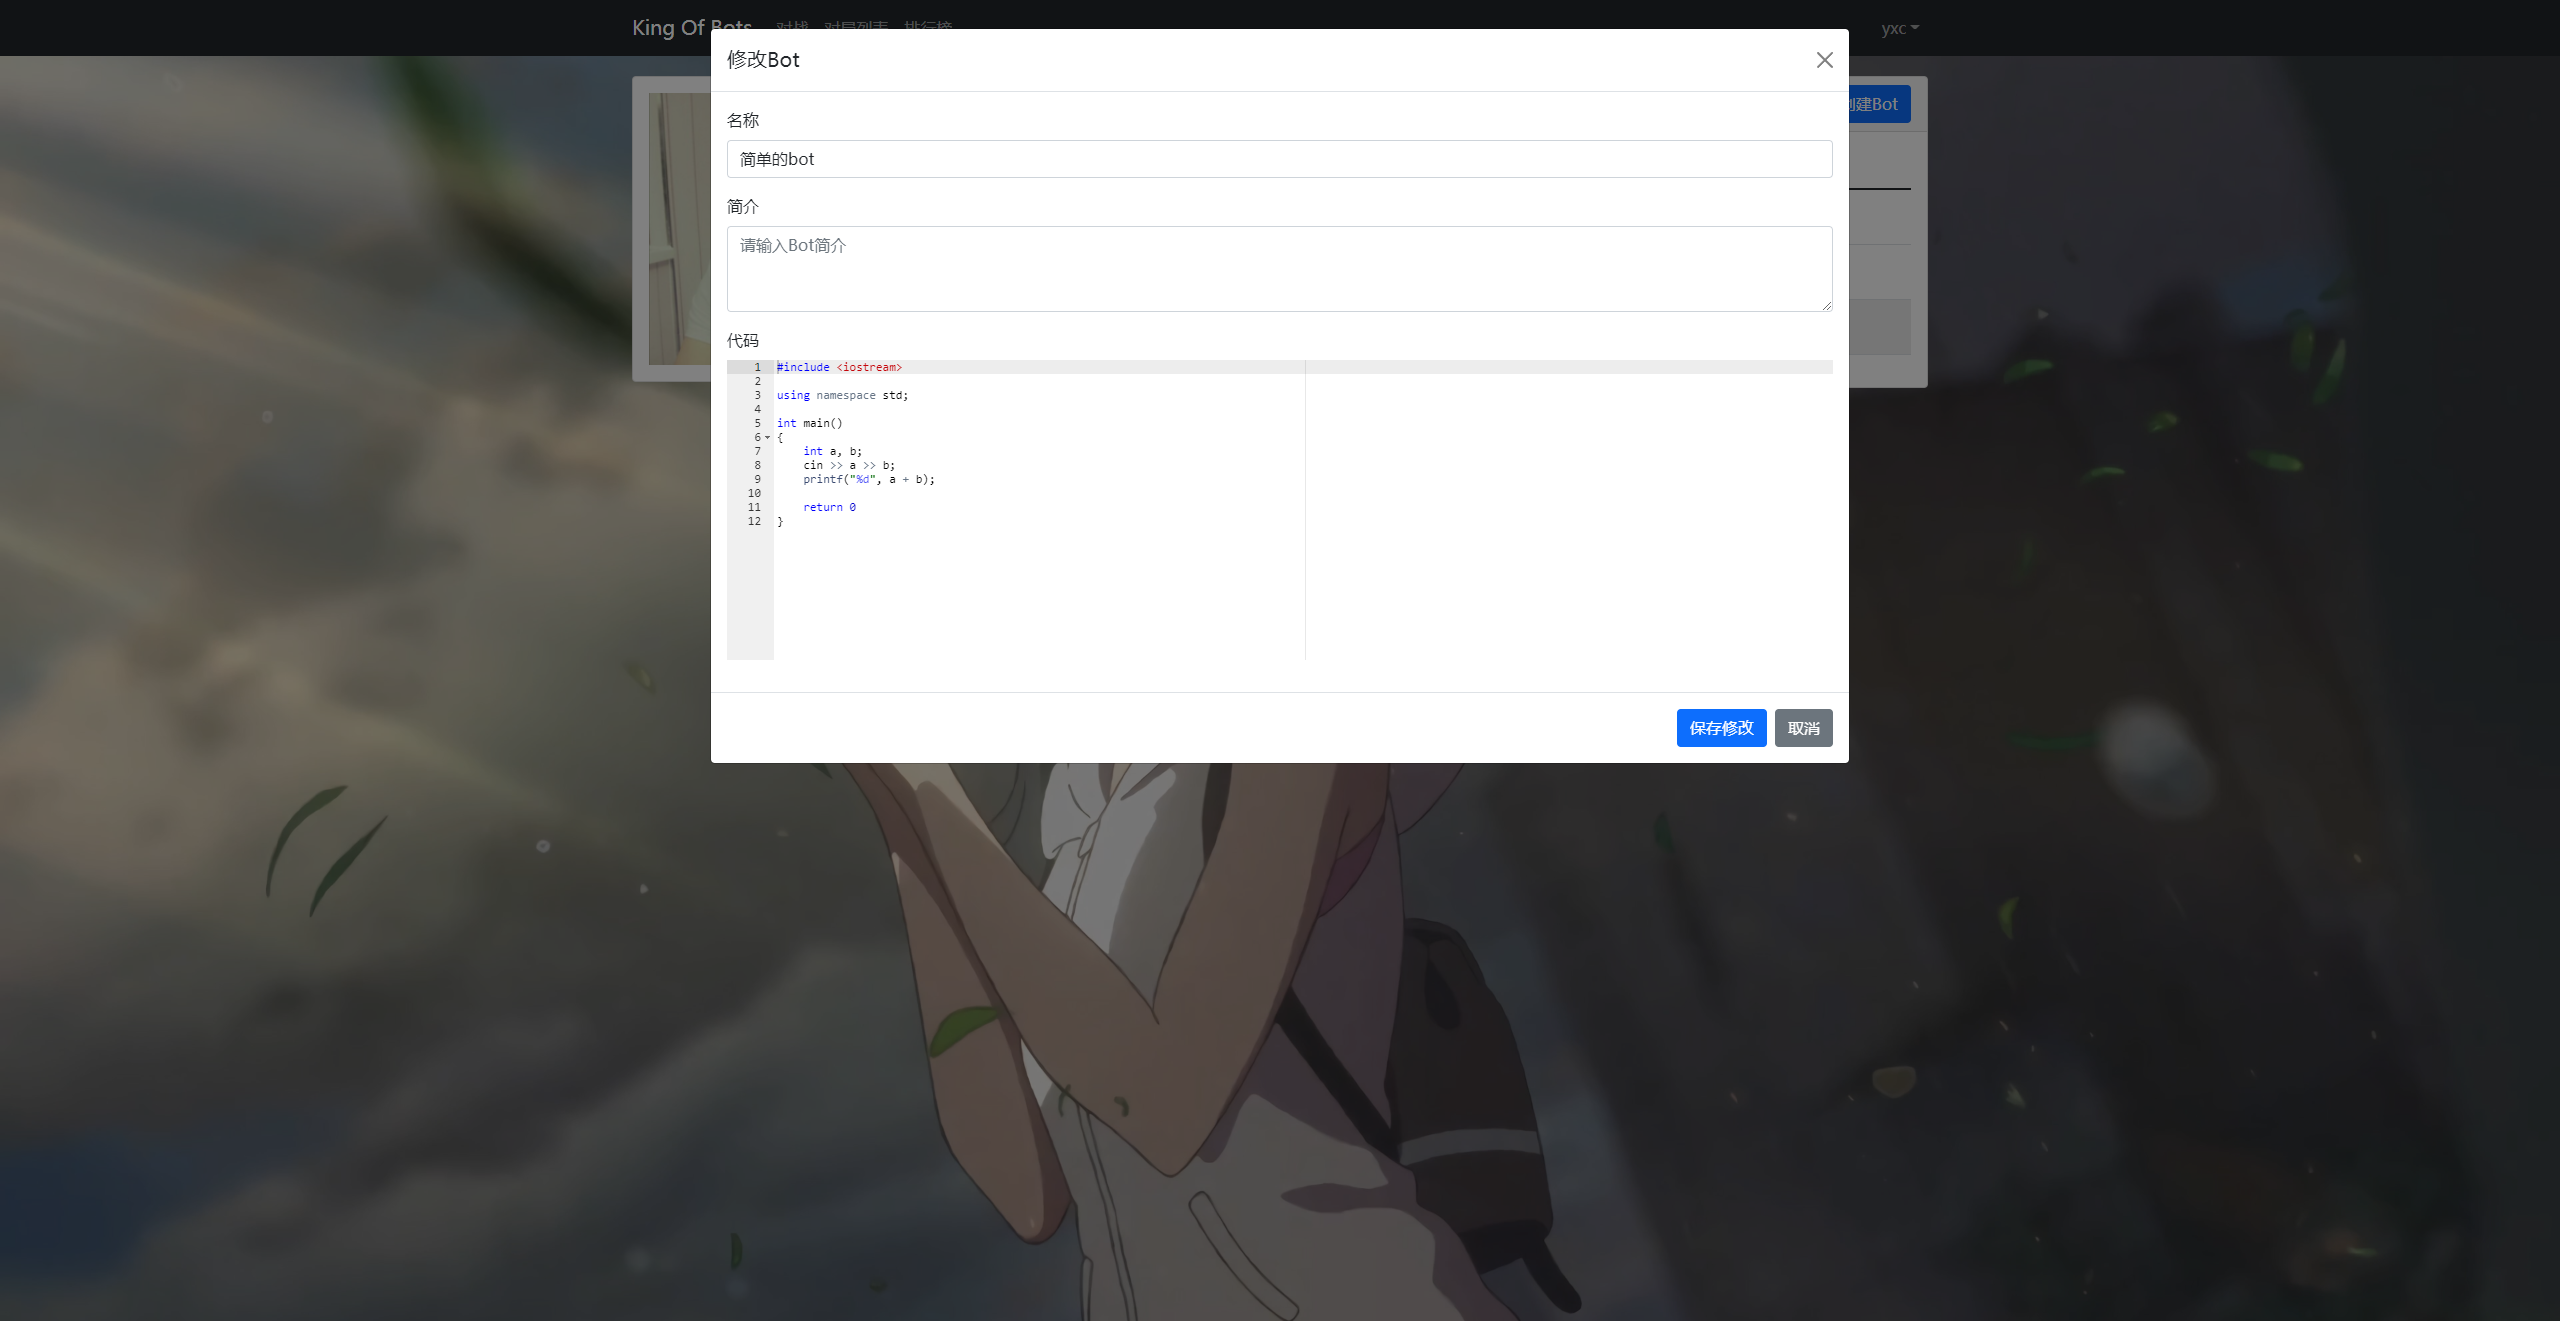
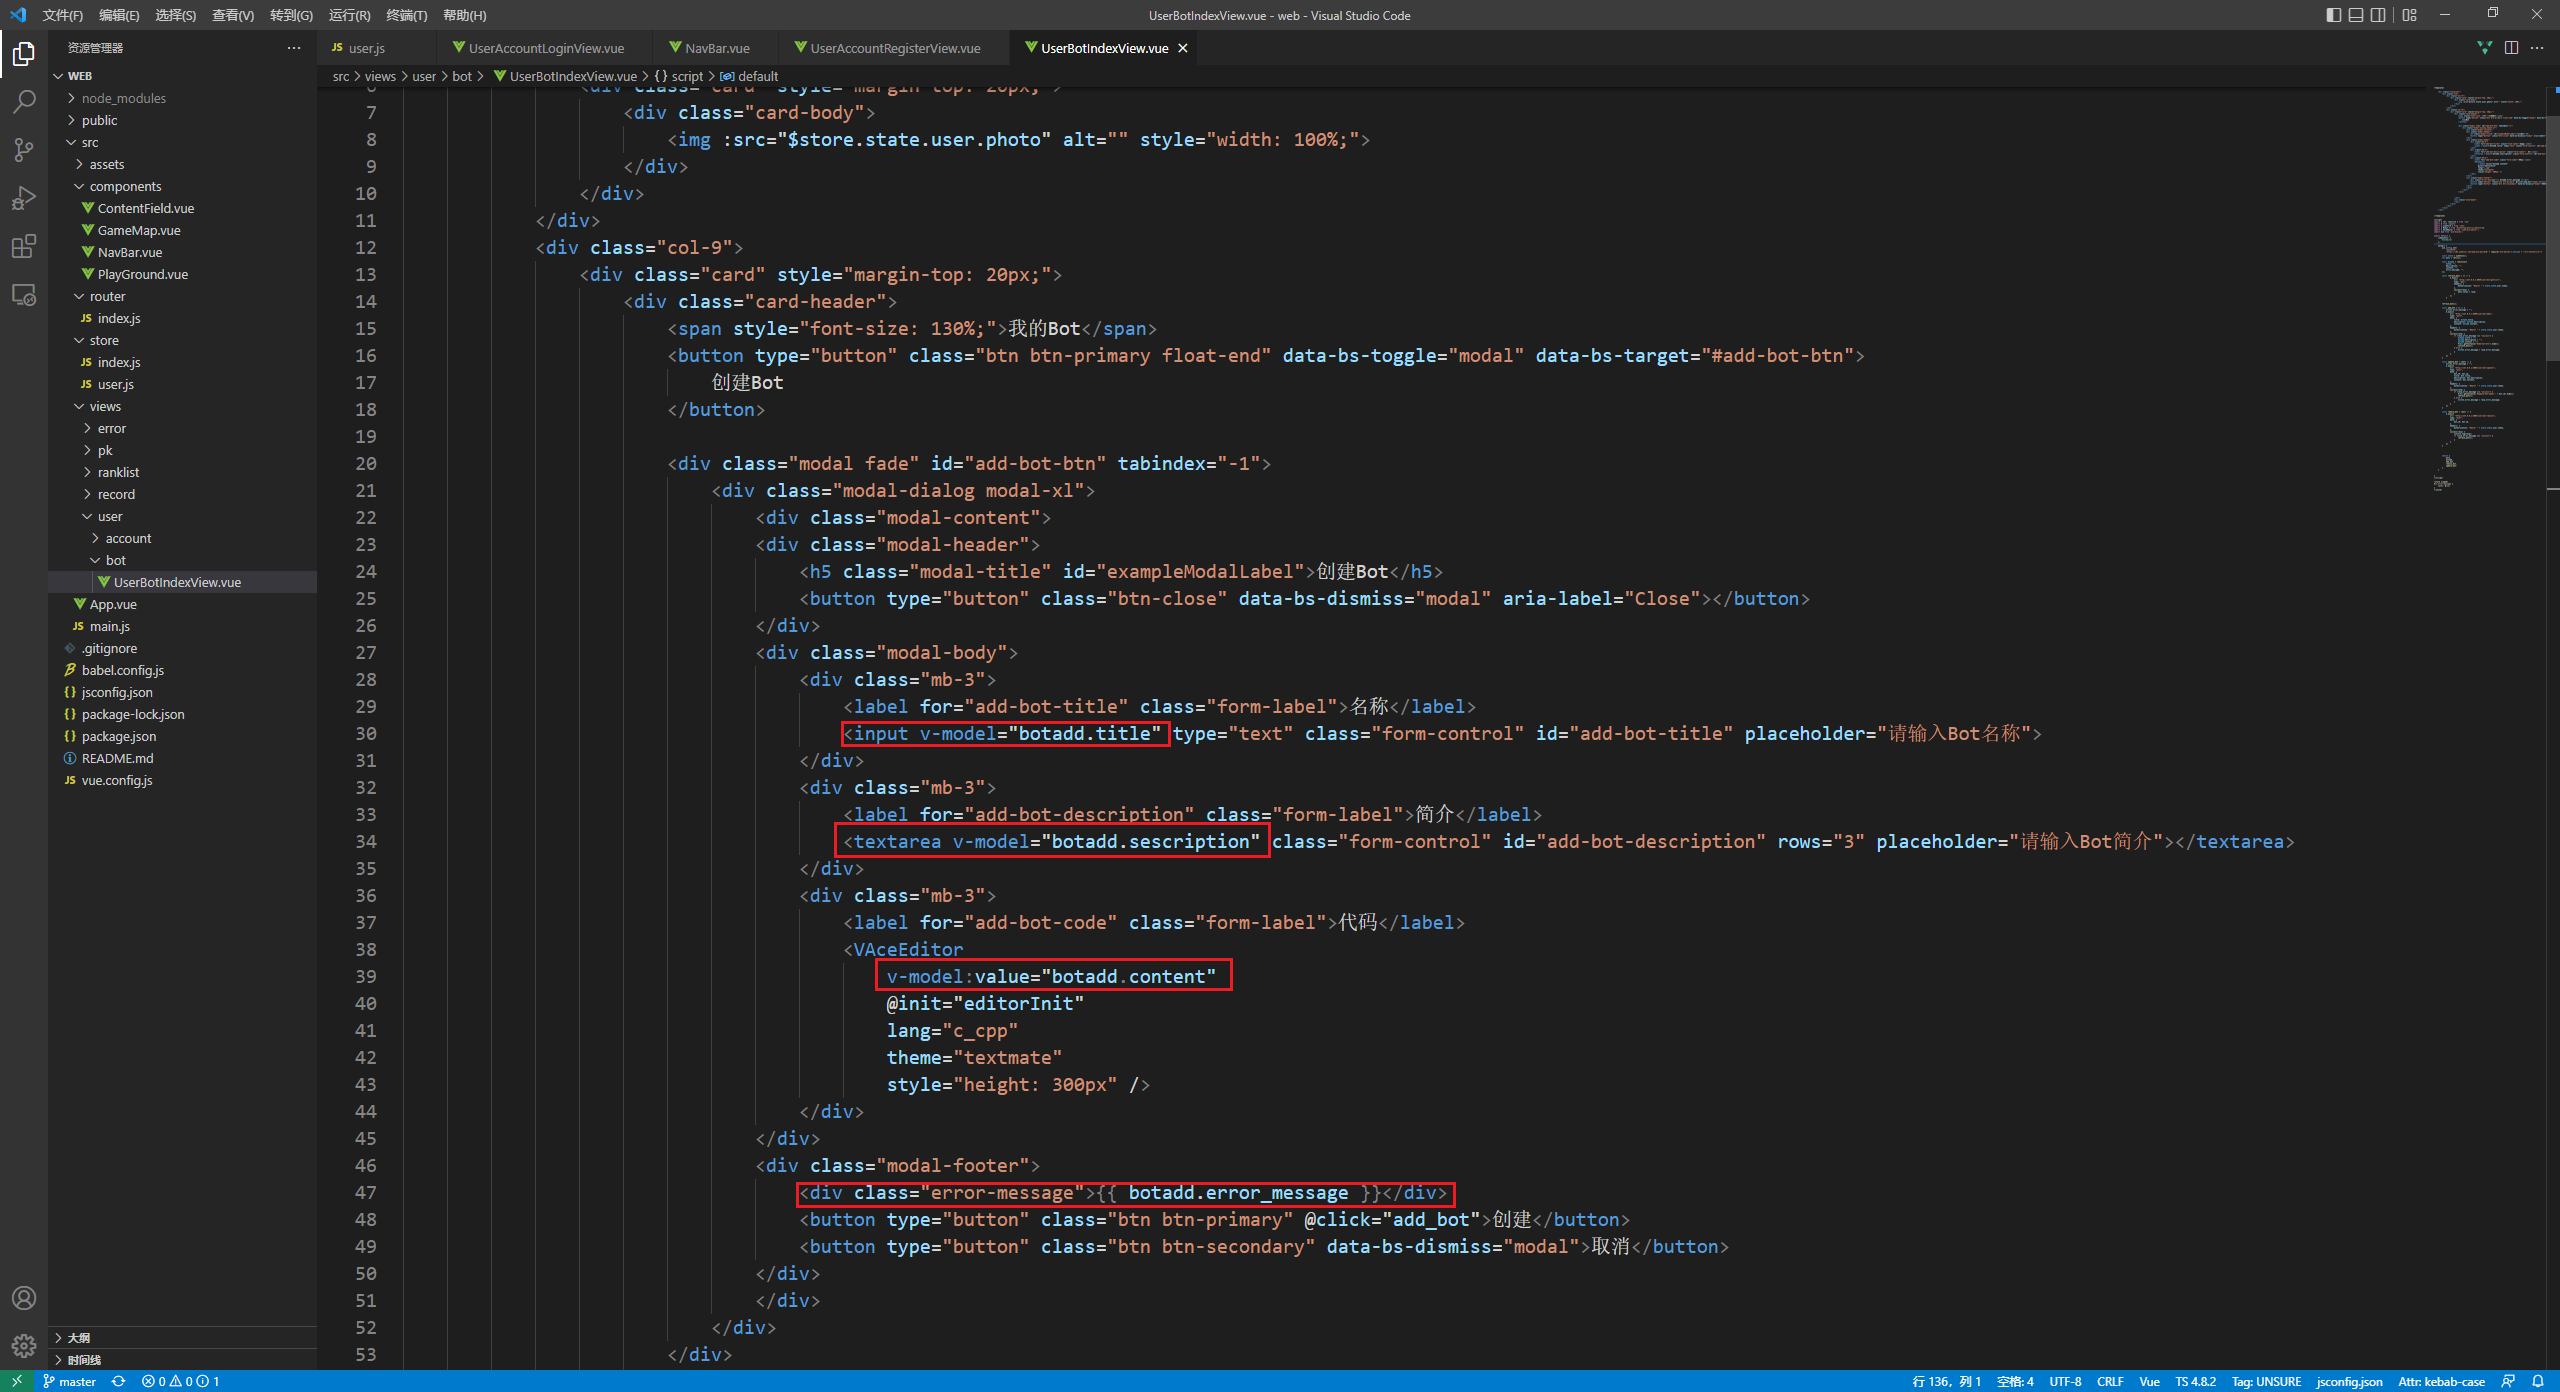
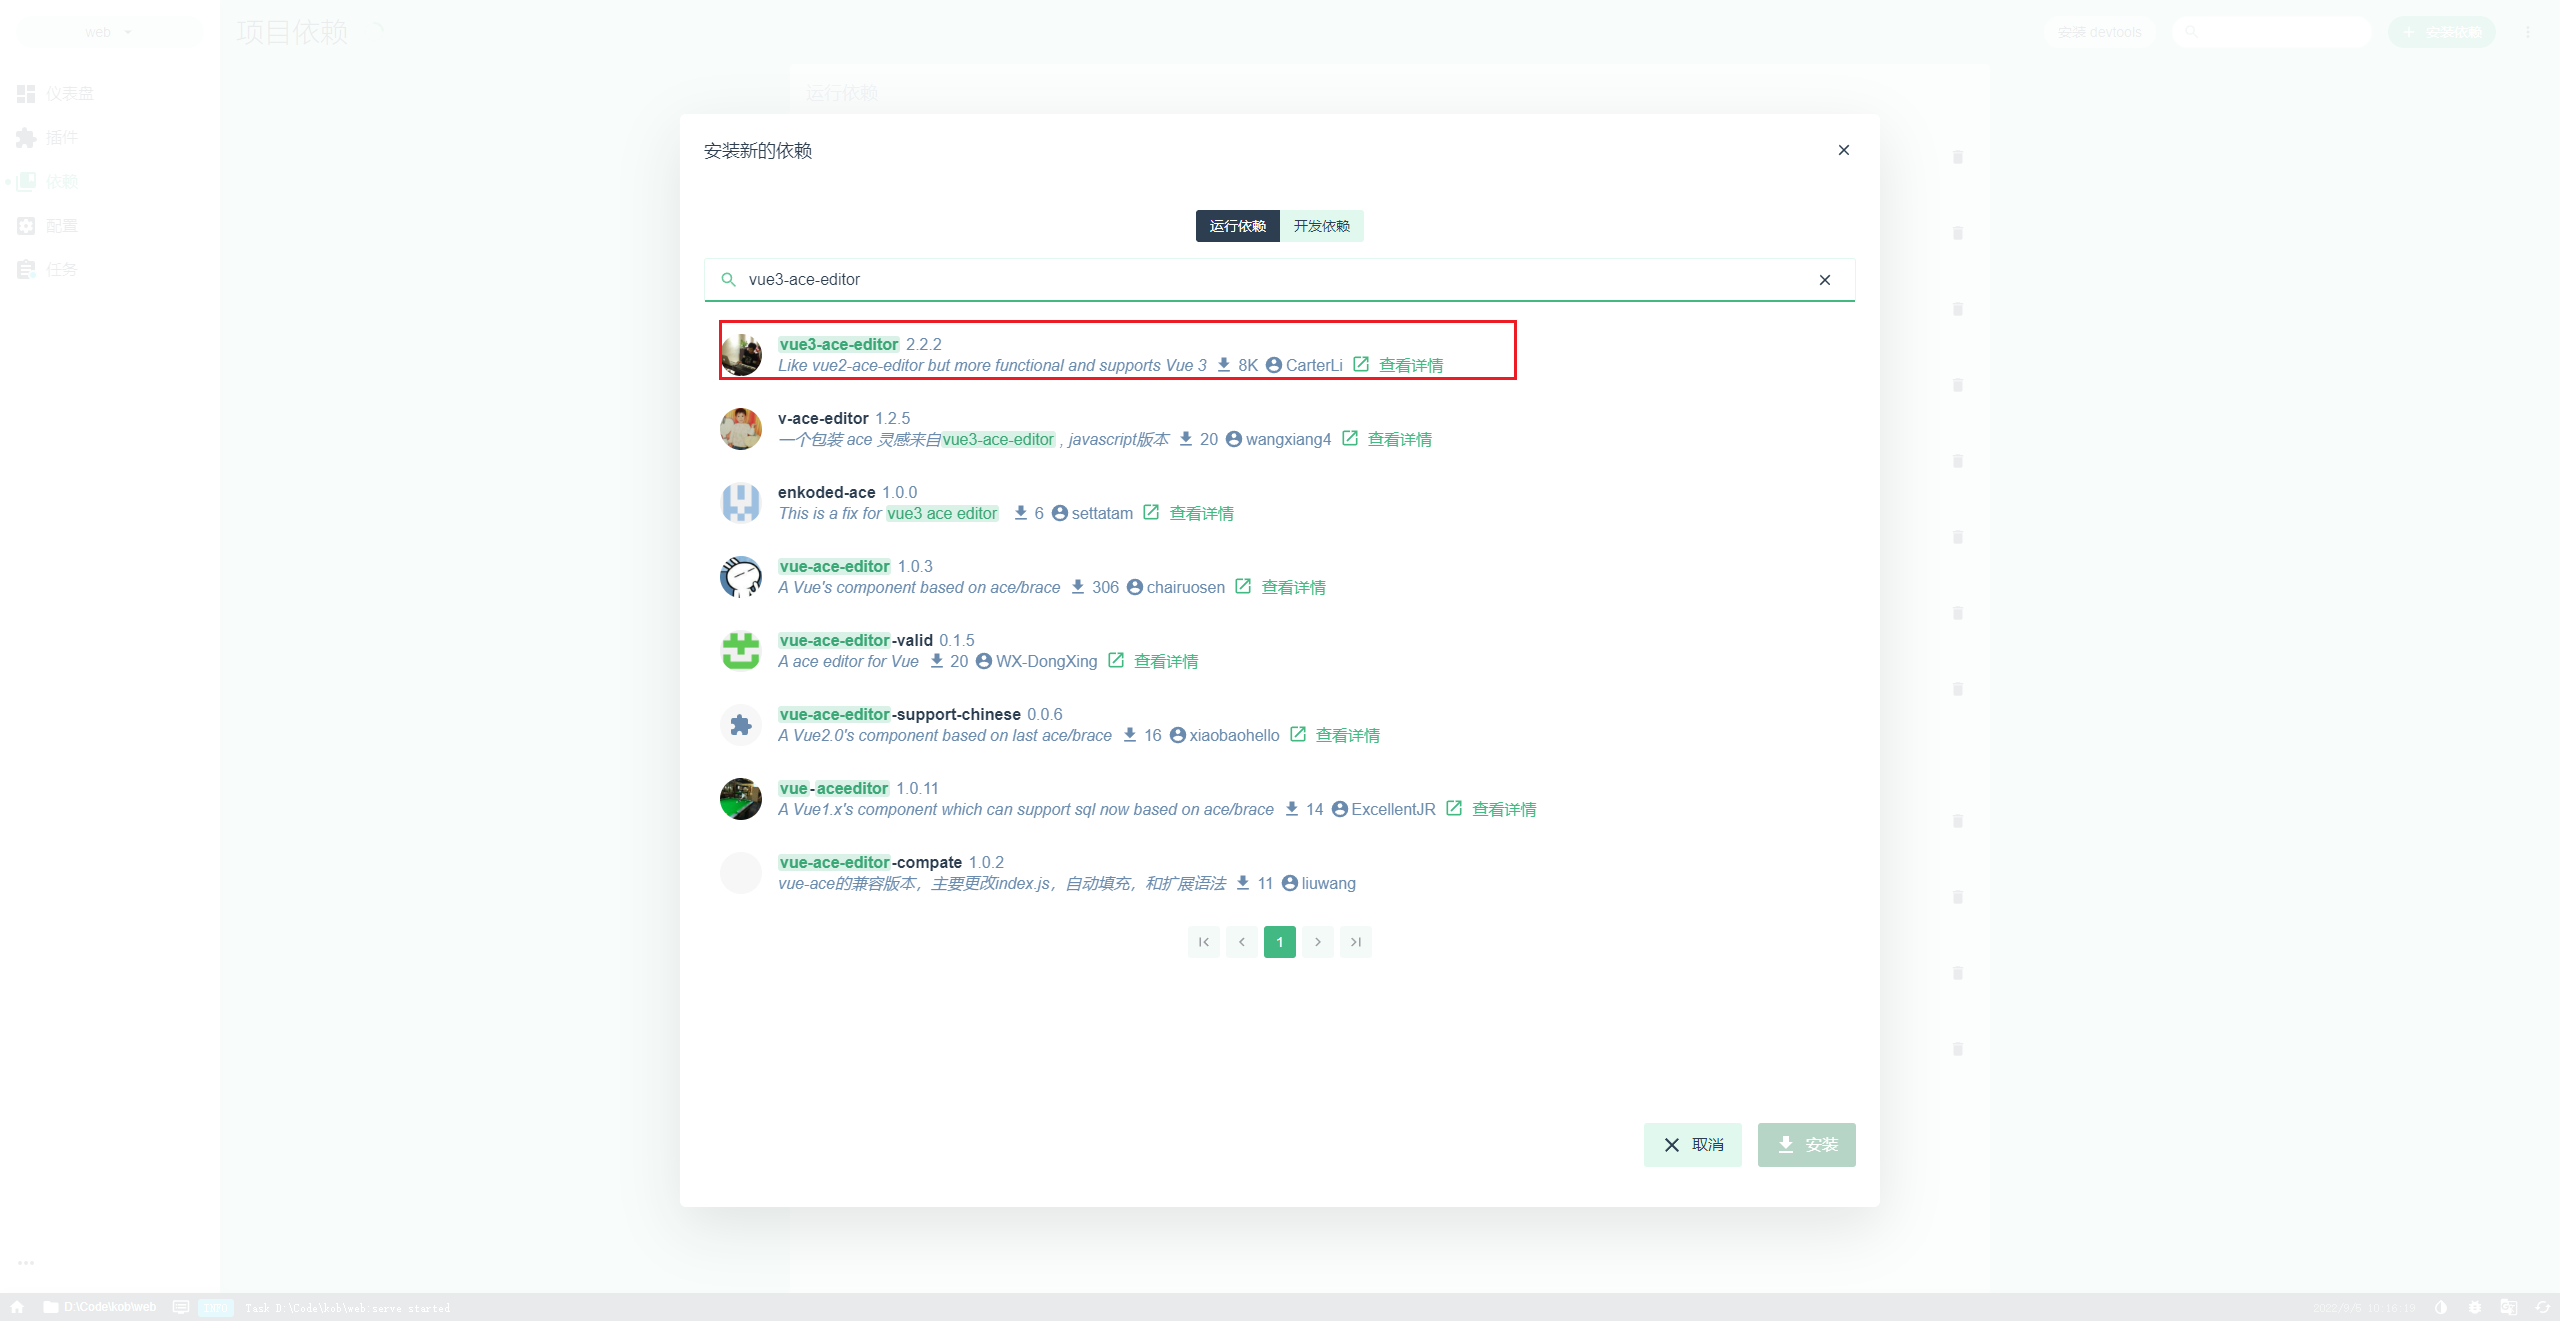
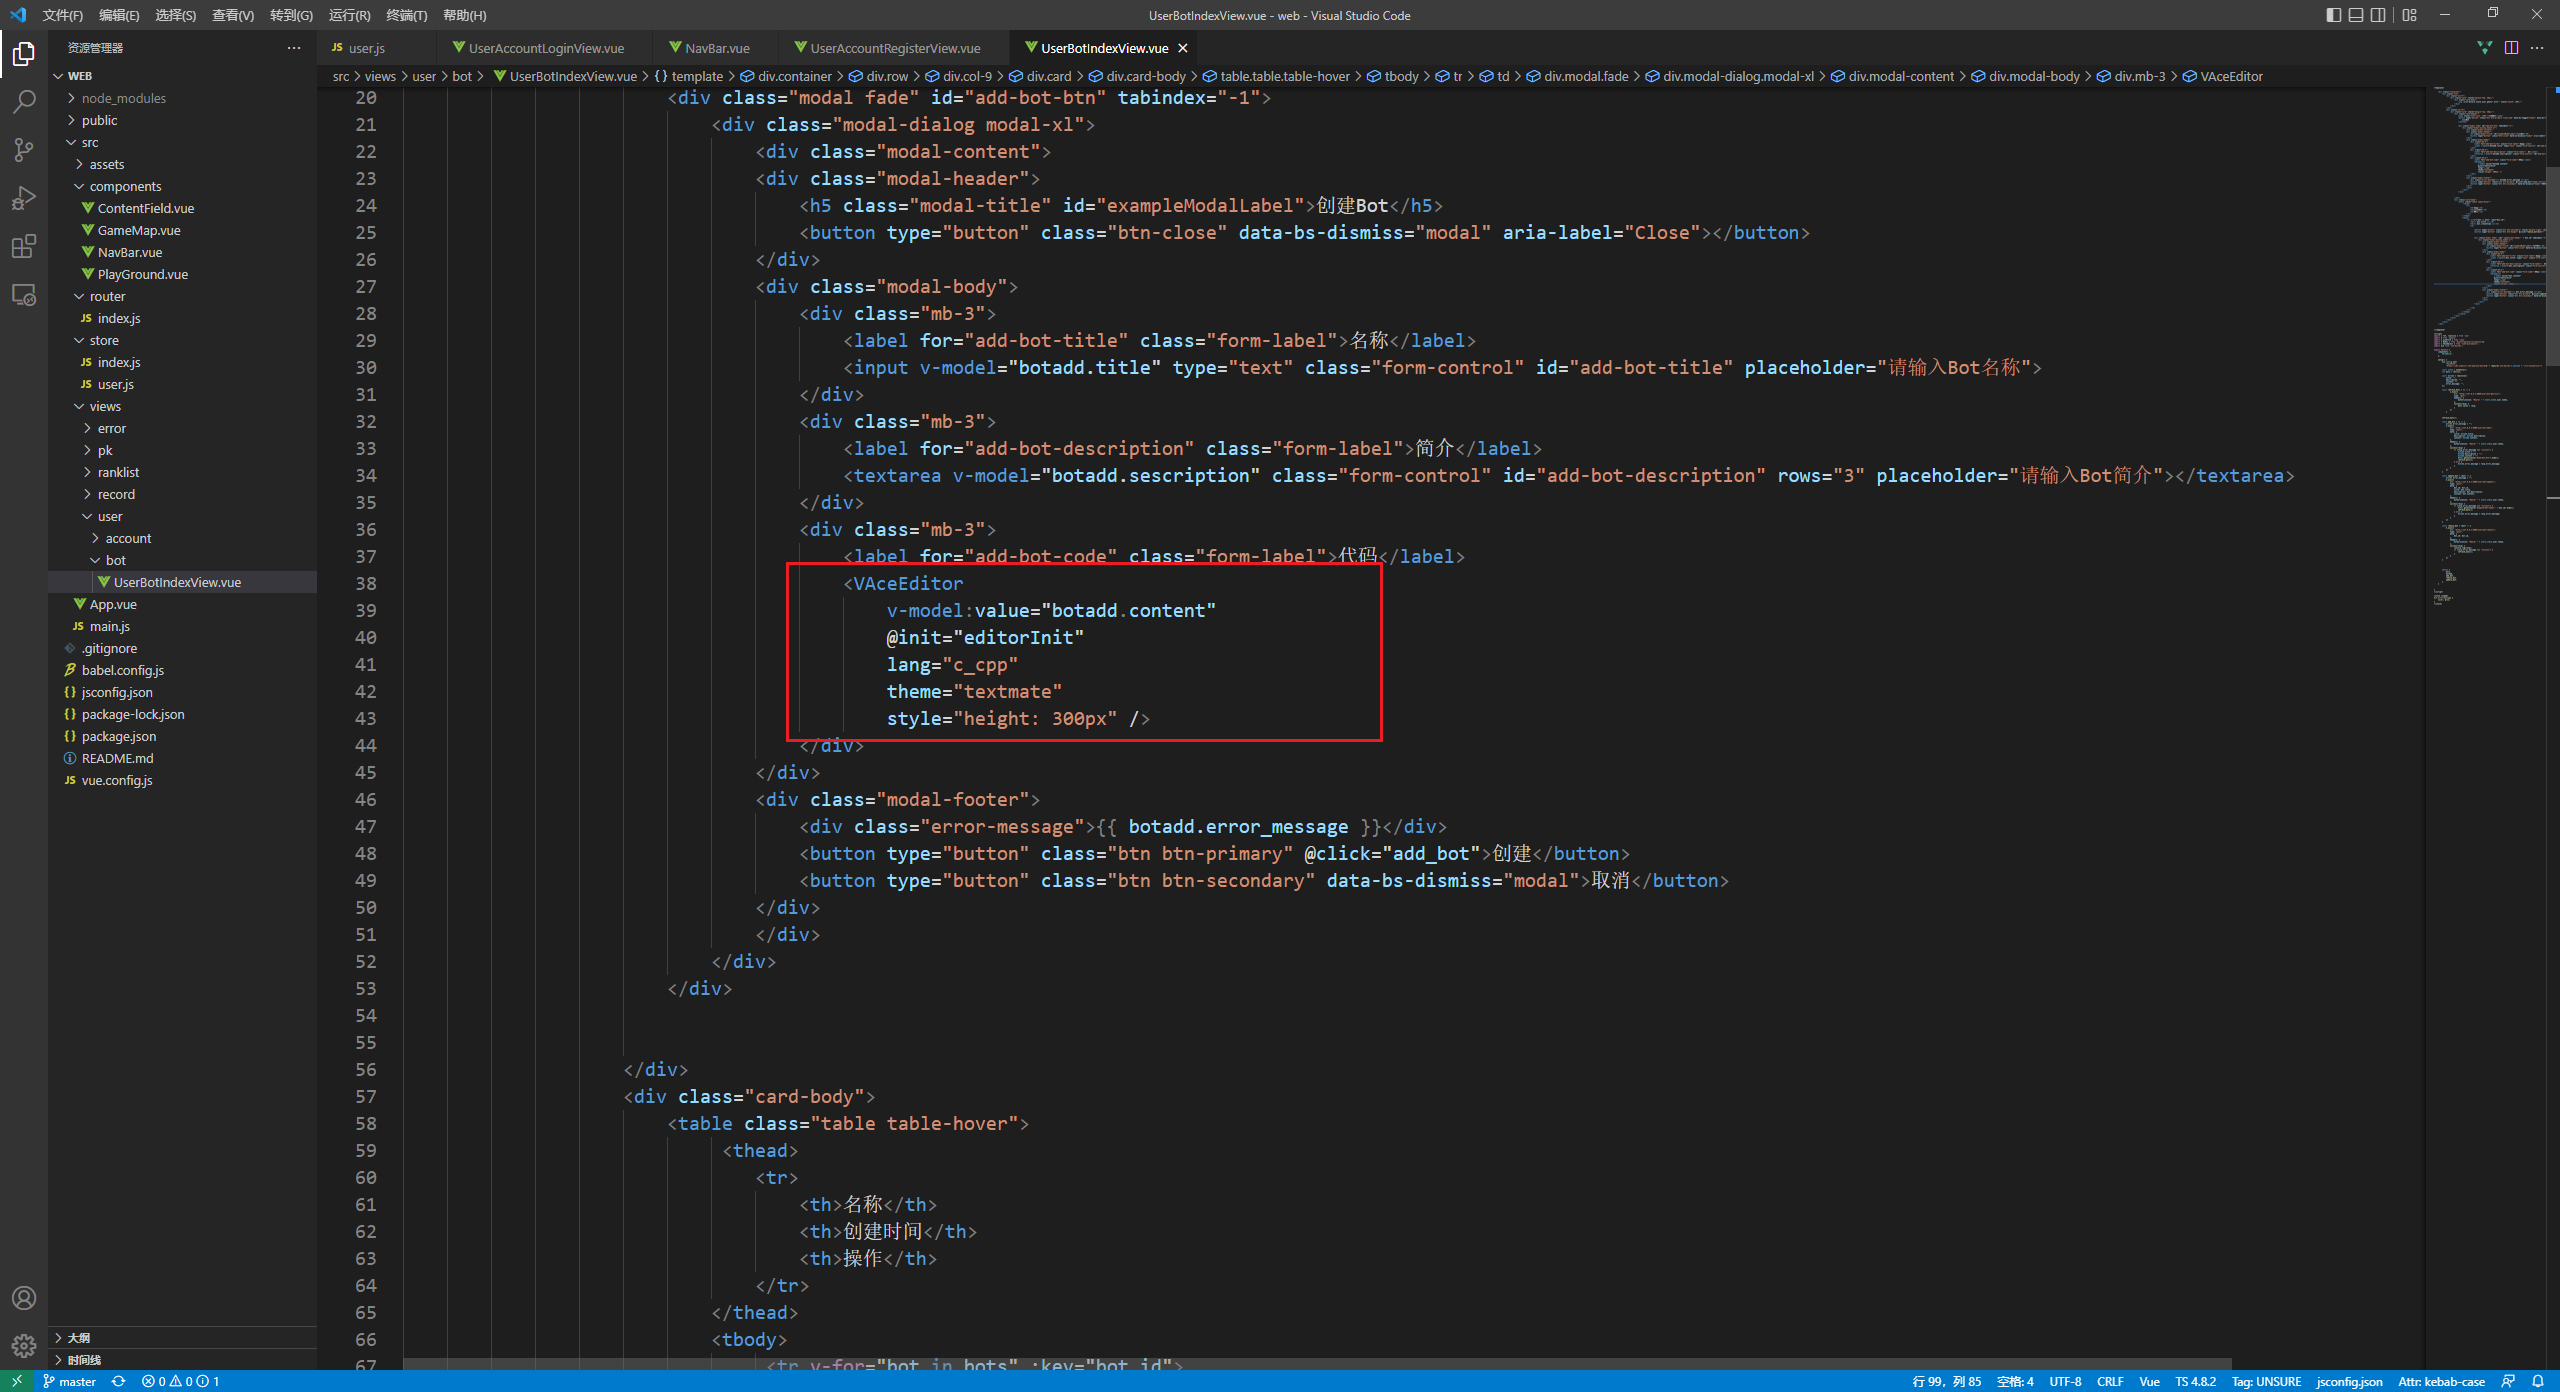
3.4 实现代码框
- 在 vue 界面添加依赖
vue3-ace-editor - 添加组件
import {
     VAceEditor } from 'vue3-ace-editor';
import ace from 'ace-builds';
ace.config.set(
    "basePath",
    "https://cdn.jsdelivr.net/npm/ace-builds@" + require('ace-builds').version + "/src-noconflict/")
<VAceEditor
    v-model:value="botadd.content"
    @init="editorInit"
    lang="c_cpp"
    theme="textmate"
    style="height: 300px" />


代码地址
智能推荐
数据结构与算法学习笔记2:栈和队列_一万个括号-程序员宅基地
文章浏览阅读374次。数据结构与算法学习笔记2栈 stack堆和栈的区别静态变量tips跨文件使用tips:关键字extern指针传递队列 queue队列类型:单端队列:循环队列:**r+1%n**?**循环队列如何判断队列为空or为满?**栈和队列 相关题目括号匹配问题约瑟夫环问题队列和栈的相互转换栈 stack受限线性表先进后出 FILO题外话:堆和栈是内存区域的问题,栈和队列是数据结构的问题,两者没有任何关系。堆和栈的区别申请空间的方式和回收不一样。堆区的空间要向系统申请,malloc和new,_一万个括号
html树状图在线画板,五款在线思维导图工具,总有一款适合你-程序员宅基地
文章浏览阅读1.4k次。原标题:五款在线思维导图工具,总有一款适合你思维导图是表达发散性思维的有效图形思维工具,通过一些主要的关键词,用非线性的方式展现出来。思维导图的真正用处不是让你能直接获得多少多少的好处,它更多的,还是类似于“打通任督二脉”,提供应用于记忆知识点、梳理知识框架、发散性组织写作提纲等多种用途。 以下分享五款思维导图软件,秉着免费,在线的两大原则,适合绝大部分人使用。一.百度脑图百度脑图由百度的程序员开..._树状图工具
机械键盘恢复出厂fn_怎么切换fn恢复f1 - 卡饭网-程序员宅基地
文章浏览阅读4.6k次。键盘如何关闭Fn功能键恢复F1~F12键盘如何关闭Fn功能键恢复F1~F12 [网友建议] 您可以尝试长按Fn键,如果弹出热键设置,您就可以选择传统模式或当前的模式了,您也可以进入电脑的BIOS进行调试:在BIOS设置界面,进入 "Configuration" 菜单,将"Hotkey mode"的设置由Enable更改为Disable,然后按F10保存后退出即可. [百度经验以联想为例]...键盘..._机械键盘怎么恢复出厂设置
numpy.arctan详解_np.arctan-程序员宅基地
文章浏览阅读2.8w次,点赞7次,收藏16次。numpy.arctan用例:numpy.arctan(x, /, out=None, *, where=True, casting=‘same_kind’, order=‘K’, dtype=None, subok=True[, signature, extobj]) = <ufunc ‘arctan’>功能:对数组中的每一个元素求其反正切值。它是正切函数的反函数,所..._np.arctan
【蓝桥杯选拔赛真题30】C++字母转换 第十三届蓝桥杯青少年创意编程大赛C++编程选拔赛真题解析-程序员宅基地
文章浏览阅读306次。C/C++字母转换第十三届蓝桥杯青少年创意编程大赛C++选拔赛真题一、题目要求1、编程实现给定一个大写字母,输出其对应的小写字母2、输入输出输入描述:只有一行,输入一个大写字母输出描述:只有一行,输出大写字母对应的小写字母输入样例:A输出样例:a二、算法分析
ListView适配器BaseAdapter_lv.setadapter(myadapter1);-程序员宅基地
文章浏览阅读299次。activity_main.xml
随便推点
Visual Studio 2008简体中文试用版(90天)变成永久正式版的两种方法-程序员宅基地
文章浏览阅读176次。Visual Studio 2008简体中文试用版(90天)变成永久正式版的两种方法: 一、先安装试用版,然后在“添加或删除程序”里找到VS2008,点“更改/删除”就会看到一个输入序列号的地方,把序列号输进去,点“升级”按钮即可,Team Suite和Professional通用。 二、用UltraISO打开VS的ISO安装文件,把Setup\setup.sdb文件解压缩出来,一定记得..._xmq2y4t3v6xj48yd3k2v6c4wt
Ubuntu Server内核优化提高并发_ubuntu server 系统优化-程序员宅基地
文章浏览阅读3.1k次。设置文件打开句柄数# 查看系统默认的值ulimit -n# 设置最大打开文件数ulimit -n 1000000这样只能在当前 shell 中有效。通过修改配置文件的方式修改程序最大打开句柄数可以永久有效:sudo vim /etc/security/limits.confroot soft nofile 1040000root hard nofile 1040000..._ubuntu server 系统优化
【考研数学】零基础跟「张宇」的几点体会-程序员宅基地
文章浏览阅读302次,点赞3次,收藏8次。(比如我也听了武忠祥老师的课,不得不说某些方法确实让人拍手叫绝,但是一看题呢,该不会的还是不会。这些阶段如果保质保量的完成,在考试里大致对应的分数是 0,80,120,130。但很多人不知道展开到几项,哪些是可以扔掉的,把很简单的题算得很复杂,有的还背了很多不必要的技巧,纯属浪费时间。入门,基础,强化,是递进关系,不能越级!综测会一直持续到备考结束,也就是说将近一年的时间里,它都会通过滚动复习,让你持续保持火热的手感~真的是保姆级了!根据你自己的薄弱低点,针对性地练,哪里不会练哪里,才能吃透,而且省时间。
【翻译+理解】Channel Access Protocal——EPICS Base-3.16版CA协议 - 基本概念_epics ca协议-程序员宅基地
文章浏览阅读2k次。参考文献:1. 官方CA协议说明 https://epics.anl.gov/base/R3-16/1-docs/CAproto/index.html#_concepts(本翻译的原文)2. EPICS培训PPT EPICS_Introduction_PSI2011.ppt https://download.csdn.net/download/u013894429/10823381(找不到..._epics ca协议
基于java和微信小程序的 点餐外卖小程序-后台Java 毕业设计毕设源码最终作品_java外卖小程序源码-程序员宅基地
文章浏览阅读2.2k次,点赞3次,收藏13次。微信小程序在线点餐外卖系统主要包含功能:微信登录、普通用户注册和登录、用户信息修改、用户密码修改;用户首页、菜品分类、产品浏览、增加数量、减少数量、订餐、收藏、地址管理、评论、广告设置等;提供项目源代码(小程序+接口+后台)。开发工具:IDEA2020开发环境:JDK1.8 +Tomcat8数据库:Mysql8小程序后台..._java外卖小程序源码
jqGrid用法及增删改查方法_jqgrid 列表增删改查-程序员宅基地
文章浏览阅读3.5k次。jquery grid是富客户端的,基于XML , Ajax网格插件的jQuery库。 jqGridView提供专业的解决方案,代表和编辑表格数据在网络上。精心设计的,具有强大的脚本API的,这可编辑网格是很简单的DHTML与XML 的配置,并显示出令人信服的成果与大量数据。现在我现在熟悉一下jquery grid的的使用方法和一些常用的option设置。1.调用gridjqGrid已经可_jqgrid 列表增删改查